Microsoft SharePoint List Data Destination
A Microsoft SharePoint List Data Destination![]() A Data Destination specifies where to send data from a submitted form. You can use Data Destinations to automate data sharing and storage, routing data to a specific service (such as email or cloud storage) in several different formats. creates or updates items in a SharePoint list based on the data from a submitted form. You can use this destination to send data from Regular sections or from a Repeatable Section. This topic describes what a SharePoint List Data Destination is, how it works, and the steps to configure it.
A Data Destination specifies where to send data from a submitted form. You can use Data Destinations to automate data sharing and storage, routing data to a specific service (such as email or cloud storage) in several different formats. creates or updates items in a SharePoint list based on the data from a submitted form. You can use this destination to send data from Regular sections or from a Repeatable Section. This topic describes what a SharePoint List Data Destination is, how it works, and the steps to configure it.
Available on all tiers:
Contents
What is a Microsoft SharePoint List Data Destination?
A Microsoft SharePoint List Data Destination is an out-of-the box integration point between TrueContext and SharePoint.
Use this destination to:
-
Map selected data from TrueContext to specific columns in a SharePoint list.
-
Dynamically sort submitted data into different lists in SharePoint.
-
Automatically create new SharePoint lists based on submitted form data.
-
Choose whether the destination should create new items (rows) in a list or update existing items.
Configuration options for a SharePoint List Data Destination
The following sections describe the different configuration options and how your choices affect the items in your SharePoint list.
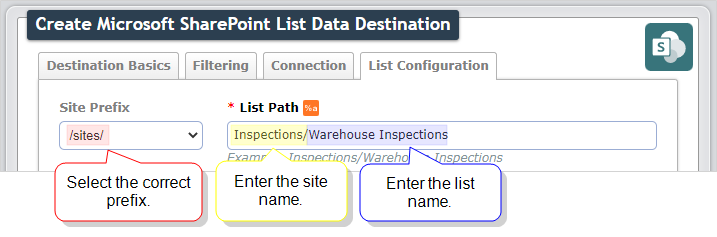
Site Prefix and List Path
SharePoint List Site Prefix and List Path
When you set up your destination, you select a Site Prefix and enter a List Path. These depend on the location of your existing SharePoint list or, for a new list, where you want to add the list.
-
The Site Prefix tells us where the SharePoint list is, relative to the main (root) site.
-
The List Path tells us both the name and the location of your list, relative to the site prefix.
To find the Site Prefix and List Path:
-
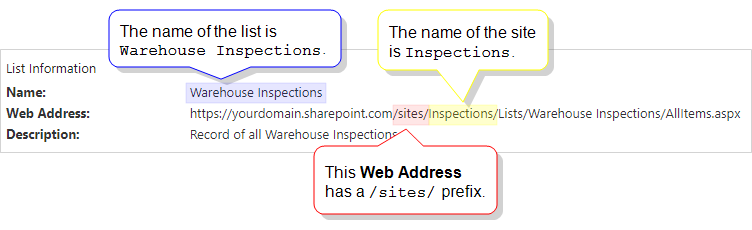
Navigate to your SharePoint list. Select the settings icon, and then select List settings.
Result: SharePoint displays the list Web Address.
-
Does your Web Address include
/sites/or/teams/?-
If yes, use the one that’s shown as your Site Prefix in TrueContext.
-
If no, use
/as your Site Prefix.
In this example, the Web Address includes a
/sites/prefix.
-
-
Find your site name, which follows the site prefix. In this example, the site name is
Inspections.Tip:- If your list is not in a site, you only need the name of the list.
- If your list is in a subsite, take note of the whole path, including all of the subsites.
-
Find your list name. The list name follows
/Lists/in your Web Address. In this example, the list name isWarehouse Inspections.Note:- Do not include
/Lists/when you enter the List Path. - If you change your list name, you must update your List Path.
- Do not include
- : < > ? / \ |
- leading or trailing spaces
- sometimes # or %, depending on organization settings
Create or update lists
When you configure your List Path, you can decide if you want to create or update a SharePoint list.
To support existing integrations, some items will continue to use “prontoforms” or “pf” in the domain or code.
| Option | What to enter in the List Path | Result |
|---|---|---|
| Update an existing list | The name of your SharePoint list |
|
| Create a new list |
A new name that’s not already one of your SharePoint list names. Tip:You can use DREL |
|
Data from different form submissions routed to different lists
You can use DREL expressions to specify which list you want to send form data to. For example, if you have a different SharePoint list for each customer, you could configure your File Path as follows:
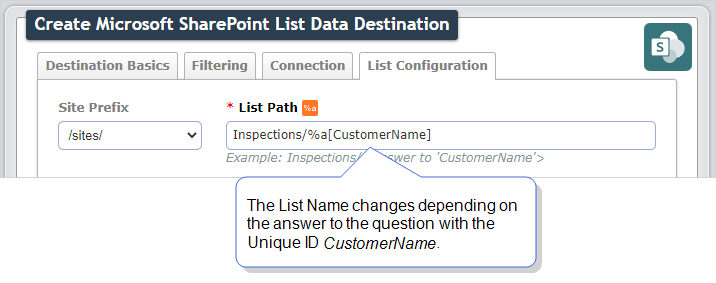
When a user submits a form, the destination sends the data to the list with the same name as the customer. If a user enters a new customer name, the destination creates a new SharePoint list.
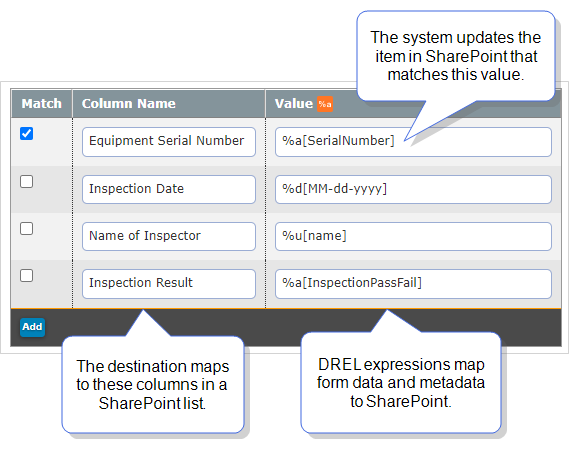
Column mapping
In TrueContext, you map submitted form data and metadata to your SharePoint list columns, as shown in the following example. Use a DREL expression to get the data from the submitted form.
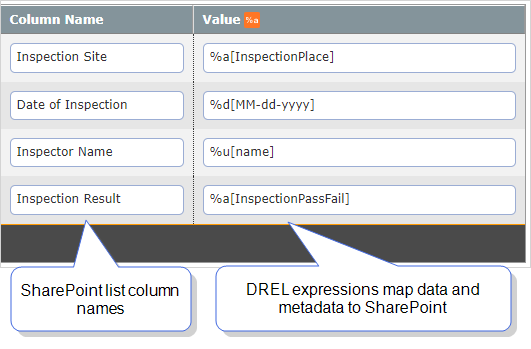
- Column names in SharePoint lists are case sensitive.
- You can only enter each column name once. If you need to map more than one answer to a column, enter multiple DREL expressions in the Value field.
- For Repeatable Destinations, use the
%aDREL expression to map answers from a Repeatable Section A Repeatable Section is a subform that contains a set of related questions. The data captured is “repeating”, because the field user can complete the same subform more than once, which creates multiple entries. instead of
 %e. - If you map form metadata and data from regular sections to a Repeatable Destination A Repeatable Destination is a TrueContext Data Destination that sends data from a Repeatable Section to a field-based, third-party system., the destination repeats the data on each item it creates.
- You can’t map data to the ProntoForms ID and ProntoForms Row ID columns that the system automatically creates.
Create or update items
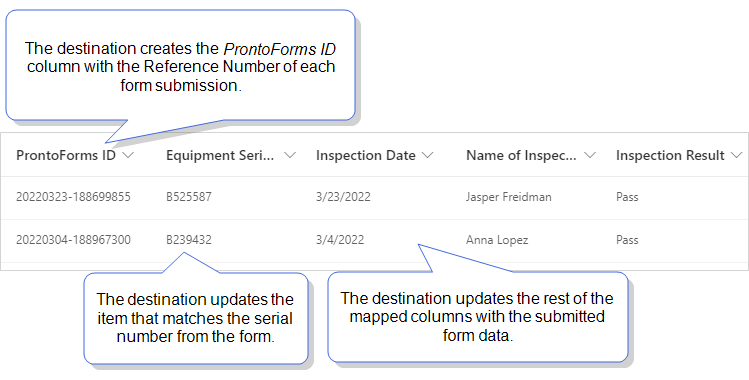
For existing lists, you can configure a Microsoft SharePoint List Data Destination to either create or update items. To update an existing item, use the Match column to set up your matching criteria. If no match is found, the system creates a new item.
Note:Due to a limitation of the Microsoft API, Data Destinations![]() A Data Destination specifies where to send data from a submitted form. You can use Data Destinations to automate data sharing and storage, routing data to a specific service (such as email or cloud storage) in several different formats. can’t match on the SharePoint “ID” column. If you try to match on the “ID” column, the system creates a new item instead. If you need to match on an ID-type column, create a custom column in SharePoint.
A Data Destination specifies where to send data from a submitted form. You can use Data Destinations to automate data sharing and storage, routing data to a specific service (such as email or cloud storage) in several different formats. can’t match on the SharePoint “ID” column. If you try to match on the “ID” column, the system creates a new item instead. If you need to match on an ID-type column, create a custom column in SharePoint.
In this example, the destination updates the item in SharePoint that matches the serial number.
On the List Configuration tab, in the Column Mapping section, you select if you want to create or update items.
| Option | Behavior |
|---|---|
| Always create a new item |
The system creates new items each time the destination executes. Note:This doesn’t apply to different submissions within a single Form Submission life cycle. For example, incomplete TrueContext Teamwork |
| Update an existing item |
The system displays the Match column as part of the column mapping table. When the destination executes, it updates the item that matches the selected column values. Note:
|
Data from Repeatable Sections
You can create multiple items in a SharePoint list with data from a Repeatable Section. When you configure your destination, you can select an option to use it as a Repeatable Destination.
For example, when a user submits a form with a list of parts:
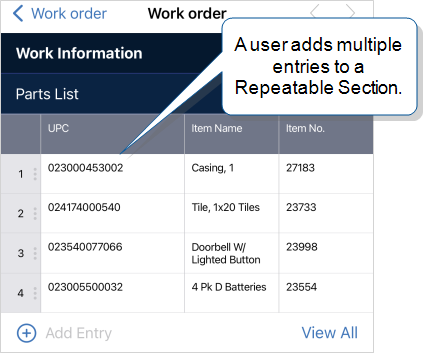
The destination sends the data from each row in the repeatable section to the SharePoint list:
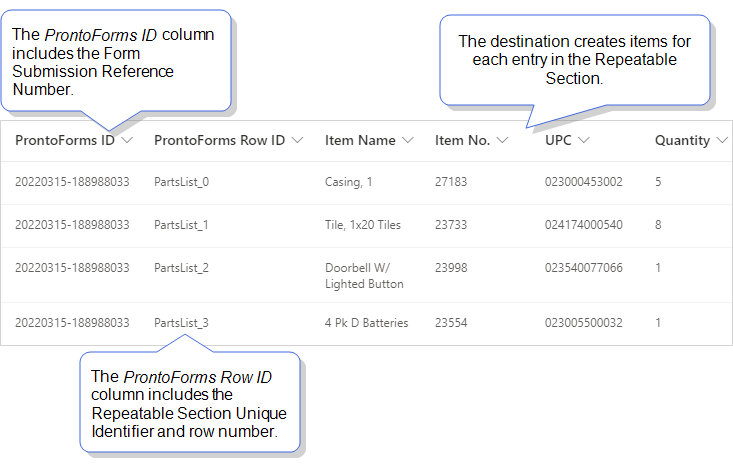
Note:All SharePoint destinations automatically create the ProntoForms ID column. Repeatable Destinations also create the ProntoForms Row ID column.
Supported SharePoint List column types
Use the following table to check the SharePoint List column types that TrueContext Data Sources![]() Data sources, also known as "Lookups", are external sources of data that you upload or connect to TrueContext. You can reference this data in a form to populate answers or answer options. Data sources save typing, reduce errors, and make it easy to provide mobile users with only the relevant, most current data. and Data Destinations support.
Data sources, also known as "Lookups", are external sources of data that you upload or connect to TrueContext. You can reference this data in a form to populate answers or answer options. Data sources save typing, reduce errors, and make it easy to provide mobile users with only the relevant, most current data. and Data Destinations support.
| SharePoint column type | Data Sources | Data Destinations |
|---|---|---|
| Single line of text | ✔ | ✔ |
| Multiple lines of text |
✔ |
✔ |
|
Choice Note:TrueContext doesn’t support columns that allow multiple selections. |
✔ | ✔ |
| Number |
✔ |
✔ |
| Currency | ✔ |
✔ |
| Date and time | ✔ | ✔ |
| Yes/No | ✔ |
✔ Note:If the value in TrueContext is "yes" or "true", then the value in SharePoint will be "yes". Any other values will result in "no" in SharePoint. |
| Person or Group | ||
| Hyperlink | ||
| Calculated | ✔ | Only supported as a column to match on. You can’t send or edit data in Calculated columns. |
| Image | ||
| Location |
✔ |
Prerequisites to configure a SharePoint List Data Destination
-
You must be either
-
a TrueContext Admin user, or
-
a member of a FormSpace
FormSpaces are where forms are stored and organized in the TrueContext Web Portal. A TrueContext Team may have multiple FormSpaces, depending on their needs. Admins can set FormSpace permissions to control which users have access to the forms in that FormSpace. group with Can Create permissions.
-
-
Your team must have a Microsoft 365 connection configured.
Note:We recommend that you create a dedicated Integration User account for your Microsoft system and use that account to set up TrueContext Connections
A Connection is an integration point that's used to link a TrueContext Data Source or Data Destination to an external service to import or export data. Data Destinations and Data Sources that share the same external service can also share the same Connection.. -
The account you use for the connection must be in a group in SharePoint with Edit, Design or Full Control permissions.
-
If you want to use this as a Repeatable Destination, you must have a form with a Repeatable Section configured. Note the Repeatable Section Unique Identifier.
Steps to configure a SharePoint List Data Destination
-
Go to Forms & Integrations > Data Destinations > CREATE DATA DESTINATION > Microsoft SharePoint List.
Result: The system opens a new Microsoft SharePoint List Data Destination in edit mode.
-
Enter a Name and a Destination Unique Identifier.
-
Do you want to send data to a SharePoint list from a Repeatable Section?
-
If yes, select Use as a Repeatable Destination for a Repeatable Section, and then enter the Repeatable Section Unique Identifier.
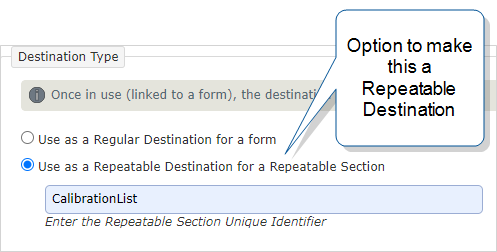
Tip:Ensure that you enter the correct ID. Remember, if you change a section unique ID, the linked destination does not automatically update.
-
If no, select Use as a Regular Destination for a form.
Note:Once you link the destination to a form, you can’t change the destination type.
-
-
On the Filtering tab, configure the conditions that each submitted form must meet for the Data Destination to execute.
Info:Refer to the following topics for details about Data Destination filtering depending on your Data Destination type:Regular Destination—Apply Filtering to Data Destinations
Repeatable Destination—Create Filter Rules for Individual Rows in a Repeatable Destination
-
On the Connection tab, select an existing Microsoft 365 Connection or create a new one.
-
On the List Configuration tab:
-
Enter the location and name of the SharePoint list you want to create or update.
Tip:Vanity URLs are a Microsoft SharePoint legacy feature.
If your company hosts SharePoint
sharepoint.com, select Site has a Vanity URL. Enter your custom domain name in the format my.company.com.-
To create a new list, enter a new list name or DREL expression.
-
To update an existing list, enter the name of an existing list.
Info:The section Site Prefix and List Path describes how to enter the list location and name in more detail.
-
-
In the Column Mapping section:
-
Select the option to create or update items in your SharePoint list.
-
Map form data to specific columns in your list.
-
-
-
Create your Data Destination.
Tip:Remember that you need to link the Data Destination to each form that you want to trigger this destination.