Form Building Basics
Building a custom form is easy and intuitive with the Form Builder. This article describes how to create a form.
Contents
Video demo
This video provides a brief demo of how to create a form in the Form Builder.
Pages
What are Pages?
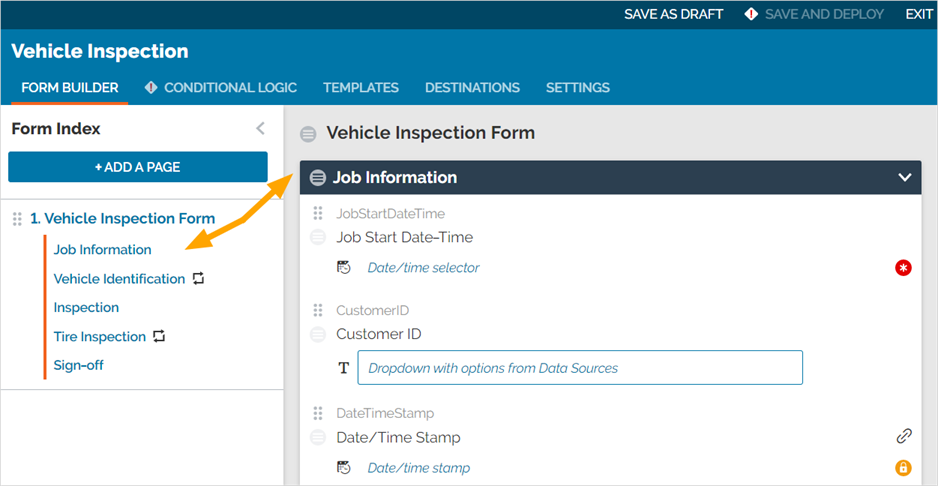
Pages are the main way to structure a form—they are equivalent to a “screen” in the Mobile App. They form the main navigation of a form, dividing a form into a sequence of clear steps.
Pages in the Form Builder
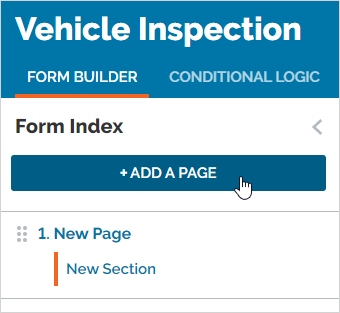
- Pages in a form are listed in the left navigation panel of the Form Builder.
- The contents of the currently selected page are listed on the right.
Sections
What are Sections?
Sections are containers for questions within a page. They are shown in the right panel of the Form Builder. There are different types of sections and layouts to choose from.
Sections and Layouts
The following table describes each section type and layout.
| Section type | Layout | Example | Works best for… |
|---|---|---|---|
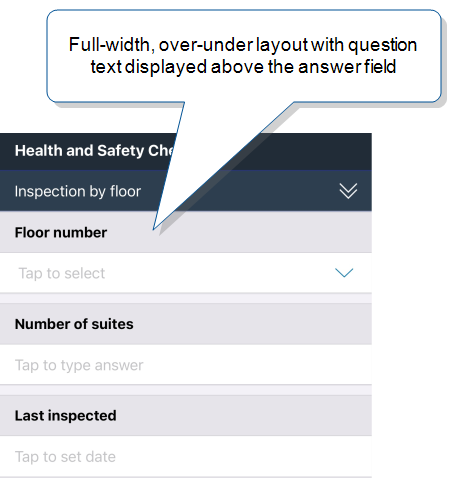
| Regular | Full-width, over-under (“stacked”) | 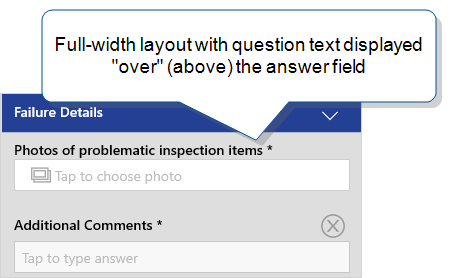
|
|
|
Regular with Multicolumn Layout (Enterprise tier only) |
Flexible, questions flow from one column to the next | 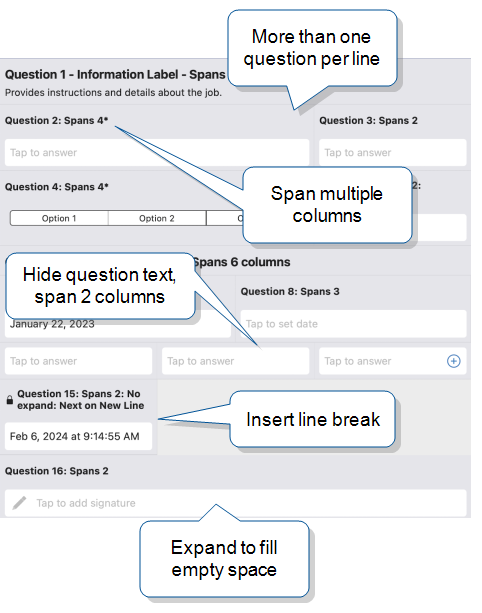
|
|
|
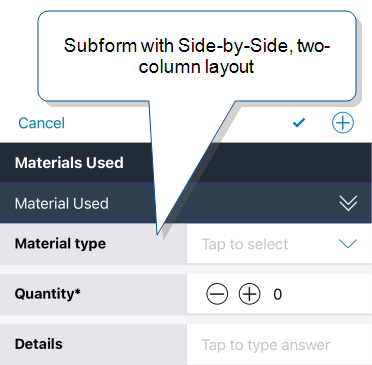
(Enterprise tier only) |
Two-column, with configurable ratio | 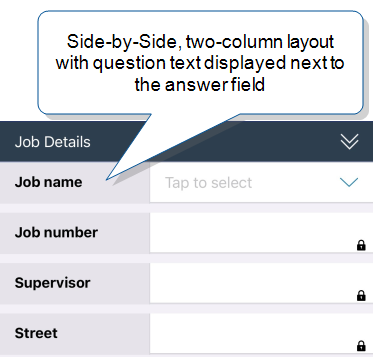
|
|
|
(Enterprise tier only) |
Full-width, over-under (same as a Regular Section |
|
|
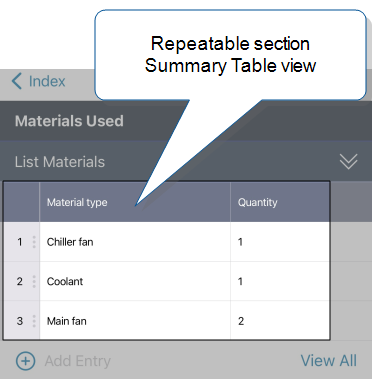
| Repeatable |
Summary Table for quick reference and editing |
Note:Use a Repeatable Section |
|
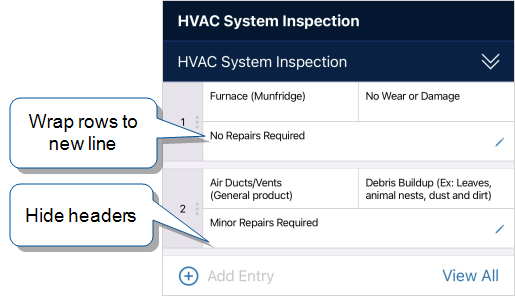
| Summary Table Enterprise tier options |
This example shows rows wrapped and headers hidden:
The Full view
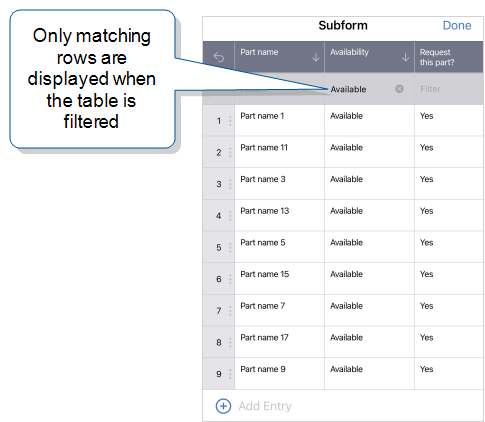
This example shows the filter option:
|
||
| When the subform opens, the layout can be over-under, |
|
Info:The topic Form Layout Options provides more details about the different layouts.
Regular Sections
A Regular Section is a set of related questions grouped together for easy reference. The data captured is “non-repeating”. That is, field users enter a single instance of each answer. Regular Sections divide questions into logical groups, visually breaking them up and making it easier for mobile users to navigate a page.
Regular Sections group your questions under headers in the right panel of the Form Builder.
Tip:When mobile users are faced with a lot of questions with no visual separation, the form is harder to use and they are more likely to miss a question. A Regular Section should have no more than 10 questions shown at once. If you have more than that, it's time to create a new section!
Info:The topic Regular Sections describes in detail how to use a Regular Section.
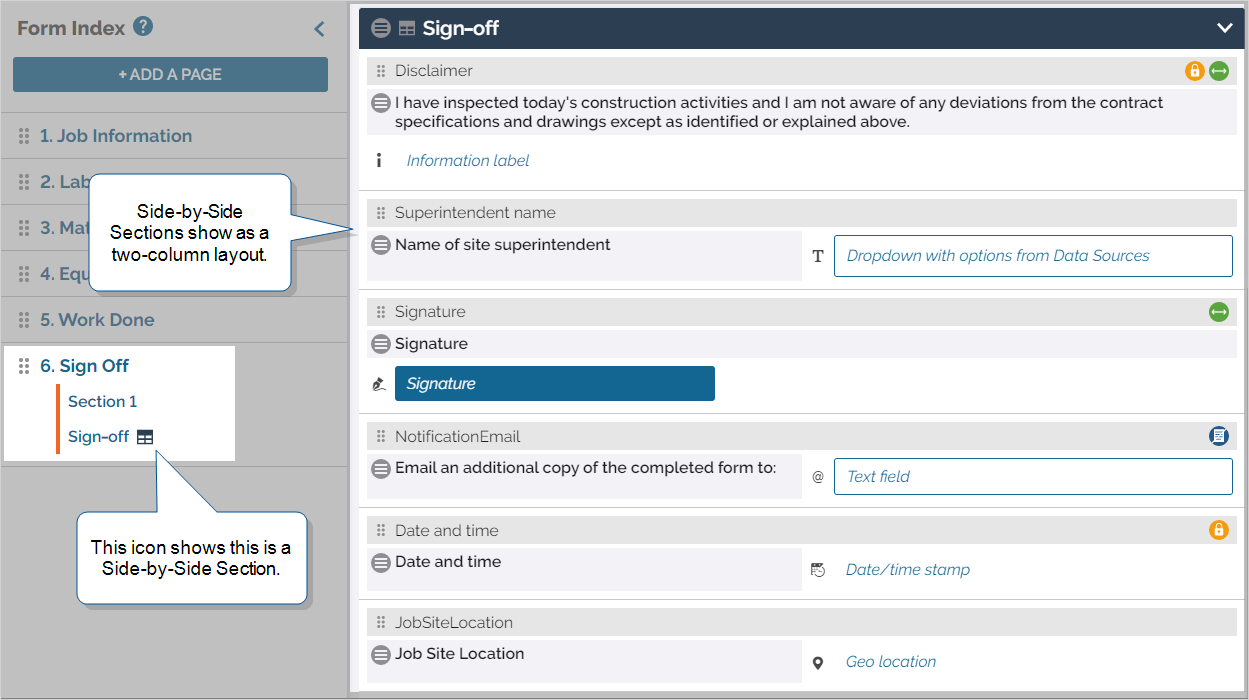
Side-by-Side Sections (Enterprise tier only)
In a Side-by-Side Section, questions and answers appear next to each other in a two-column layout. This layout removes unnecessary space, which helps the field user efficiently scan and answer questions.
The Form Index displays the Side-by-Side icon  next to the Side-by-Side section name. When you add questions to the section, the Form Builder shows the questions in a two-column layout.
-
Use the Change Section Type setting to easily switch between Regular and Side-by-Side sections. You don’t have to re-create existing sections. Edit the section to change its type.
-
When you select a question-answer ratio, think about the question types you plan to include in the section. Wider question types, like Button Group, don’t fit well in smaller answer widths, especially on smaller devices.
Info:The topic Side-by-Side Sections describes in detail how to set up a Side-by-Side Section.
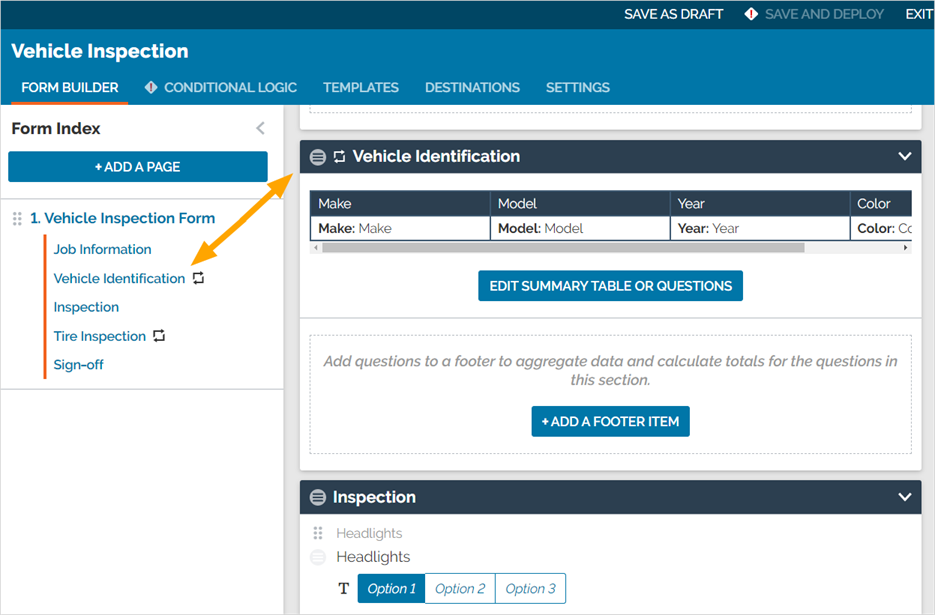
Repeatable Sections
A Repeatable Section is a subform that contains a set of related questions.
Field users benefit from a summary view of the data collected. Each entry is displayed as a line item in the Summary Table.
Note:Use a Repeatable Section only for its intended purpose of adding information in a repeating subform. Do not use a Repeatable Section to achieve a particular layout. If you need additional layout options for questions in a Regular Section, consider upgrading to the Enterprise tier
Repeatable Sections look like a table in the right panel of the Form Builder. This is not a preview of how the Mobile App displays the form.
Info:The topic Overview: Repeatable Sections describes in detail how to use a Repeatable Section.
Template-Based Sections
Template-Based Sections allow you to quickly and easily create and edit groups of questions that follow a repeated pattern. These kinds of repeated sets of questions are often seen in inspection, audit, or checklist-based forms.
Template-Based Sections appear in the Form Builder as blocks of questions that reference a specific template.
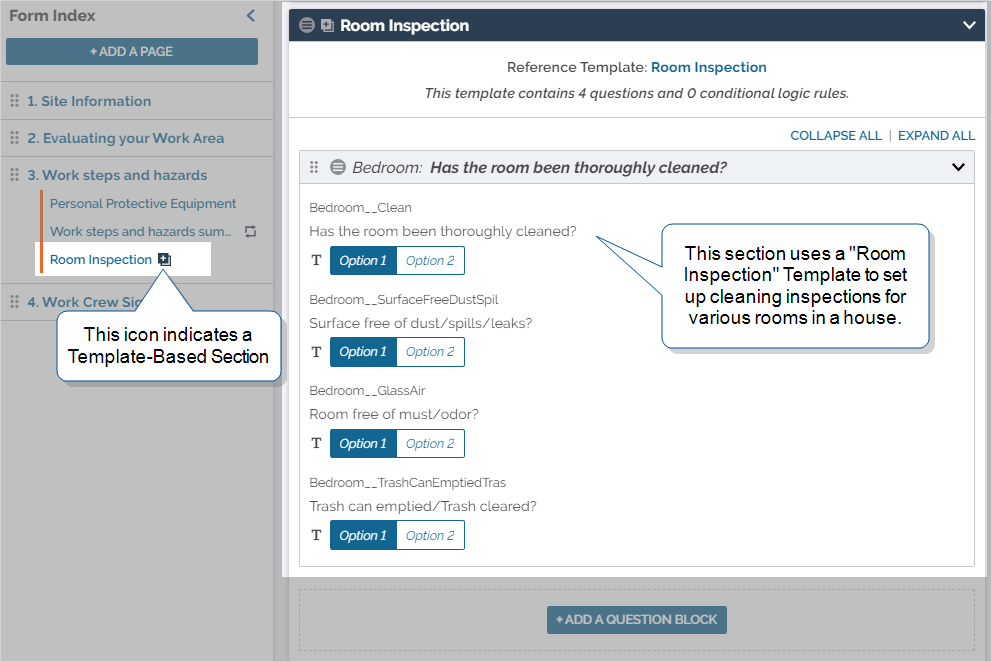
Info:The topic Building Template-Based Sections describes in detail how to use a Template-Based Section.
Questions
What are Questions?
Questions are what mobile users interact with in the mobile form. Users can type with a keyboard, select from a list of options, or attach files in order to provide answers.
There are many kinds of questions that can be added to a form.
- Question Type determines how users interact with the question and what it looks like (such as manually typing in a response rather than selecting it from a list).
- Data Type determines the kind of information the question should collect (such as a number, a date, or a signature, for example).
Info:The topic Question and Data Types in the Form Builder provides a complete list of all the available options.
Tip:We recommend that you use different types of questions in your form. This helps to keep the field user’s attention and to capture data accurately. When consecutive questions are all the same type, the form can get monotonous and cause users to miss a question. Vary your question types. Button Group questions, for example, use color to highlight the answer. Your forms will be more usable, and your mobile users will appreciate it.
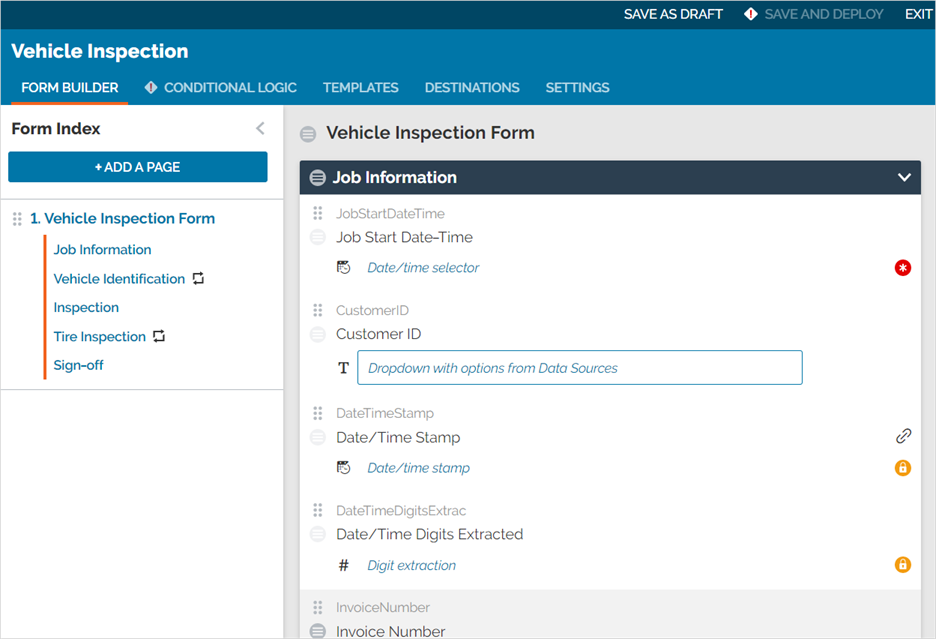
Questions in the Form Builder
Questions are found in sections and are shown in the right panel of the Form Builder.
Create Your Form
-
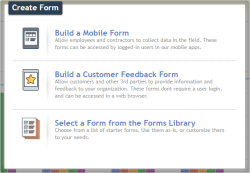
From Manage Forms in the Web Portal, select Create New Form.
-
Select Build a Mobile Form from the window that appears.
-
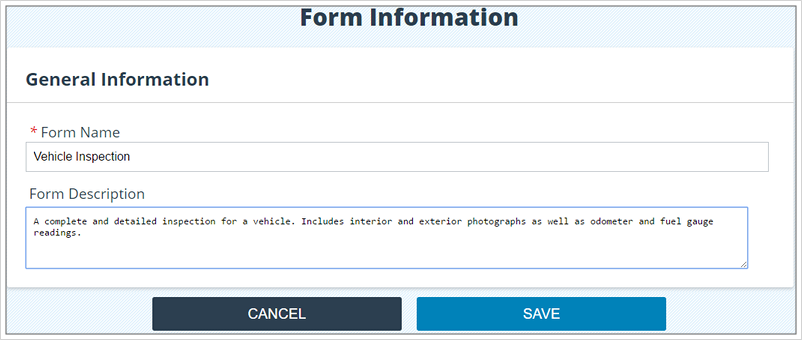
Once the Form Builder has loaded, you'll be on the General Information screen. Give your form a Form Name and Form Description. You'll be able to edit this later if you desire.


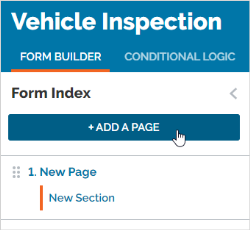
Build Pages
Add a Page
-
In the left navigation pane of the Form Builder, select Add a Page.
-
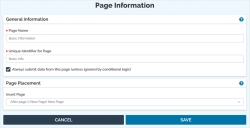
Name your page.
Mobile users will see this name in the mobile form in the left navigation, and at the top of the screen.
-
(Optional) Customize the page's Unique Identifier.
This identifier is referenced in Conditional Logic, analytics, and other parts of the Form Builder.
-
(Optional) Select where the page should go in your form.
By default, new pages are inserted at the end of the current page listing.
-
Select Save at the bottom of the page.

Edit, Delete, or Copy a Page
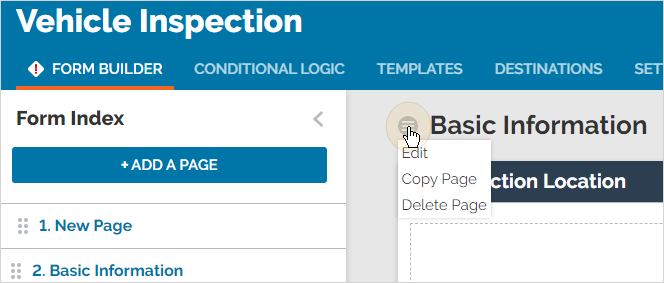
These actions can all be accessed from the menu icon beside the page name in the right panel of the Form Builder.
-
Edit: This will bring up the Page Information screen, where you can modify the page name and Unique Identifier.
-
Copy Page: The page will be copied. If copying a page with self-contained Conditional Logic (i.e., all rules and effects are contained within the page), then the Conditional Logic rules will also be copied.
-
Delete Page: This will permanently remove the page from the form. This may impact and cause errors in other parts of your form or Conditional Logic.
Move a Page
In the left navigation, select and hold the dotted icon  while dragging the page to the desired location. Or edit the page and select the desired location under Page Placement.
Build Sections
Add a Section
-
Make sure you are on the desired page.
-
Select Add a Section at the bottom of the right panel.

-
Choose your Sections and Layouts.
-
Name your section.
-
Mobile users will see this name in the header above each section in the mobile form.
-
If you don't name your section, the header won't show up, and there will be no visual separation between sections. This is usually done for the first section on a page.
-
-
(Optional) Customize the section's Unique Identifier.
-
This identifier is referenced in Conditional Logic and other parts of the Form Builder.
-
-
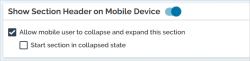
Choose whether to Show Section Header on Mobile Device.
-
If OFF, the header will not show in the mobile form, but it WILL show in documents.
-
If ON, there are two additional options:
- Allow mobile user to collapse and expand this section: Using the
 and
and  icons, your mobile users can make the questions in the section shown or hidden. This is useful for space saving on larger forms.
 - Start section in collapsed state: Users will have to manually tap the button to expand the section.
- Allow mobile user to collapse and expand this section: Using the
-
-
(Side-by-Side Sections only) Select a question-answer ratio for the section layout.
The question-answer ratio affects how the Side-by-Side Section appears on form pages in the Mobile App. It has no effect on the summary view, document formats, or Web Portal display.
-
Select Save to add the section to your form.


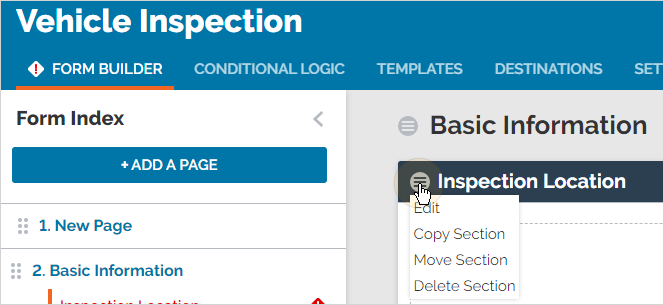
Edit, Delete, Move or Copy a Section
These actions can all be accessed from the menu icon beside the Section name in the right panel of the Form Builder.
-
Edit: This will bring up the Section Information page.
-
Copy Section: The section will be copied. If copying a section with self-contained Conditional Logic (i.e., all rules and effects are contained within the section), then the Conditional Logic rules will also be copied.
-
Move Section: This will open a list of sections in the form. You can choose to move this section to after any of the listed sections.
-
Delete Section: This will permanently remove the section from the form. This may impact and cause errors in other parts of your form or Conditional Logic.
Build Questions
Add a Question
-
Navigate to the desired section.
-
Add a question.
You have two options when adding a new question:
-
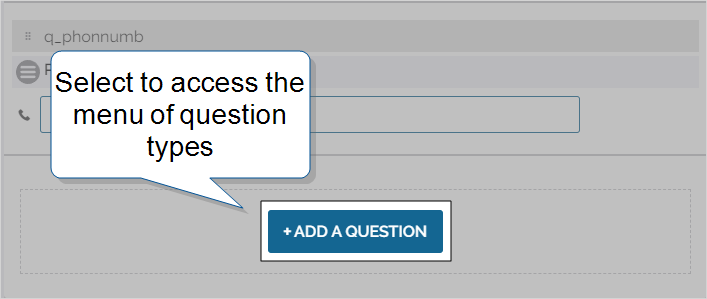
Hover between two questions, and select the plus sign [+].
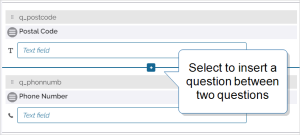
-
Scroll to the bottom of a section and select ADD A QUESTION.

To move a question, drag it to one of the separators between questions or to an empty section. You can also move a question to another page by dragging it to the Form Index.
-
-
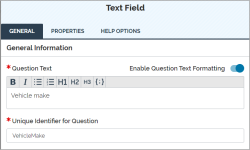
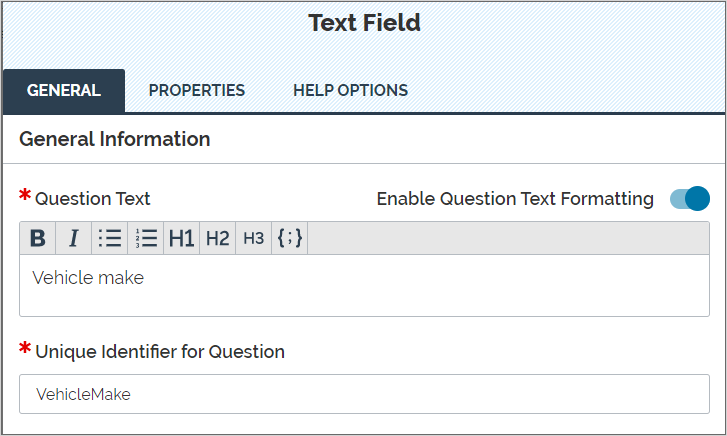
Choose a Question Type.
-
Provide Question Text.
This is the “Question” you are asking users to respond to, or instructions on what kind of information to enter. You can format the question text to make it easier for your users to read.
-
Customers on the Enterprise tier can choose to Hide question text on device. This saves space in a Regular Section with an over-under or Multicolumn layout.
-
(Optional) Customize the Unique Identifier. This identifier is referenced in Conditional Logic and other parts of the Form Builder.
-
Choose a Data type
 Data types describe the format in which a user answers a question. For example, a user might enter a name (Text) in one question, and a dollar amount (Currency) in another. A data type also supports validation (making sure that mobile users enter a valid email address format, for example).. The list of available data types will differ depending on what question type you chose. For more information on Data Types, please read: Question and Data Types in the Form Builder
-
Select any necessary Restrictions:
-
Required
-
Read-Only
-
Hidden on Device
-
Hidden on Reports
-
Keep question width to 100% (Side-by-Side Sections only)
-
-
The remaining configuration options (In the Options and Properties tabs, if present) will differ based on your question and data type. For more information please read: Question and Data Types in the Form Builder.
-
(Optional) Add Help Properties. Read more here.

Edit a Question
To edit a question, simply select the question. Its properties will open again.
Delete, Move or Copy a Question
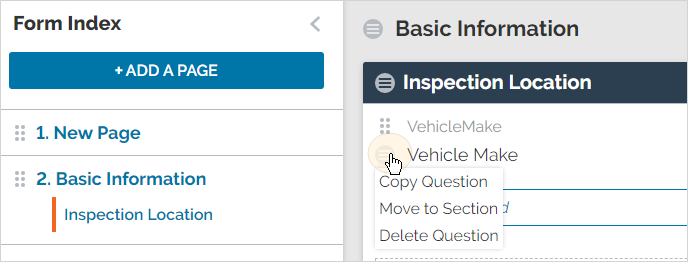
These actions can all be accessed from the menu icon beside the Question in the right panel of the Form Builder.
-
Copy Question: The question will be copied.
-
Move Question: This will open a list of sections in the form. You can choose to move this question into any of the listed sections. You can also drag and drop the question within the same page or onto different pages.
-
Delete Question: This will permanently remove the question from the form. This may impact and cause errors in other parts of your form or Conditional Logic.
Save your Form
Once you have finished building your form, there are several options to save it. These options can be found at the top right of the Form Builder.

Saves the current form as a draft. Drafts are only deployed to Admin users and users who have “Can Test” permissions.
Save and Deploy
Saves the form as an Active version and deploys it to mobile devices. Save and deploy is typically used only when a form has been completed and is ready to be deployed to end users.
This option is not available if there is an error in your form.
exit
Prompts you to save a draft or discard your changes.