Set Up Salesforce for TrueContext Corporate Login/Single Sign-On (SSO)
Available on the Enterprise tier only:
About
Salesforce can act as a single sign-on (SSO) identity provider to TrueContext, allowing end users to easily and securely access TrueContext with one login. When using SAML for federated authentication, enable Salesforce as an identity provider and then set up TrueContext.
This article will walk administrators through setting up Salesforce and TrueContext for SSO.
Set Up Your Salesforce Org as an Identity Provider (IdP)
You can set up Salesforce as an identity provider and set up a subdomain for SSO.
Download the Metadata Document
- From Setup, enter Identity in the Quick Find box, and then select Identity Provider.
- Select Download Metadata.
If you need to generate a new metadata key, follow Salesforce's help here: Certificates and Keys (external link).
Create a Connected App in Salesforce
-
In Salesforce, create a connected app:
-
In Lightning Experience, from Setup, enter App in the Quick Find box, and select App Manager. Select New Connected App.
-
In Salesforce Classic, from Setup, enter Apps in the Quick Find Box, and select Apps. Under Connected Apps, select New.
-
-
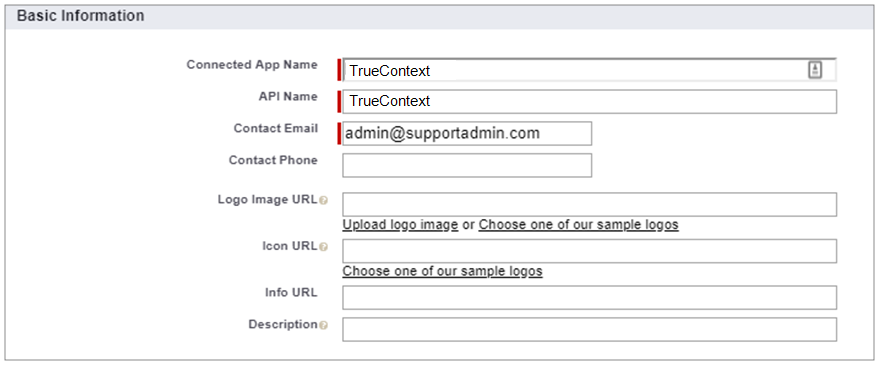
Configure the connected app's Basic Information settings:
-
Enter a name for the TrueContext connected app. Salesforce uses this name to populate the API name.
-
Enter the contact email for Salesforce to use when contacting you or your support team. This address isn’t given to Salesforce admins who install the app.
-
Optionally, upload or specify a logo and icon to represent your TrueContext application in the Salesforce App Launcher.
-
-
-
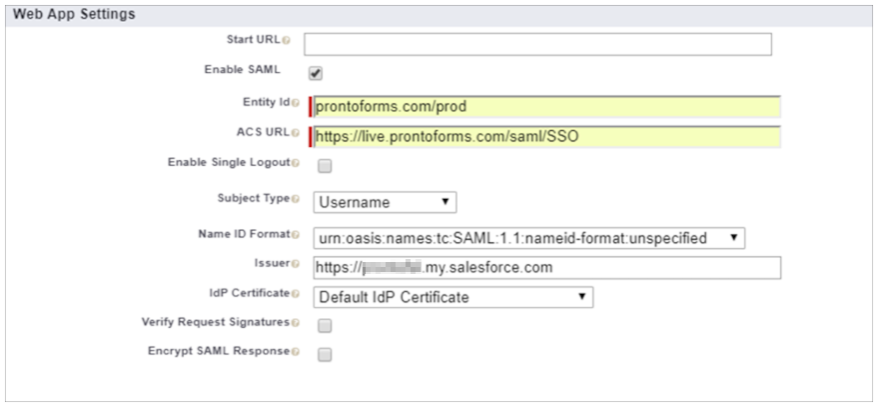
Select Enable SAML.
-
For Entity ID, enter prontoforms.com/prod
Info:We’re now TrueContext.To support existing integrations, some items will continue to use “prontoforms” or “pf” in the domain or code.
For more detailed information about what’s changing, visit https://support.truecontext.com/hc/en-us/articles/19516168513556
-
For ACS URL, enter https://live.prontoforms.com/saml/SSO
-
For Subject Type, choose how users are identified to the identity provider. For TrueContext, choose Username.
-
For Name ID Format, keep the default value.
-
For Issuer, keep the default value, which is your My Domain subdomain.
-
For IdP Certificate, keep the default (Default IdP Certificate).
Configure the connected app's Web App Settings:
-
-
Save the settings.
-
Configure profiles and permission sets for the connected app.
-
From Setup, enter Apps in the Quick Find box.
-
If you are using Lightning Experience, select Manage Connected Apps.
-
If you are using Salesforce Classic, under Manage Apps, select Connected Apps.
-
Select the name of your connected app for Zendesk (TrueContext). The connected app detail page will appear.
-
Select Manage Profiles or Manage Permission Sets, and add profiles or permission sets for the users who can access this app.
-
-
In Salesforce, enter the start URL for TrueContext. To find this:
-
Navigate to the Connected App Detail page.
-
Copy the IdP-initiated login URL displayed on the page:
-
On the connected app detail page, select Edit Policies.
-
For Start URL, paste the IdP-initiated login URL.
-
Save the settings.
-
Once this is done, set up SSO in TrueContext' Web Portal. For instructions on how to do this: Set up corporate login (Single Sign-On).