Recipe to Update a Google Sheets Data Source Using Data from Submitted Forms
Available on all tiers:
Data Sources![]() Data sources, also known as "Lookups", are external sources of data that you upload or connect to TrueContext. You can reference this data in a form to populate answers or answer options. Data sources save typing, reduce errors, and make it easy to provide mobile users with only the relevant, most current data. and Data Destinations
Data sources, also known as "Lookups", are external sources of data that you upload or connect to TrueContext. You can reference this data in a form to populate answers or answer options. Data sources save typing, reduce errors, and make it easy to provide mobile users with only the relevant, most current data. and Data Destinations![]() A Data Destination specifies where to send data from a submitted form. You can use Data Destinations to automate data sharing and storage, routing data to a specific service (such as email or cloud storage) in several different formats. work together to keep your system of record up-to-date. This topic shows you how to use a Google Sheets Data Destination to update a Google Sheets Data Source.
A Data Destination specifies where to send data from a submitted form. You can use Data Destinations to automate data sharing and storage, routing data to a specific service (such as email or cloud storage) in several different formats. work together to keep your system of record up-to-date. This topic shows you how to use a Google Sheets Data Destination to update a Google Sheets Data Source.
Contents
Topic overview
Scenario for this example
-
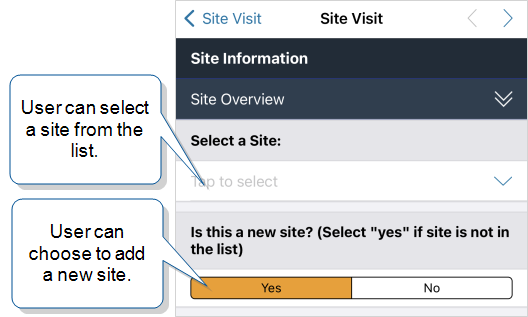
A form called “Site Visit” has a Dropdown question that pulls in site-related data from a Google Sheets Data Source.
-
Field workers can select the site name from the Dropdown list.
-
If there’s a new site that hasn’t been added to the Data Source, the field user can enter the new site details.
-
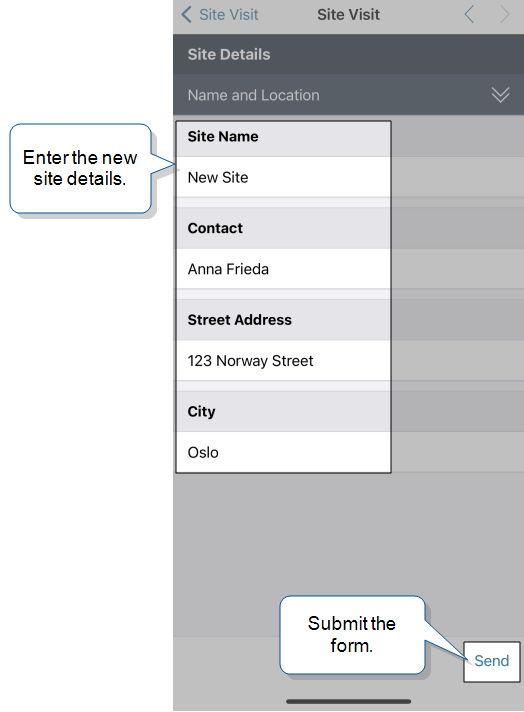
After the field user submits the form, the Google Sheets Data Destination automatically adds a new row to the Google Sheet. The new row includes the information about the new site.
Additional Data Destinations
The example used in this topic describes a single Data Destination. You can, however, link multiple Data Destinations to a single form. For example, you can set up:
-
An Email destination to send a PDF output document to a customer.
-
A Google Drive destination to store the PDF output document and other files, such as attached image files.
Set up the Google Sheets Data Source
-
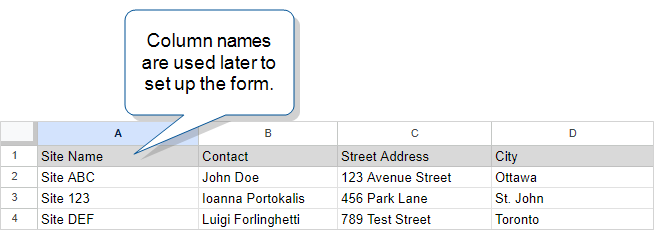
Set up your Google Sheet and save it with the name “Site Info”. Name the columns as shown in the following example. You’ll refer to these column names later when you set up the form.
 Tip:Keep in mind that:
The first line in your spreadsheet is the column header row. Give each column a name that you can recognize later.
TrueContext automatically generates a unique column header for any columns that don’t have a name.
The first blank line in your spreadsheet is treated as the end of input. Make sure that there are no empty lines in the middle of your worksheet.
-
In the TrueContext Web Portal
 The TrueContext Web Portal is a web application used to manage security settings, forms, FormSpaces, other users, Data Sources, and Data Destinations., create a Google Connection. This sets up communications between your Google Sheet and TrueContext.
Forms & Integrations > Connections > Create Connection > Google Connection
-
Set up a Google Sheets Data Source.
Forms & Integrations > Data Sources > Create Data Source > Google Sheets
-
On the Data Source Connection tab, in the Spreadsheet Path field, enter the name Site Info.
Tip:If the sheet is in a Google Drive folder, include the folder and sub-folder names along with the Google Sheet name, for example:Customers/Site Info
-
Save your changes. You’ll link the Data Source to the form when you set up the mobile form.
Set up the mobile form
This section describes how to set up a form so that field users can either select an existing site or add a new one.
-
Create the form and name it Site Visit.
Forms & Integrations> Create New Form > Build a Mobile Form
-
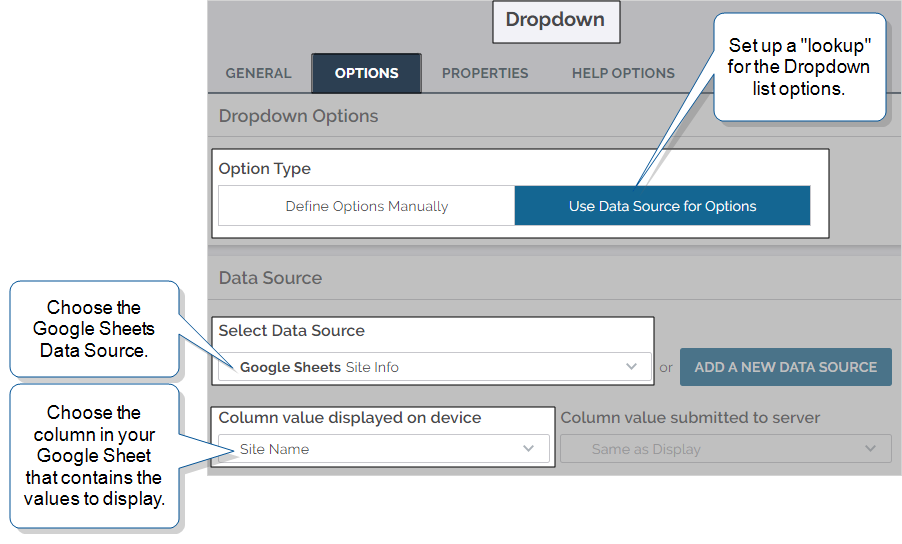
On the first page, set up a Dropdown lookup.
-
In the Question Text field, enter Select a site:.
-
On the Options tab, set up the options as shown in the following example.
-
-
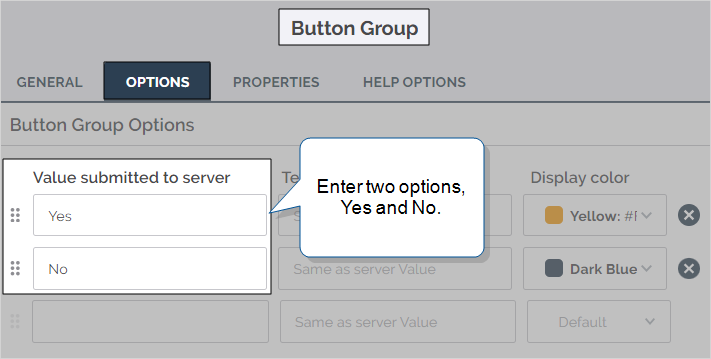
Set up a Button Group question to display the options Yes and No. Give the question the Unique ID
A Unique ID refers to the specific identifier of a question, form page, form section, or Data Destination. Unique IDs are used as reference points when pulling data for conditional logic, Analytics projects, Data Destinations, and Documents. NewSite.-
In the Question Text field, enter Is this a new site? (Select "yes" if site is not in the list).
-
On the Options tab, set up the Yes and No options as shown in the following example.
Tip:Later, you’ll set up a Data Destination filter rule to check the answer to the NewSite question. If the user answers Yes, the destination adds a row to the Google Sheet.
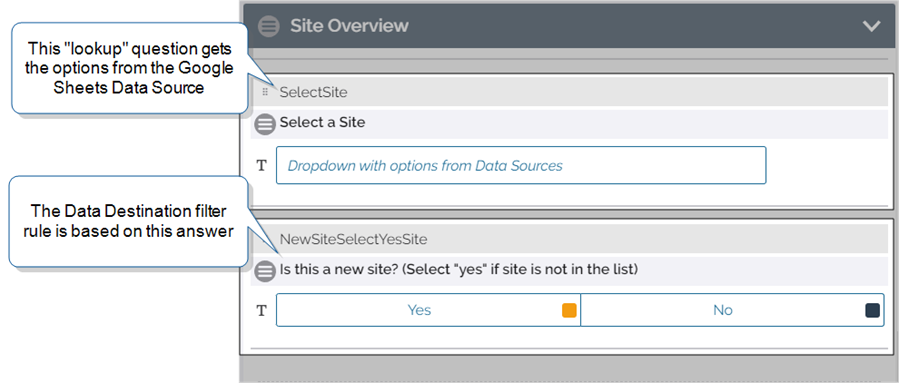
The following example shows the Dropdown and Button Group questions in the Form Builder.
-
-
Add a second page to the form, and then add Text Field questions to capture the site information. The following example shows these questions in the Form Builder.
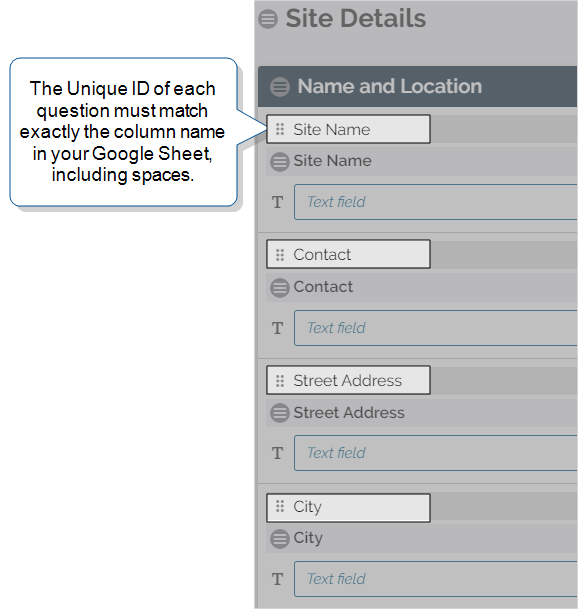
Note:Make sure that the question Unique IDs exactly match the column names in your Google Sheet, including spaces.
-
Set up the lookup question that you created in step 2 to auto-fill the text fields that you added in step 4.
-
Go to the Select a Site question Options tab.
-
Set up the questions as shown in the following example:
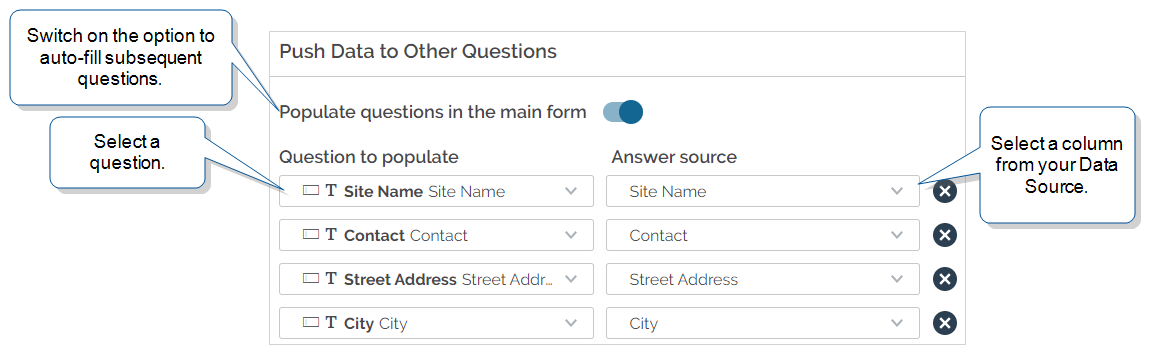
When a field user selects an existing site from the list, the text fields are auto-filled with data from the Data Source.
-
-
Save as draft so that you can test the form before you deploy it.
Set up the Google Sheets Data Destination
-
Create a Google Sheets Data Destination. Give the destination a name that clearly identifies its use, for example, Update Site Info.
Forms & Integrations> Data Destinations > Create Data Destinations > Google Sheets
-
On the destination Filtering tab, Add and set up a filter rule as shown in the following example:
![Data Destination "Filtering" tab that shows the "Answer Filtering" section set to "Match All", "Input Expression" = %a[NewSite] (the Unique ID of the Button Group question that the user answers with Yes or No), and the "Filter Expression" = Yes (so that the destination adds a row to the Google Sheet when the answer to the NewSite question is "Yes").](../Resources/Images/DataDestinationPages/WPDataDestinationFilterRuleGoogleSheet.png)
-
Input Expression—%a[NewSite]
This uses a DREL expression to reference the Button Group question NewSite.
-
Filter Expression—Yes
This sets the filter to trigger the destination when the user answers Yes.
-
-
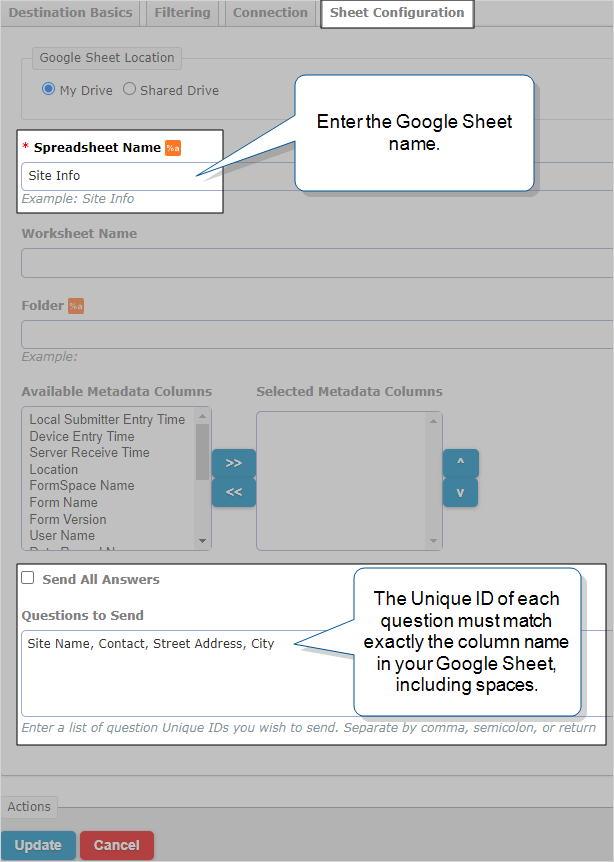
On the Sheet Configuration tab, set up the fields as shown in the following example.
-
Spreadsheet Name—Site Info
-
Folder—If the sheet is in a Google Drive folder, include the folder and sub-folder names, for example:
Customers/Site Info
-
Selected Metadata Columns—None selected (for this example)
The Data Destination always adds a Data Record ID column to your Google Sheet. You can select other metadata columns—such as User Name—to make it easier to find information about a submitted form. The Data Destination adds one column to your Google Sheet for each selected metadata column.
-
Send All Answers—Cleared
-
Questions to Send—Site Name, Contact, Street Address, City
Note:Make sure that the Unique IDs exactly match the column names in your Google Sheet, including spaces.
-
-
Select Create.
-
Link the Data Destination to the mobile form and save the form as a draft.
-
Navigate to the form, and then select Edit Form.
-
From the top menu, select Destinations.
-
Select Add a Data Destination, and then select your Google Sheets destination from the list.
-
Save as draft so that you can test the setup before you deploy the form.
-
Test your setup and deploy the form
Note:To test a draft form, you must be an Admin user or a User with Can Test permissions.
-
Open the TrueContext Mobile App on your device.
-
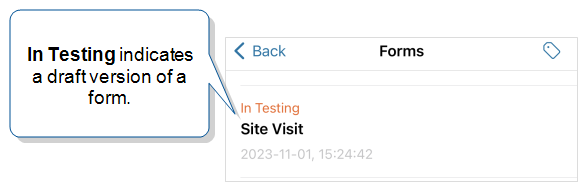
Open the Forms list, and then find and open the form named Site Visit.
Tip:The words In Testing help you to locate draft versions of forms.
-
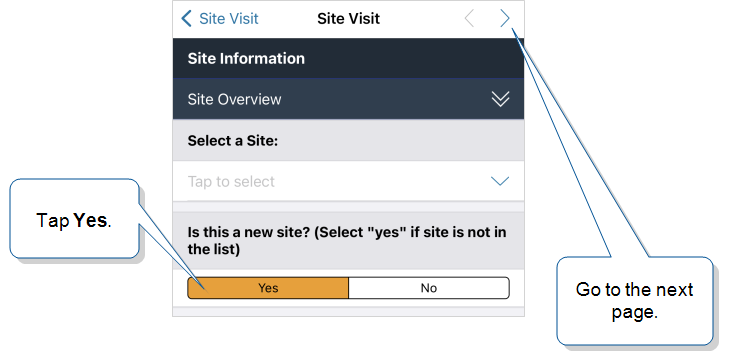
Go to the first page. Answer Yes to the question Is this a new site?, and then go to the next page.
-
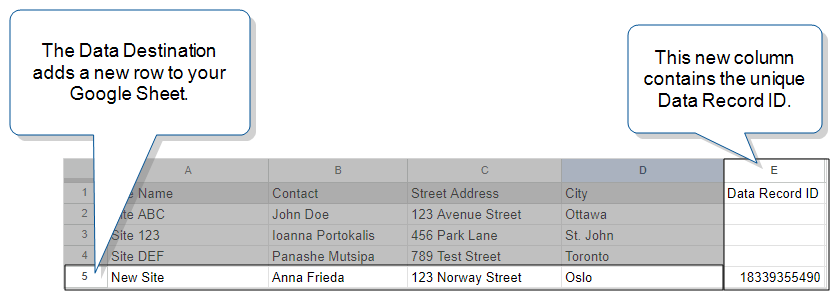
Enter the new site details as shown in the following example.
-
Select Send to submit the form.
Result: Because you selected Yes on the first page, the Data Destination filter conditions are met. The destination adds a new row to your Google Sheet and adds a column for the Data Record ID. This is the unique identifier of the submitted form.
-
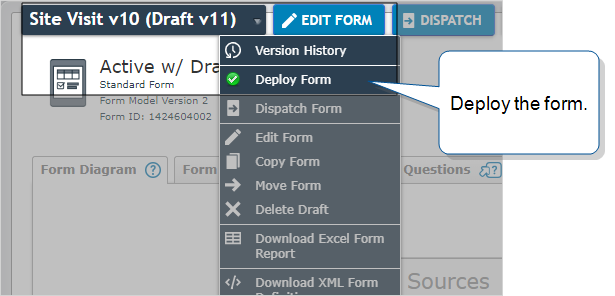
You can now deploy the form to make it available to your field users. In the Web Portal, navigate to the form, hover over the arrow next to the form name, and then select Deploy Form.
 Note:Although the Google Sheet is updated quickly, the TrueContext Data Source fetches the new data as scheduled. If you want your field users to access the new data before the next scheduled fetch, go to:
Forms & Integrations > Data Sources > Data Source Name > Fetch New Data.
Field users must reconcile to get the new data.