Use the ServiceNow Agent Mobile App to Open and Send Data to the TrueContext Mobile App
The ServiceNow Agent mobile app can open and send data to the TrueContext Mobile App by using a deep link (App‑to‑App) URL. This recipe shows you how to set up the ServiceNow Agent mobile app to send an App‑to‑App request to the TrueContext Mobile App. It also describes how you can use a Data Source![]() Data sources, also known as "Lookups", are external sources of data that you upload or connect to TrueContext. You can reference this data in a form to populate answers or answer options. Data sources save typing, reduce errors, and make it easy to provide mobile users with only the relevant, most current data. and a Data Destination
Data sources, also known as "Lookups", are external sources of data that you upload or connect to TrueContext. You can reference this data in a form to populate answers or answer options. Data sources save typing, reduce errors, and make it easy to provide mobile users with only the relevant, most current data. and a Data Destination![]() A Data Destination specifies where to send data from a submitted form. You can use Data Destinations to automate data sharing and storage, routing data to a specific service (such as email or cloud storage) in several different formats. to complete your ServiceNow integration.
A Data Destination specifies where to send data from a submitted form. You can use Data Destinations to automate data sharing and storage, routing data to a specific service (such as email or cloud storage) in several different formats. to complete your ServiceNow integration.
Available on the Intelligent and Elite tiers:
Contents
Recipe overview
Workflow example
In the ServiceNow Agent mobile app, you can set up a Smart Button that makes an App‑to‑App request to the TrueContext Mobile App. This enables you to follow your standard dispatch and scheduling processes in ServiceNow while using TrueContext for rich data collection. If you follow this recipe, this is what you can do with your own workflow.
-
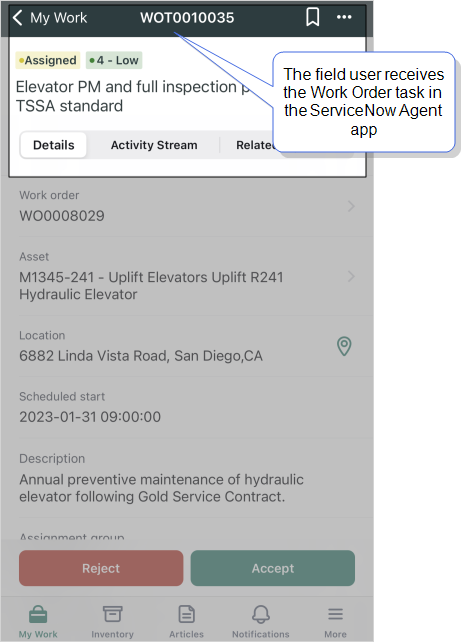
You assign a work order task to a ServiceNow Agent app user.
-
The user opens the work order task in the app as shown in the following example.
-
The user selects the Launch Maintenance Form Smart Button from the work order task top menu.
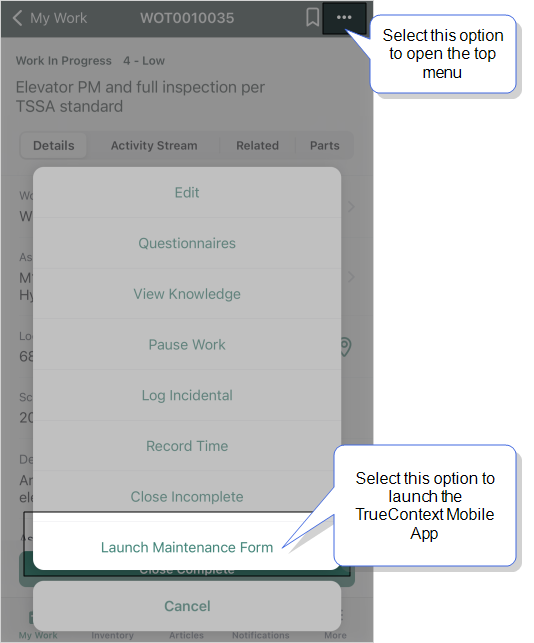
Result: The ServiceNow Agent app makes an App‑to‑App request to the TrueContext Mobile App.
-
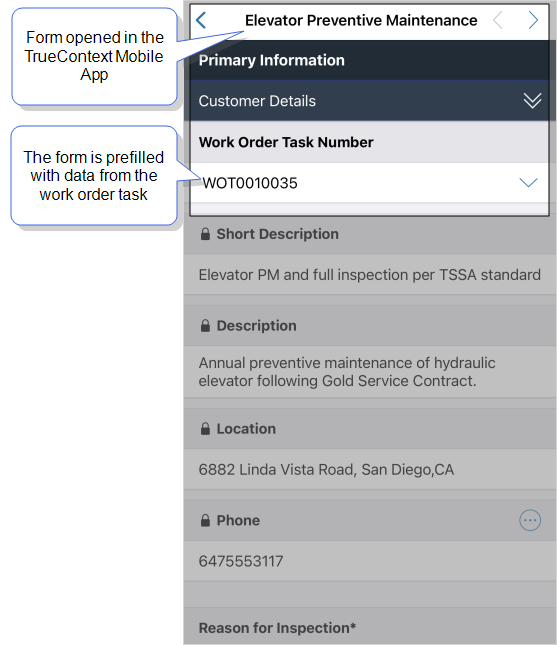
The TrueContext Mobile App opens and performs the requested action. In this example, it opens a form and prefills it using data from the work order task.
-
The user completes and sends the form. Then, the App‑to‑App call sends the user back to the ServiceNow Agent mobile app.
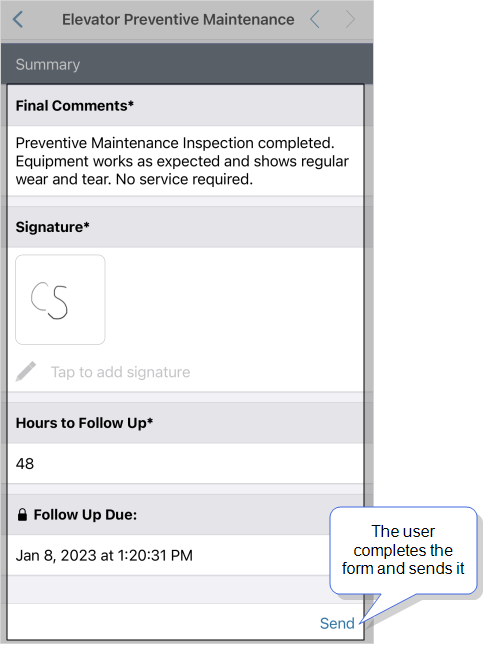
Result: TrueContext sends the data to ServiceNow using a Data Destination. The following example shows the updated work order record in ServiceNow.
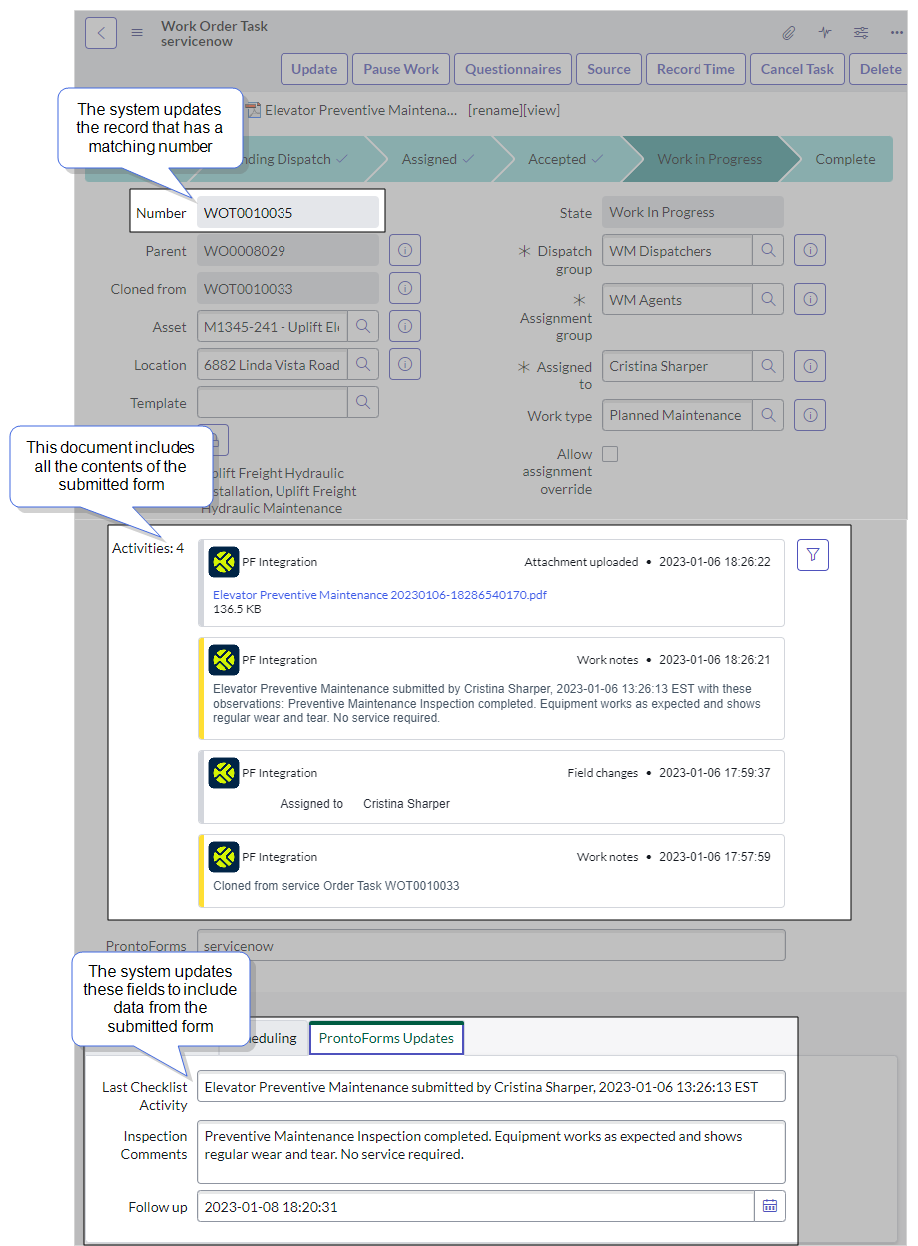
Note:The ServiceNow Agent mobile app does not support custom callback parameters. The only way to send data back to ServiceNow from TrueContext is with a Data Destination. Users must be online to upload the submitted form. When the submitted form reaches the TrueContext cloud server, the Data Destination executes and sends the data and documents to ServiceNow.
High-level process
The following table describes what you need to set up in TrueContext and ServiceNow to complete this recipe.
| System | Action | Result |
|---|---|---|
| ServiceNow | Make the TrueContext Mobile App available for Deep Linking. | This gives ServiceNow authorization to open the TrueContext Mobile App using a deep link (App‑to‑App call). |
| Create a Smart Button URL Function that includes a TrueContext Mobile App App‑to‑App call. | The Smart Button makes an App‑to‑App call to open and send data to the TrueContext Mobile App. | |
| Add the Smart Button as a top Menu function. | Field users can access the Smart Button from the top menu of their Work Order Tasks. | |
| TrueContext | Add ServiceNow Agent mobile app to your App‑to‑App allow list. | This gives the TrueContext Mobile App authorization to send callbacks to the ServiceNow Agent mobile app. |
| (Optional) Create a Data Source. | You can use data from your ServiceNow tables to prefill answers in the form. | |
| Set up the form question Unique Identifiers to match the parameters in the App‑to‑App call. | The App‑to‑App call prefills the right questions in your form using data from the work order task. | |
| Create a Data Destination. | The Data Destination updates related records in ServiceNow using data from the submitted form. |
Prerequisites
ServiceNow prerequisites
-
Your ServiceNow Instance must be on the Rome release or later.
-
Your ServiceNow instance must have the Field Service Mobile plugin active.
-
Your users must have the ServiceNow Agent mobile app installed on their iOS or Android device.
-
You must have admin permissions to:
-
You must have wm_qualifier permissions to create and assign work order tasks to test the recipe.
TrueContext prerequisites
-
You must be a TrueContext Admin user.
-
App‑to‑App communication requires that field users install and sign in to the TrueContext Mobile App.
Note:App‑to‑App requests sent to logged-out users fail without triggering an x-error callback.
-
You must set up a ServiceNow Connection to use ServiceNow Table Data Sources
 Data sources, also known as "Lookups", are external sources of data that you upload or connect to TrueContext. You can reference this data in a form to populate answers or answer options. Data sources save typing, reduce errors, and make it easy to provide mobile users with only the relevant, most current data. and Data Destinations A Data Destination specifies where to send data from a submitted form. You can use Data Destinations to automate data sharing and storage, routing data to a specific service (such as email or cloud storage) in several different formats..
ServiceNow setup
Make the TrueContext Mobile App available for deep linking in ServiceNow
-
In your ServiceNow instance, navigate to
sys_properties.list. -
Open the
glide.sg.allowed_external_deeplinksrecord in edit mode. -
In the Value field, enter
Info:We're now TrueContext.Use
truecontext://ortcxt://in your App‑to‑App calls.To maintain existing integrations, TrueContext will continue to support
prontoforms://and the alternativehttps://prontofor.ms/. -
Select Update to save your changes.
Info:The topic Configure which external apps are available for deep linking in the ServiceNow documentation includes more details about Deep Linking in ServiceNow.
Create a Smart Button function in ServiceNow
-
In your ServiceNow instance, navigate to All > System Applications > Studio.
-
Select the Field Service Mobile application.
-
Go to Mobile Studio > Functions > Smart Buttons.
-
Select the pop out icon to open a list of Smart Buttons as shown in the following example.
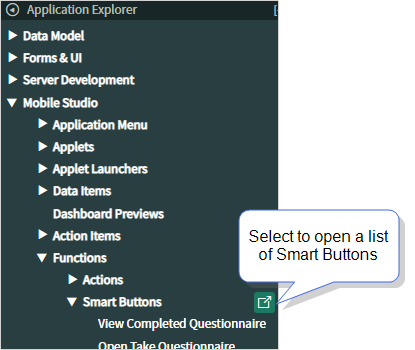
Result: The Smart Buttons list opens.
-
Select Create new.
Result: A new Smart Button opens in edit mode.
-
Configure the Smart Button as follows:
-
Name—enter TrueContext_Preventive_Maintenance.
-
Type—select URL.
-
Context—select Record.
-
Use source value from field—clear this option.
-
Table—select Work Order Task [wm_task].
-
URL Link—enter the following deep link (App‑to‑App call) formatted according to TrueContext requirements:
truecontext://x-callback-url/open?name=Elevator%20Preventive%20Maintenance&WorkOrderTaskID={{sys_id}}&WorkOrderTaskNumber={{number}}&ShortDescription={{short_description}}&Description={{description}}&AssetName={{asset}}&x-success=snagent://&x-error=snagent://&x-cancel=snagent://where:
truecontext://x-callback-url/open?name=Elevator%20Preventive%20MaintenanceOpens the TrueContext Mobile App and opens a form or a list of forms that have the words “Elevator Preventive Maintenance” in the form name. &WorkOrderTaskID={{sys_id}}& WorkOrderTaskNumber={{number}}& ShortDescription={{short_description}}& Description={{description}}& AssetName={{asset}}Are parameters that define the TrueContext questions to prepopulate using values from the work order task record. WorkOrderTaskID,WorkOrderTaskNumber,ShortDescription,Description, andAssetNameare the unique IDs of the questions in the form that you want to prefill.&x-success=snagent://&x-error=snagent://&x-cancel=snagent://
Brings the user back to the Agent mobile app when the App‑to‑App call results in an error, or when a user:
-
Saves or submits a form.
-
Closes and discards the form.
-
-
URL Label—enter Launch Elevator Preventive Maintenance Form.
-
Available Offline—enable this setting so that field users can use the Smart Button even if they’re offline.
-
-
Select Save.
Info:The topics Smart button functions and Configure a smart button in the ServiceNow documentation include more detailed information.
Add the Smart Button as a top menu function in ServiceNow
-
In your ServiceNow instance, navigate to All > System Applications > Studio.
-
Select the Field Service Mobile application.
-
Go to Mobile Studio > Applets > Work Order Tasks.
Result: The Work Order Tasks Applet opens.
-
Go to Form Screen > Functions, and then select the add button as shown in the following example.
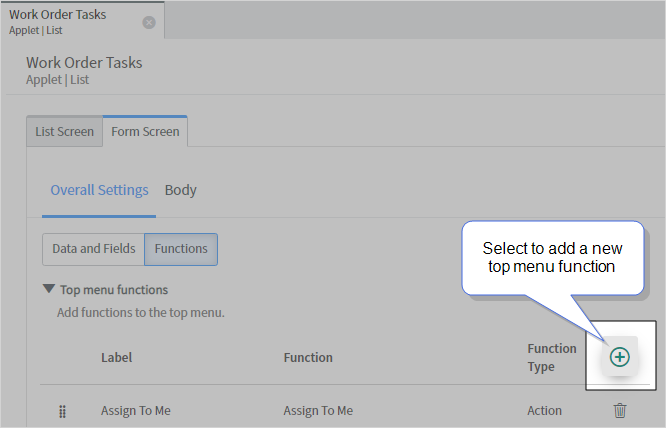
Result: A new Top menu function opens in edit mode.
-
Configure the Top menu function as follows:
-
Label—Enter Launch Maintenance Form. The ServiceNow Agent app displays this label.
-
Function—Select the Smart Button function you created, TrueContext_Preventive_Maintenance.
-
-
Select Save.
Result: You added a top menu function that field users can access from Work Order Tasks in the ServiceNow Agent app.
Info:The topic Associate a function with a location in the app in the ServiceNow documentation includes more details about how to add a top menu function.
TrueContext setup
Add ServiceNow to your TrueContext App‑to‑App allow list
The App‑to‑App call you entered in the Smart Button includes x-callback parameters. To use x-callback parameters![]() As part of an App‑to‑App call to the TrueContext app, x-callback parameters provide a way to launch and send data to the calling app. These include x-success, x-cancel, and x-error parameters., TrueContext requires that you add the ServiceNow Agent app to your App‑to‑App allow list.
As part of an App‑to‑App call to the TrueContext app, x-callback parameters provide a way to launch and send data to the calling app. These include x-success, x-cancel, and x-error parameters., TrueContext requires that you add the ServiceNow Agent app to your App‑to‑App allow list.
The default allow list settings depend on when your team was created:
-
For teams created before February 23, 2021, the allow list defaults to all callbacks allowed.
-
For teams created after February 23, 2021, the allow list defaults to no callbacks allowed.
Note:In both cases, we recommend that you configure a custom App‑to‑App allow list.
To add the ServiceNow Agent app to your App‑to‑App allow list:
-
Go to USERNAME > TEAM SETTINGS > Security > App-to-App Allow List > Update.
-
Add snagent:// to the list of allowed URLs.
-
Select Update to save your changes.
Create a Data Source
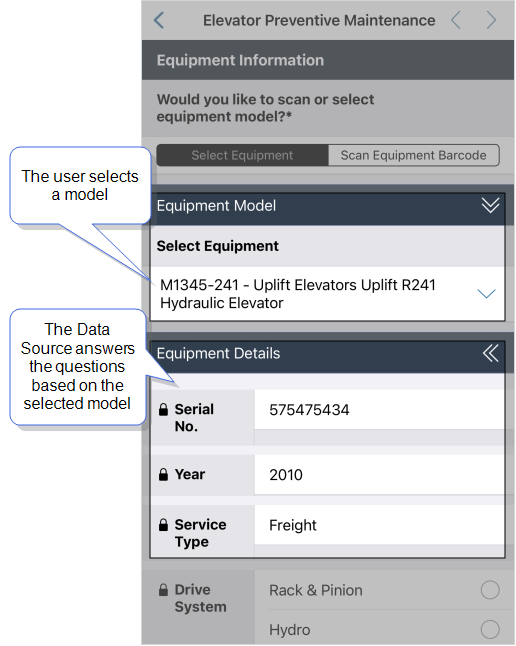
From the Smart Button, you can only prefill your form using data from the work order task record. If you want to get data from other ServiceNow tables, use a ServiceNow Table Data Source (Forms & Integrations > Data Sources > CREATE DATA SOURCE > ServiceNow Table).
In this example, when the user selects an Equipment Model, the form automatically populates additional details about the equipment.
Info:The topic Set up a ServiceNow Table Data Source describes how to configure a Data Source in more detail.
Set up your form questions
For questions that the ServiceNow Smart Button function App‑to‑App call sends data to, configure the corresponding unique identifiers. You can do this in a new or an existing form.
-
Create a new form or edit an existing form:
Go to Forms & Integrations > List Forms > Create Form or
Forms & Integrations > List Forms > FormName > Edit Form or Continue Editing.
-
For this example, set up questions that have the following Unique IDs:
-
WorkOrderTaskID
-
WorkOrderTaskNumber
-
ShortDescription
-
Description
-
AssetName
-
-
SAVE AND DEPLOY your form when you’re ready to make it available to your users.
Create a Data Destination
ServiceNow Table Data Destinations enable you to update your ServiceNow records using the data from submitted forms. When online field users submit the form, the Data Destination automatically updates the work order task record to include data from the submitted form.
Note:The ServiceNow Agent mobile app does not support custom callback parameters. The only way to send data back to ServiceNow from TrueContext is with a Data Destination. Users must be online to upload the submitted form. When the submitted form reaches the TrueContext cloud server, the Data Destination executes and sends the data and documents to ServiceNow.
-
Create a ServiceNow Table Data Destination (Forms & Integrations > Data Destinations > CREATE DATA DESTINATION > ServiceNow Table).
-
On the ServiceNow Table Fields tab:
-
Enter wm_task as the Name of the Table.
-
Map the ServiceNow fields you want to update as shown in the following example:
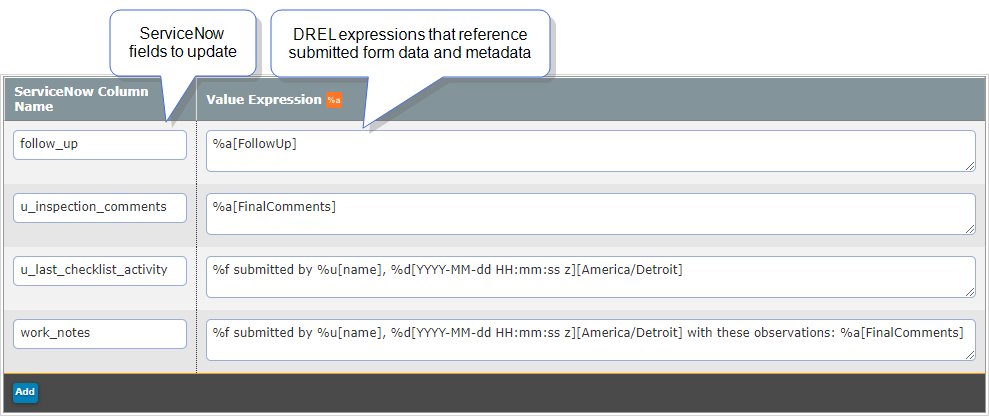
-
ServiceNow Column Name—enter the names of the ServiceNow columns to update.
-
Value Expression—enter a DREL expression to reference submitted form data or metadata.
-
-
-
Set up an Update Query that finds and updates the work order task record that has a matching number. The work order task number is a unique identifier for each work order task record.
In this example, the App‑to‑App call prefills the question that has the unique ID
WorkOrderTaskNumberwith the ServiceNow work order task number. Use this question to find the matching work order task record as shown in the following example.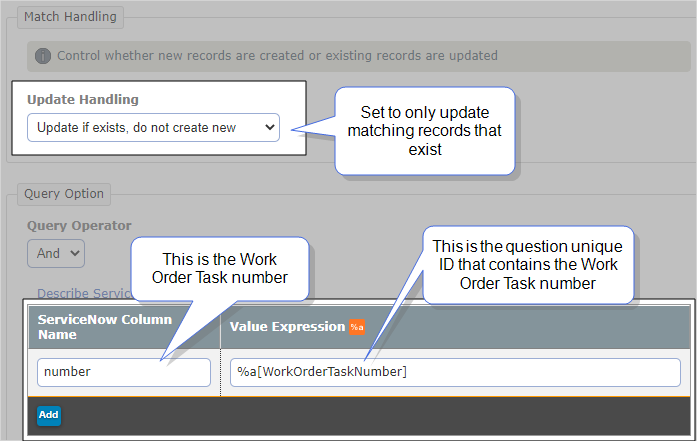
-
Select Create to save your Data Destination.
-
Add the Data Destination to your form.
-
Go to Forms & Integrations > List Forms > FormName > Edit Form or Continue Editing.
-
On the Destinations tab, select Add a Data Destination.
-
Select the ServiceNow destination that you set up in steps 1-4.
-
In the Documents to attach section, select a default document. For this recipe, select PDF (V2).
-
Save and Deploy the form.
-