Set up a ServiceNow Table Data Destination
A ServiceNow Table Data Destination![]() A Data Destination specifies where to send data from a submitted form. You can use Data Destinations to automate data sharing and storage, routing data to a specific service (such as email or cloud storage) in several different formats. sends data and documents from forms submitted in the TrueContext Mobile App to ServiceNow. You can map data from submitted forms to populate fields in your ServiceNow Table. You can also send documents and other file attachments that field users submitted. This topic describes how a ServiceNow Table Data Destination works and how to set it up.
A Data Destination specifies where to send data from a submitted form. You can use Data Destinations to automate data sharing and storage, routing data to a specific service (such as email or cloud storage) in several different formats. sends data and documents from forms submitted in the TrueContext Mobile App to ServiceNow. You can map data from submitted forms to populate fields in your ServiceNow Table. You can also send documents and other file attachments that field users submitted. This topic describes how a ServiceNow Table Data Destination works and how to set it up.
Available on the Intelligent and Elite tiers:
Contents
How a ServiceNow Table Data Destination works
A ServiceNow Table Data Destination sends submitted form data to ServiceNow. Depending on your configuration, you can use a ServiceNow Table Data Destination to:
-
Create or update records in a ServiceNow Table.
-
Populate fields with submitted form data.
-
Attach Documents that include submitted form data to a record.
-
Attach submitted files such as images or audio recordings to a record.
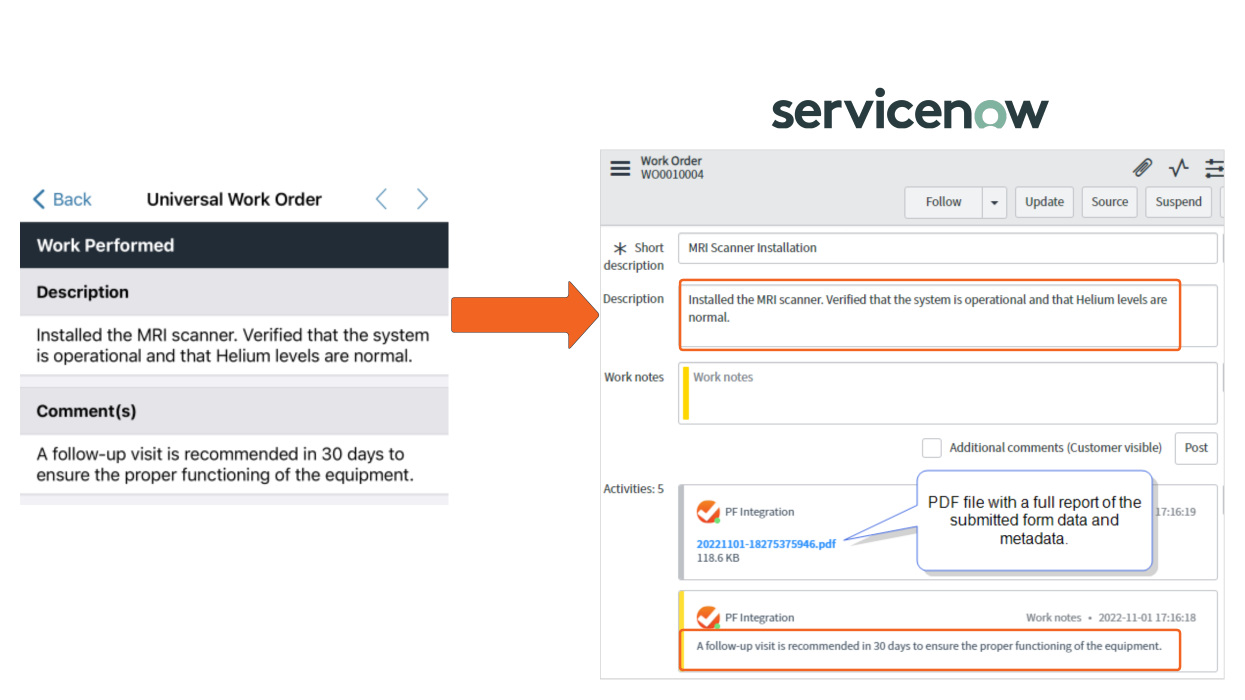
The following example shows how a ServiceNow Table Data Destination sends data from a submitted form to ServiceNow.
ServiceNow Table Data Destination configuration options
Map data to ServiceNow Tables
In TrueContext, you map submitted form data and metadata to your ServiceNow Table fields, as shown in the following example.
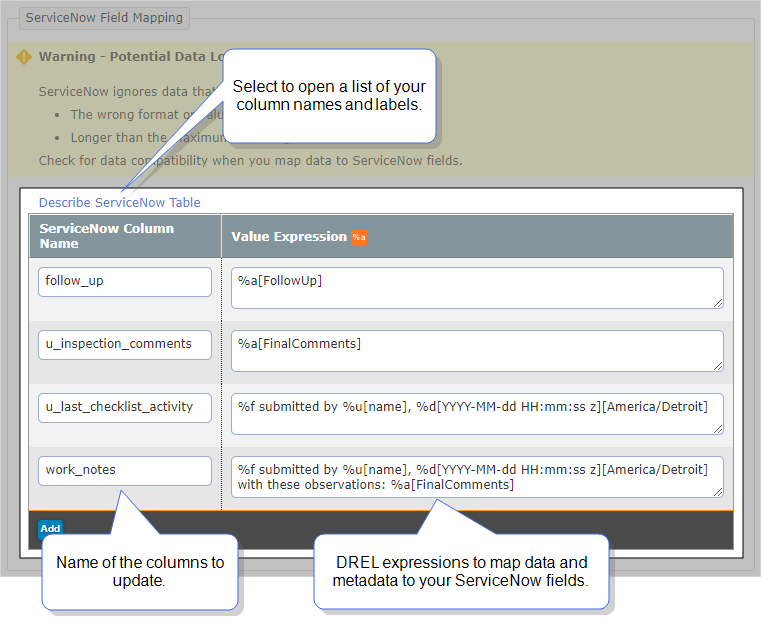
When a user submits a form, the Data Destination searches for the specified column. Then, the Data Destination populates the field using the data referenced by the DREL![]() Data Reference Expression Language (DREL) is used to get form data and metadata and add it to a string, such as dates, usernames, or answers to questions in forms. expression.
Data Reference Expression Language (DREL) is used to get form data and metadata and add it to a string, such as dates, usernames, or answers to questions in forms. expression.
Warning:ServiceNow ignores data that is not compatible with your Table fields. Make sure that you map data using the correct format, length, and values for the specified Column.
Create or update records in ServiceNow
You can configure your ServiceNow Table Data Destination to:
-
Always create new records.
-
Update a record if a query match exists. If not, create a new record.
-
Always update existing records.
The following example shows a Data Destination configured to update a record if a match exists. The record must have a Work Order Number that matches the answer to the question with the Unique ID![]() A Unique ID refers to the specific identifier of a question, form page, form section, or Data Destination. Unique IDs are used as reference points when pulling data for conditional logic, Analytics projects, Data Destinations, and Documents.
A Unique ID refers to the specific identifier of a question, form page, form section, or Data Destination. Unique IDs are used as reference points when pulling data for conditional logic, Analytics projects, Data Destinations, and Documents. Job ‑ Work Order #. If the system doesn’t find a match, it creates a new record.
![Example of an Update Query configuration. The Update Handling is set to Update if exists, otherwise create new. The Query operator is set to the default And. Under ServiceNow Column Name, the user entered "number". Under Value Expression, the user entered the DREL expression "%a[Job - Work Order #]"](../Resources/Images/ServiceNow/DataDestination_UpdateQuery.png)
Send attachments and files to ServiceNow
Submitted forms might include audio recordings, images, or uploaded files. You can choose to attach these to your ServiceNow record so you can access and review them from ServiceNow. This makes it easy to inspect the images in detail or access the audio recordings without having to sign in to TrueContext.
You can configure a ServiceNow Table Data Destination to attach the following file types to the record:
When the Data Destination executes, you can find these files in the Manage Attachments section of your ServiceNow record.
File attachments are collected when the user fills out the form.
Documents are generated when the system processes the submitted form. They include all the collected data and metadata.
Send all submitted form data as a Document
You can bundle all the data collected in the field—including images—into a single Document. Your Data Destination can save a copy of this document to a ServiceNow record as an attachment. This means that all details collected in TrueContext are available to review in ServiceNow.
After the Data Destination executes, you can find Documents in the Manage Attachments section of your ServiceNow record.
Info:You add Documents to your Data Destination when you add the Data Destination to your form.
Send data from Repeatable Sections
You can create or update multiple records in a ServiceNow Table using data from a Repeatable Section![]() A Repeatable Section is a subform that contains a set of related questions. The data captured is “repeating”, because the field user can complete the same subform more than once, which creates multiple entries.. Each entry in the Repeatable Section can create or update a different record in ServiceNow.
A Repeatable Section is a subform that contains a set of related questions. The data captured is “repeating”, because the field user can complete the same subform more than once, which creates multiple entries.. Each entry in the Repeatable Section can create or update a different record in ServiceNow.
Info:When you configure your destination, you can select the option to use it as a Repeatable Destination.
Store Response Outputs
When your Data Destination executes, it receives a response from ServiceNow. The response includes the sys_id of the record that the Data Destination created or updated.
You can set the Data Destination to store the response and then reference the sys_id in a subsequent Data Destination. This way, you can create a parent-child relationship between records.
Info:The topic Use Response Data Handling to Store Data Received from a Third-Party System describes how to store Response Outputs in more detail.
Prerequisites to configure a ServiceNow Table Data Destination
-
You must be either:
-
A TrueContext Admin user.
-
A member of a FormSpace
 FormSpaces are where forms are stored and organized in the TrueContext Web Portal. A TrueContext Team may have multiple FormSpaces, depending on their needs. Admins can set FormSpace permissions to control which users have access to the forms in that FormSpace. group with Can Create permissions.
-
-
Either a ServiceNow Connection already exists in your FormSpace, or you are a TrueContext Admin user and can create a ServiceNow Connection or modify an existing one to make it available in your FormSpace.
-
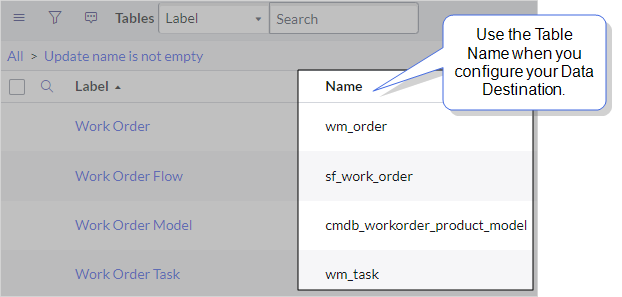
Note the Name (not the label) of the ServiceNow Table to map data to. To find the Table Name in ServiceNow, go to System Definition > Tables. The following example shows Table Names in ServiceNow:
Steps to configure a ServiceNow Table Data Destination
-
Go to Forms & Integrations > Data Destinations > CREATE DATA DESTINATION > ServiceNow Table.
Result: The system opens a new ServiceNow Table Data Destination in edit mode.
-
Enter a Name and a Destination Unique Identifier.
-
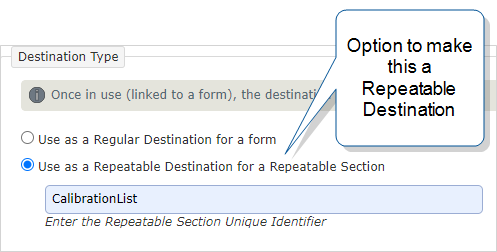
Do you want to send data to a ServiceNow table from a Repeatable Section?
-
If yes, select Use as a Repeatable Destination for a Repeatable Section, and then enter the Repeatable Section Unique Identifier.
Tip:Ensure that you enter the correct ID. Remember, if you change a section unique ID, the linked destination does not automatically update.
-
If no, select Use as a Regular Destination for a form.
Note:Once you link the destination to a form, you can’t change the destination type.
-
-
On the Filtering tab, configure the conditions that each submitted form must meet for the Data Destination to execute.
Info:Refer to the following topics for details about Data Destination filtering: -
On the Connection tab, select an existing ServiceNow Connection or create a new one.
Tip:If the system doesn’t list the Connection you want to use, make sure it’s available in the same FormSpace.
-
On the ServiceNow Table Fields tab:
-
Enter the Name of the Table to update.
-
Map form data to specific columns in your Table.
Warning:ServiceNow ignores data that is not compatible with your Table fields. Make sure that you map data using the correct format, length, and values for the specified Column.
-
ServiceNow Column Name—enter column names as shown in your ServiceNow tables.
Tip:Select Describe ServiceNow Table to open a list of your Table Column Labels and Column Names. Make sure to include the ServiceNow Column Name (not the Label) in your field mapping configuration.
-
Value Expression—enter a DREL expression to reference submitted form data or metadata.
Note:Consider the following:Column Names are case sensitive.
You can only enter each Column Name once. If you need to map more than one answer to a column, enter multiple DREL expressions in the Value field.
ServiceNow uses the Database Value to update fields. Send the correct data to ServiceNow by configuring lookup questions that use the Database Value as the answer.
-
-
-
On the Update Query tab, specify which rows to update. The following table describes how to configure your Data Destination to create or update records.
Update Handling Selection Additional Configuration Required Result Never update, always create new You must map data to ServiceNow fields. When the destination executes, the system creates a new record. Update if exists, otherwise create new You must configure Query Options to specify which record to update.
-
Under ServiceNow Column Name, enter column names as shown in your ServiceNow tables.
-
Under Value Expression, enter a DREL expression to reference submitted form data or metadata.
Tip:Select Describe ServiceNow Table to open a list of your Table Column Labels and Column Names.
If you enter more than one query, select a Query Operator:
-
Select And to match all queries.
-
Select Or to match at least one query.
Note:If you select And, you can’t include the same Column Name more than once.
When the destination executes, the system searches for a matching record. If the system doesn’t find a match, it creates a new record. Update if exists, do not create new When the destination executes, the system searches for a matching record. If the system doesn’t find a match, the Data Destination fails. Note:The Data Destination fails when:The system finds multiple matching records.
The system finds no matching records, and the destination is set to only update records.
-
-
On the Attachments tab, select which file types that users submit in forms you want to attach to your ServiceNow records.
-
Go to the Response Configuration tab. Do you want to store response outputs?
-
If yes, select Store all response outputs for use in later destinations.
-
If no, select Don’t store response outputs.
Tip:If you want to make this destination a parent of a child destination, select the option to store response outputs. When you configure the child destination, you can use the
%oDREL Data Reference Expression Language (DREL) is used to get form data and metadata and add it to a string, such as dates, usernames, or answers to questions in forms. property to reference the stored output. -
-
Create your Data Destination.
Tip:Remember that you need to link the Data Destination to each form that you want to trigger this destination.