Create an Incident Work Order in Microsoft Dynamics
This recipe shows you how to use an On-Demand HTTP GET Data Source to look up an existing work order. You then combine it with a Webhook![]() A Webhook is an HTTP endpoint that an external system exposes to receive data automatically. You can configure an HTTP Data Destination to send form submission data or Documents to a third-party system's Webhook URL, such as posting a notification to Slack when a user submits a form. question to post a new related incident work order back to Microsoft Dynamics.
A Webhook is an HTTP endpoint that an external system exposes to receive data automatically. You can configure an HTTP Data Destination to send form submission data or Documents to a third-party system's Webhook URL, such as posting a notification to Slack when a user submits a form. question to post a new related incident work order back to Microsoft Dynamics.
Available on the Elite tier:
Contents
Use case
A technician is working on a scheduled work order and records gas readings and visual checks for hydrocarbon releases. If the readings exceed a regulatory threshold or there is a visible release, the technician must declare a reportable incident immediately. This triggers a follow-up work order in Microsoft Dynamics for the incident investigation.
This recipe shows how to configure the form, Data Source![]() Data sources, also known as "Lookups", are external sources of data that you upload or connect to TrueContext. You can reference this data in a form to populate answers or answer options. Data sources save typing, reduce errors, and make it easy to provide mobile users with only the relevant, most current data., and Webhook. The technician can then select the original work order, capture incident details, and create a linked incident work order in Microsoft Dynamics from a single TrueContext form.
Data sources, also known as "Lookups", are external sources of data that you upload or connect to TrueContext. You can reference this data in a form to populate answers or answer options. Data sources save typing, reduce errors, and make it easy to provide mobile users with only the relevant, most current data., and Webhook. The technician can then select the original work order, capture incident details, and create a linked incident work order in Microsoft Dynamics from a single TrueContext form.
Prerequisites
- A Microsoft Dynamics 365 Field Service environment with work orders, service accounts, customer assets, and incident types configured.
- A Microsoft Dynamics API user or app registration with permission to read and create work orders or incidents by using the Web API.
- A TrueContext HTTP Connection for Microsoft Dynamics, including authentication and the base Web API URL.
High-level process
Setting up this recipe requires completing the following steps:
1. Create a Dataverse Connection
Create a Dataverse Connection that TrueContext can use to authenticate to Microsoft Dynamics and send Data Source and Webhook requests.
Set Up an HTTP Connection to Microsoft Dataverse.
2. Configure the Microsoft Dynamics HTTP GET Data Source
The On-DemandData Source lets the technician select an existing Microsoft Dynamics work order and pulls related values into hidden questions on the form.
| Step | Action | ||||||
|---|---|---|---|---|---|---|---|
| 1 | Go to Forms & Integrations > Data Sources > Create Data Source > HTTP GET Data Source. | ||||||
| 2 | On the Name tab, enter a name, then select Enable on-demand data retrieval on your connected devices. | ||||||
| 3 | On the Data Retrieval and Format tab, select JSON for Input Configuration > Data Format. | ||||||
| 4 | On the Connection tab, select the Dataverse Connection you created. | ||||||
| 5 | Set the URL Path to /api/data/v{{apiVersion}}/msdyn_workorders. Add an apiVersion parameter for your Microsoft Dynamics API version. In this recipe, we use API version = 9.2. |
||||||
| 6 | Add the following Query-String Argument to return the Dynamics work order columns you want to use in the form:
|
||||||
| 7 | Add the following HTTP Headers:
|
Info:Learn more by reading Set Up On-Demand Data Sources.
3. Create the Microsoft Dynamics POST Webhook
Create a FormSpace![]() FormSpaces are where forms are stored and organized in the TrueContext Web Portal. A TrueContext Team may have multiple FormSpaces, depending on their needs. Admins can set FormSpace permissions to control which users have access to the forms in that FormSpace.-level POST webhook in the web portal. This webhook defines the API call that creates a new incident work order in the Microsoft Dynamics
FormSpaces are where forms are stored and organized in the TrueContext Web Portal. A TrueContext Team may have multiple FormSpaces, depending on their needs. Admins can set FormSpace permissions to control which users have access to the forms in that FormSpace.-level POST webhook in the web portal. This webhook defines the API call that creates a new incident work order in the Microsoft Dynamics msdyn_workorders table.
| Step | Action | ||||||
|---|---|---|---|---|---|---|---|
| 1 | Go to Forms & Integrations > Webhooks > CREATE WEBHOOK > HTTP Webhook. | ||||||
| 2 | On the Name tab, enter a name for the webhook, for example Dynamics POST. | ||||||
| 3 | On the Connection tab, select the Dataverse Connection you created. | ||||||
| 4 | In Request Configuration, set HTTP Method to POST and set URL Path to /api/data/v9.2/msdyn_workorders. Leave Query Parameters empty. |
||||||
| 5 | Add the following HTTP headers:
Note:The |
||||||
| 6 | Set Body Format to Raw and enter the following in Raw Body Template:
{
	"msdyn_serviceaccount@odata.bind": "/accounts({{service_account_guid}})",
	"msdyn_customerasset@odata.bind": "/msdyn_customerassets({{customer_asset_guid}})",
	"msdyn_primaryincidenttype@odata.bind": "/msdyn_incidenttypes({{incident_type_guid}})",
	"msdyn_systemstatus": 690970000
}Note:The double-brace syntax ( |
||||||
| 7 |
In Test Request, confirm that the Parameters section shows the three parameters derived from the body template:
Enter sample GUID values for each parameter and select Test Webhook to confirm the connection and request are configured correctly.
|
||||||
| 8 | Select Create to save the webhook.
Result: The Dynamics POST webhook is now available to add to forms in your FormSpace. |
Info:Learn more by reading Set Up a Webhook.
4. Configure the Regulatory Incident Declaration form
The form uses one page for selecting and pre-populating work order info, and another for the incident checklist and follow-up incident work order details.
| Step | Action |
|---|---|
| 1 | Create a page named Work Order and section named Information.
|
| 2 | Add a question, API version, a hidden Text Field question with a default value of 9.2, used as a parameter for the Microsoft Dynamics HTTP GET Data Source. |
| 3 | Add a Select Work Order dropdown question. |
| 4 | In Select Data Source, choose the On-Demand HTTP GET Data Source you created in the previous section. |
| 5 | In the Data Source configuration section, set the Column value displayed on device to msdyn_autonumbering. |
| 6 |
Add Text Field questions to store the following values returned by the Dynamics Data Source:
Note:Add Hidden on Device and Read only Restrictions to ID questions. Note:If question labels are specified, make sure to use them exactly as written, so they match the response body. |
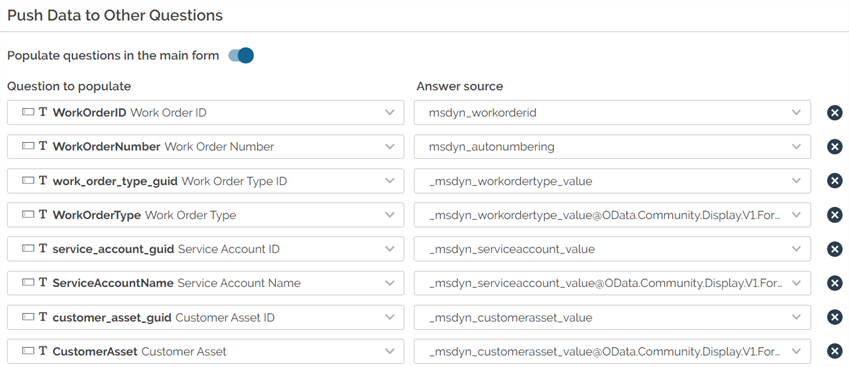
| 7 |
Return to the Select Data Source question form step 3. In the Push Data to Other Questions section, select the Work Order Text Field questions we added in step 6.
|
| 8 | Create a page named Checklist and add the following questions:
|
| 9 |
Create a manual Incident Type GUID Mapper Data source, with two columns, Incident Type, and Incident Type GUID, fill this Data Source with your Dynamic Incident Type information. Note:An alternative is to execute a separate GET request to Dynamics, to return the GUID for the Incident Type selected in the form. |
| 10 | Add a section named Incident Report to the Checklist page and add the following questions:
|
5. Configure the Microsoft Dynamics Webhook question
The Webhook question referenced in the previous steps sends a POST request to Microsoft Dynamics, using the incident context from the form.
| Step | Section | Action |
|---|---|---|
| 1 | Webhook Configuration | Select the Dynamics POST Webhook you previously created. |
| 2 | For Response usage, select both boxes: the first displays the answer inline in the Webhook question, and the second identifies the Webhook as using the response to route to other questions on the form. | |
| 3 | Set the Webhook trigger to Manual. The technician selects Run Action on the Webhook question to create the incident work order. | |
| 4 | Add parameters that map to the corresponding form questions, for example:
|
|
| 5 | Answer Definition | Select JSON as the Response Type. |
| 6 | Select Entire Response for the Answer Content. | |
| 7 | Routing Configuration | Do not select Require user confirmation before populating other questions. |
| 8 | Select JMESPath for Extract answer with. Select the Incident Work Order Number question and use msdyn_name for the JMESPath Expression. |
Info:Learn more about setting up a Webhook, in Set Up a Webhook.
6. Configure Conditional Logic rules for the form
Conditional Logic controls when the confirmation and incident questions appear, and which values are copied from the existing to the new work order.
| Step | Trigger | Action |
|---|---|---|
| 1 | Show additional questions | In the Logic section, create a trigger named Show additional questions. |
| 2 |
Set the condition to:
|
|
| 3 | Add the following actions:
|
|
| 4 | Incident Reported? | Create a second trigger named Incident Reported?. |
| 5 | Set the condition to: qIncidentDeclared = Yes. |
|
| 6 | Add the following actions:
|
Info:Learn more by reading Building Conditional Logic Rules
7. Test this recipe end-to-end
Complete the following steps to verify end-to-end that the form, Data Source, Conditional Logic, and Webhook work together correctly.
| Step | Action |
|---|---|
| 1 |
Deploy the form to a test user and sync the mobile app so the latest form and Data Source configurations are available. |
| 2 |
Open the form, select a work order from the Data Source, and verify that the related questions are populated correctly. Result: The work order context questions populate with the corresponding values from Microsoft Dynamics. |
| 3 |
Enter gas readings above the regulatory threshold or select Yes for Visible Hydrocarbon Release, and confirm that the incident declaration and Incident Report section appear as expected. Result: The incident declaration question and the Incident Report section become visible. |
| 4 |
Confirm a reportable incident and select Run Action on the Webhook question to create the incident work order. Verify that a new incident work order is created in Microsoft Dynamics with the correct incident type. Result: A new incident work order is created in Microsoft Dynamics with the correct incident type and linked parent work order. |
| 5 |
Confirm that the identifier for the new work order is parsed from the Webhook response and displayed within the form. Result: The Incident Work Order Number field displays the new work order number returned by Microsoft Dynamics. |