Create and Manage Data Sources
Data Sources![]() Data sources, also known as "Lookups", are external sources of data that you upload or connect to TrueContext. You can reference this data in a form to populate answers or answer options. Data sources save typing, reduce errors, and make it easy to provide mobile users with only the relevant, most current data., or “lookups”, are external sources of data that are uploaded or connected to TrueContext. This topic describes how to add a Data Source
Data sources, also known as "Lookups", are external sources of data that you upload or connect to TrueContext. You can reference this data in a form to populate answers or answer options. Data sources save typing, reduce errors, and make it easy to provide mobile users with only the relevant, most current data., or “lookups”, are external sources of data that are uploaded or connected to TrueContext. This topic describes how to add a Data Source![]() Data sources, also known as "Lookups", are external sources of data that you upload or connect to TrueContext. You can reference this data in a form to populate answers or answer options. Data sources save typing, reduce errors, and make it easy to provide mobile users with only the relevant, most current data. to your FormSpace
Data sources, also known as "Lookups", are external sources of data that you upload or connect to TrueContext. You can reference this data in a form to populate answers or answer options. Data sources save typing, reduce errors, and make it easy to provide mobile users with only the relevant, most current data. to your FormSpace![]() FormSpaces are where forms are stored and organized in the TrueContext Web Portal. A TrueContext Team may have multiple FormSpaces, depending on their needs. Admins can set FormSpace permissions to control which users have access to the forms in that FormSpace. and how to view and update the data in the TrueContext system.
FormSpaces are where forms are stored and organized in the TrueContext Web Portal. A TrueContext Team may have multiple FormSpaces, depending on their needs. Admins can set FormSpace permissions to control which users have access to the forms in that FormSpace. and how to view and update the data in the TrueContext system.
Available on all tiers:
Contents
What are Data Sources?
Data Sources are external sources of data—such as lookup tables, spreadsheets, or data from integrated systems—that you can upload or connect to TrueContext. We store Data Sources as tables (rows and columns) in the TrueContext system. Once you set up a Data Source, you can use the data for questions in your forms.
For example, you might store equipment data in an online spreadsheet or asset management system. You can use a Data Source to pull that data into TrueContext and then reference it in a Dropdown, Radio Button, or Multiselect question, making it easier for your users to enter data.
View Data Source details
You can navigate to a Data Source in different ways:
-
-
From the Forms & Integrations menu, navigate to the form you want to set up.
-
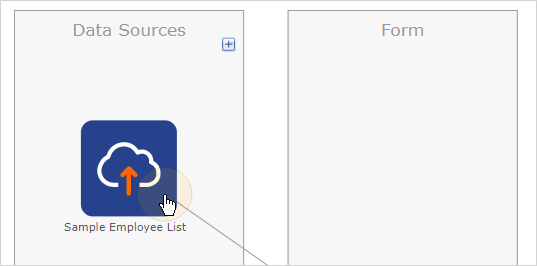
On the Form Diagram, hover over the icon for a Data Source used in the form.
-
Scroll to see the Properties and the Referencing Questions.
-
Select the Data Source if you want to make any changes.
-
-
Main menu:
Go to Forms & Integrations > Data Sources > DataSourceName.
Create a Data Source
Info:Data source size limits apply when you upload or fetch a Data Source. The topic Best Practices for Data Source Size describes these limits in more detail. If you’re an Enterprise customer, we recommend that you follow best practices for Data Source size before you request a size limit increase.
-
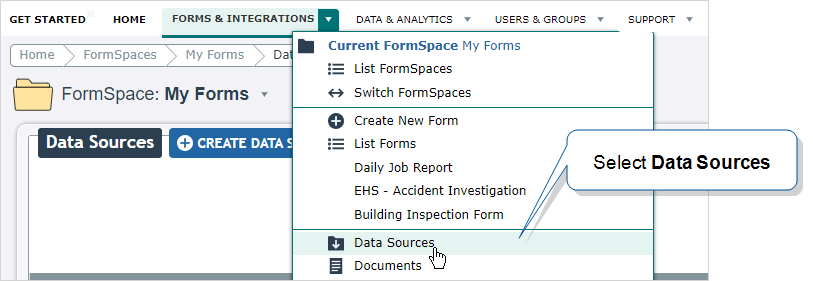
Select Forms & Integrations.
-
If the team has multiple FormSpaces, confirm that you are in the correct FormSpace, and then select Data Sources.
-
Select Create Data Source.

-
There are different types of Data Sources available. Choose the one that best meets your requirements.
Manage a Data Source
View the Data Source details
-
Select Forms & Integrations, and then select Data Sources.
Note: If you don’t see the Data Source in the list, confirm that you’re in the correct FormSpace.
-
Select a Data Source from the list.
Result: The system displays the Data Source details.
-
Check the top left of the page for a summary of the Data Source details.

-
Last Content Update is the date and time that the content from the Data Source changed. This could be by manual upload or a dynamic Data Source “fetch”.
Note:This is the last time the actual content of the Data Source changed, not the last time someone made changes to the Data Source configuration. For dynamic Data Sources, the update time only changes if there were actual changes to the data, regardless of when a fetch completed.
-
Number of rows and cells in the Data Source, along with the size limits
Info:Data source size limits apply when you upload or fetch a Data Source. The topic Best Practices for Data Source Size describes these limits in more detail. If you’re an Enterprise customer, we recommend that you follow best practices for Data Source size before you request a size limit increase.
-
Number of forms that reference the Data Source
-
Number of Analytics Projects that reference the Data Source
-
Number of partitions applied (Enterprise-tier only)
-
-
Check the bottom left of the page for a list of the column headers from the source data.

-
Columns with a check mark beside them are used in one or more forms.
-
Columns with an “x” beside them are not used in any forms.
-
-
If you change the columns in your source data, you can delete or “merge” the columns in TrueContext.
-
To delete an unused column from the list, hover over the column and select the Delete option.
Note:If the column still exists in your source data, and anything in your source data changes, it’s re-added when you upload or fetch the changed data.
Note: You can’t delete a column from a Data Source if any form version in the FormSpace uses it, whether the form is active or archived.
-
To point a used or unused column to a different column in the Data Source, hover over the column and select the Merge option.
Tip:You can use the Merge option to replace one column with another if your source data changes.For example:
Your source data has a new column called “Customer Information”.
Questions in your forms already use the column “Customer”.
You can “merge” the “Customer Information” column with the “Customer” column.
Your form questions now reference the new column data, and you don’t have to edit your forms.
-
Download the Data Source contents
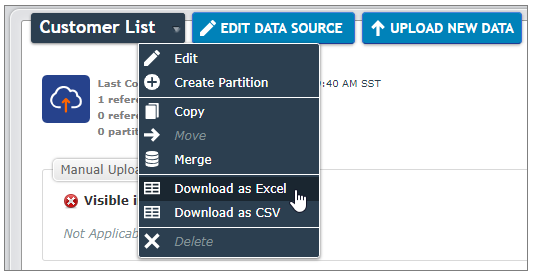
To view the contents of the Data Source, download the Data Source as a CSV or Excel file.
-
Hover over the arrow next to the Data Source name, and then select one of the download options.
-
Open the file with a compatible program.
Upload or Fetch new data
To change the content of Data Sources in TrueContext, you upload or fetch data from your source data. You can’t edit the content directly in TrueContext.
Info:Data source size limits apply when you upload or fetch a Data Source. The topic Best Practices for Data Source Size describes these limits in more detail. If you’re an Enterprise customer, we recommend that you follow best practices for Data Source size before you request a size limit increase.
Upload data manually
For Manual Upload Data Sources, upload the changed data to the Data Source within the TrueContext Web Portal![]() The TrueContext Web Portal is a web application used to manage security settings, forms, FormSpaces, other users, Data Sources, and Data Destinations..
The TrueContext Web Portal is a web application used to manage security settings, forms, FormSpaces, other users, Data Sources, and Data Destinations..
-
Navigate to the Data Source that you want to update.
-
Select Upload New Data.

-
On the next page, select the file that you want to upload, and then select Update.
Fetch data from a dynamic Data Source
For dynamic Data Sources, you update the files in your external system. TrueContext connects to the source data and can fetch it on a schedule or manually from the Web Portal.
Tip:A manual fetch is helpful when you've made changes to the Data Source that you want to test.
-
Navigate to the Data Source that you want to update.
-
Select Fetch New Data.

To edit the Fetch Frequency:
-
Go to your Data Source and select EDIT DATA SOURCE.
-
On the Data Retrieval and Format tab, select a Fetch Frequency. The default setting is Hourly.
Info:When the Data Source is set to fetch hourly, the system assigns a random minute of the hour for each fetch. For example, a Data Source will automatically fetch at 4:29, 5:29, etc. This prevents the system from having a long queue of Data Sources that fetch at the same time. The topic Data Sources Overview: How the system schedules Data Source fetches describes the fetch frequencies in more detail.
Copy a Data Source
Copying a Data Source creates a duplicate of the Data Source, which you can use to make the same Data Source available to forms across different FormSpaces.
Tip:You can also move a Data Source from one FormSpace to another.
-
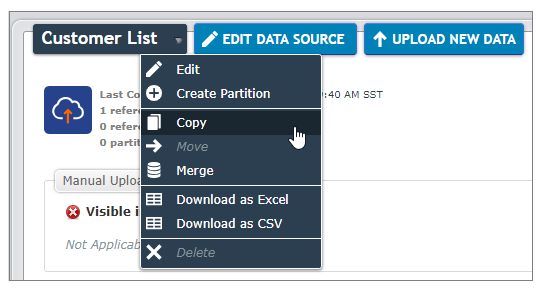
Navigate to the Data Source that you want to duplicate.
-
Select Copy.
-
When prompted, enter information in the required fields.
-
Target FormSpace—This is where you want to place the copy.
-
Target Data Source Name—This is what you'd like to name the copy.
-
Move a Data Source
You can move a Data Source from one FormSpace to another when the Data Source isn’t referenced by any forms.
-
Navigate to the Data Source that you want to move.
-
Select Move.
-
When prompted, enter information in the required fields.
-
Target FormSpace—This is the FormSpace you want to move the Data Source to.
-
Target Data Source Name—This is the new Data Source name in the target FormSpace.
-
Merge a Data Source
Merge allows you to point forms to a new Data Source without editing the forms. This is useful if you have multiple forms referencing different Data Sources that you have consolidated. You can also use the Merge function to move from one data connection type to another. For example, you could move to a Google Sheets Data Source instead of using manual data-entry.
-
Navigate to Forms & Integrations > Data Sources.
-
Select the Data Source that you want to merge. This should be the old Data Source, not the target.
Note: If the desired Data Source is not listed, confirm that you are in the correct FormSpace.
-
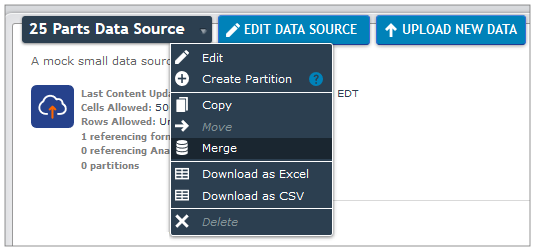
Hover over the down arrow next to the Data Source name, and then select Merge.
Warning:The selected Data Source will be permanently deleted after the merge in step 6. You can’t undo this action.
-
From the Data Source to merge into list, select the target Data Source.
-
In the Keep the data from section, select the Data Source that contains the data you want to keep.
-
Select Merge.
Result: Any forms that pointed to the old Data Source now point to the target.
Delete a Data Source
You can delete a Data Source from a FormSpace when no forms currently reference that Data Source.
Note:You can’t delete a Data Source if any form version in the FormSpace uses it, whether the form is active or archived.
Warning: Deleting a Data Source is permanent. You can’t recover the data from the TrueContext server.
-
Navigate to Forms & Integrations > Data Sources.
-
Select the Data Source that you want to delete.
Note: If the desired Data Source is not listed, confirm that you are in the correct FormSpace.
-
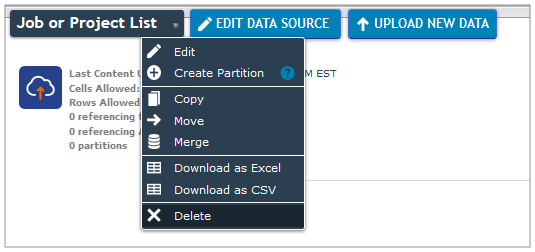
Hover over the down arrow next to the Data Source name, and then select Delete.
-
Confirm that you want to delete the Data Source.