Set Up a Multi-Language Form
With the Multi-Language feature, you can create a single form and provide it to your field users in multiple languages. It’s simple to set up a Multi-Language Form![]() A Multi-Language Form is a form that’s set up with different translations so that field users can choose their preferred language. Translated content includes page and section names, question text, help text, and other form content. and an associated output Document. Simply download Excel files that contain the strings to translate, add translations, upload the files, and activate the languages you want users to fill out the form in. You can generate a Multi-Language output document in any language configured in the form, regardless of whether the language is set as Active for form completion.
A Multi-Language Form is a form that’s set up with different translations so that field users can choose their preferred language. Translated content includes page and section names, question text, help text, and other form content. and an associated output Document. Simply download Excel files that contain the strings to translate, add translations, upload the files, and activate the languages you want users to fill out the form in. You can generate a Multi-Language output document in any language configured in the form, regardless of whether the language is set as Active for form completion.
Tip:You can set up an existing form with multiple languages—you don’t have to create a new form.
Available on the Elite tier:
Contents
Prerequisites
-
You must be either a TrueContext Admin user or a member of a FormSpace
 FormSpaces are where forms are stored and organized in the TrueContext Web Portal. A TrueContext Team may have multiple FormSpaces, depending on their needs. Admins can set FormSpace permissions to control which users have access to the forms in that FormSpace. group with Can Create permissions.
Steps to set up a Multi-Language Form
-
From the Forms & Integrations menu, create or edit a Mobile App form.
-
To create a new form:
Forms & Integrations > Create New Form > Build a Mobile Form
Enter a name and description, and then save the form.
-
To edit a form:
Forms & Integrations > List Forms > FormName > Edit Form
where FormName is the form that you want to edit.
Tip:You can choose a new or existing form; you don’t have to build a new one.
-
-
Go to Settings > Form Information.
-
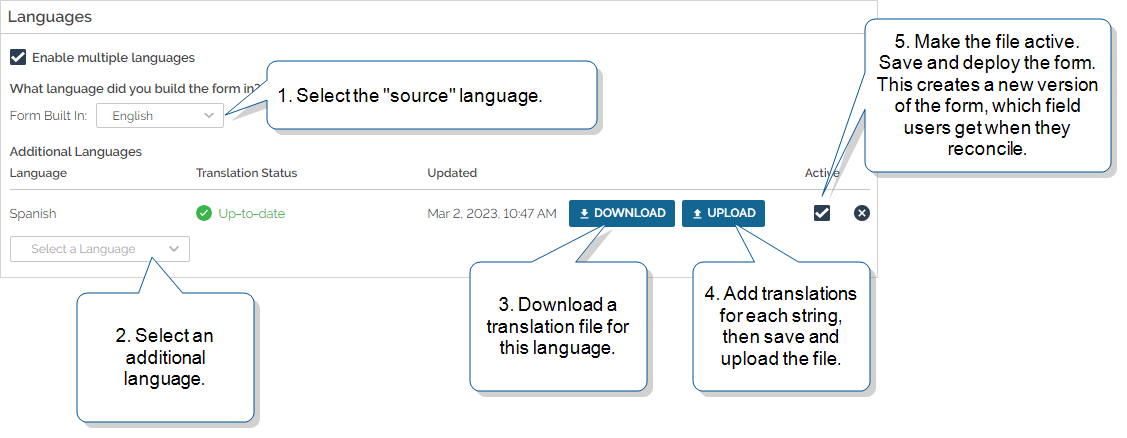
In the Languages section, select Enable multiple languages.
Result: The Languages section expands to display additional setup options.
-
Select the language that the form is built in (the source language). The system uses this language to generate the strings for translation.
Tip:The source language is also the fallback language for any missing translations.
-
In the Additional Languages section, select a language from the list.
-
Select Download to get an Excel file that contains the translation strings for all translatable
Result: The system generates a translation file (.xlsx) that contains all translatable text in the
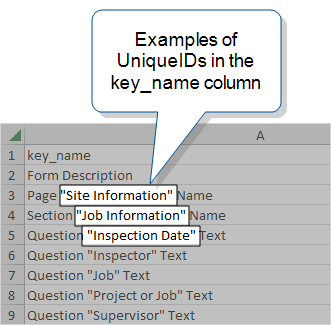
The translation file has the structure shown in the following illustration.
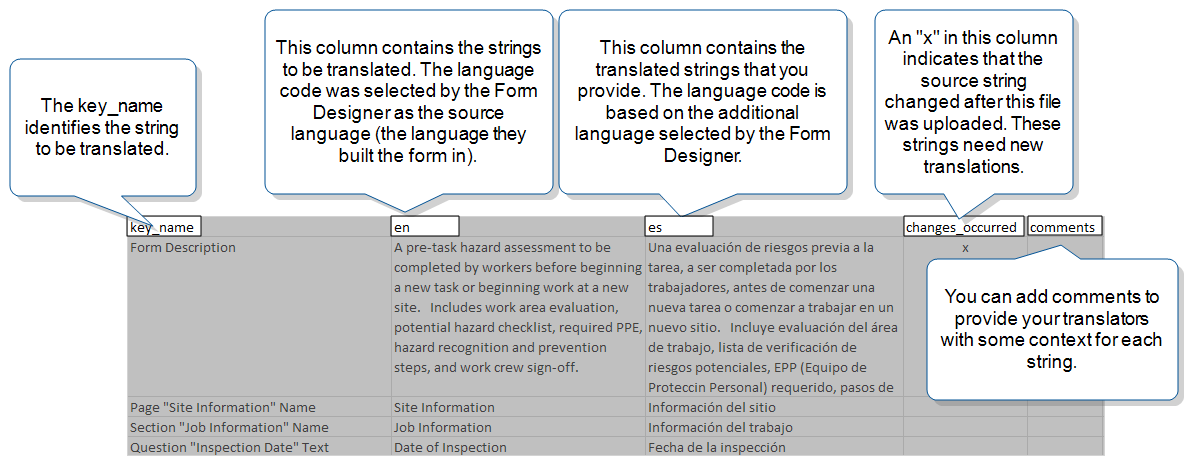
Info:The topic How Multi-Language Translation Files Work: Translation file details provides guidelines and tips for working with the translation files.
-
Add comments for your translator (optional) to provide more information about a translation string. For example, you could provide the translator with synonyms to make the meaning clear. Send the file for translation.
-
Once the translation file is complete, Upload the file. To make the
Note:To upload the translation files successfully, you must keep all five column headings exactly the same as in the downloaded file.
-
Result: The system creates a new form version.
Note: Users must reconcile to get the new form version.Test your output documents to make sure the results are what you expected.
Info:You can set up a PDF, Microsoft Word, or HTML output document for translated content and link it to the form. The topic Steps to Set Up Translations for a Multi-Language Document describes this procedure in detail. You can select any configured language for output documents, even if it is not marked 'Active' for form completion.
Options-based question translations
An options-based question is a question that displays a list of options as possible answers. The list can come from a Data Source![]() Data sources, also known as "Lookups", are external sources of data that you upload or connect to TrueContext. You can reference this data in a form to populate answers or answer options. Data sources save typing, reduce errors, and make it easy to provide mobile users with only the relevant, most current data., or you can manually define the list. We use the term lookup to describe a question that gets a list of options from a Data Source.
Data sources, also known as "Lookups", are external sources of data that you upload or connect to TrueContext. You can reference this data in a form to populate answers or answer options. Data sources save typing, reduce errors, and make it easy to provide mobile users with only the relevant, most current data., or you can manually define the list. We use the term lookup to describe a question that gets a list of options from a Data Source.
Manually-defined options
When you set up an options-based question, you can specify different values for the Value submitted to server and the Text displayed on device. You can translate the display value (but not the server value). When a field user, dispatch, or App‑to‑App call selects a language, the form shows the translated display value.
-
For any Documents that you link to the form, you can choose whether to show the display or server value.
-
You can also use the DREL
[display]property to reference the display value instead of the server value:%a[QuestionUniqueID][display] -
To show the display value in a Repeatable Section Summary Table on the device:
-
Add the question to the Summary Table.
-
Set the Answer value to display to Display Value.
-
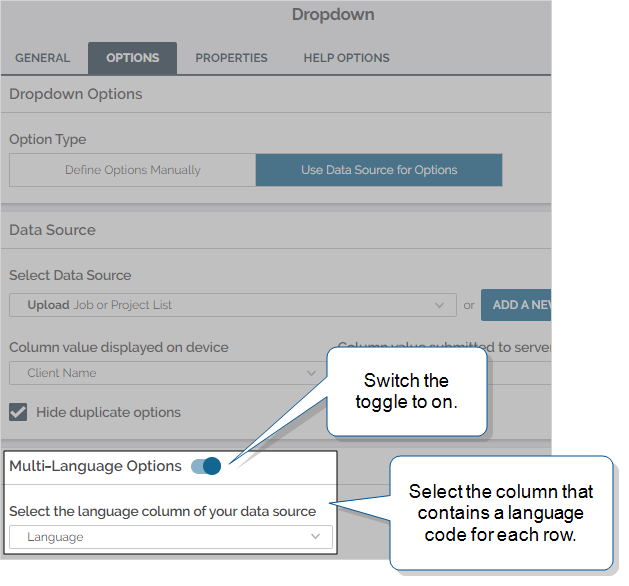
Data Source options
A Data Source provides a list of options for a lookup question. You can set up the lookup question to display translated values in the form.
Info:We store Data Sources![]() Data sources, also known as "Lookups", are external sources of data that you upload or connect to TrueContext. You can reference this data in a form to populate answers or answer options. Data sources save typing, reduce errors, and make it easy to provide mobile users with only the relevant, most current data. as tables (rows and columns) in the TrueContext system. To set up translated values in your Data Source, you must have a column that contains a language code for each row. The topic Data Source Translations describes in detail how to set up translations in a Data Source.
Data sources, also known as "Lookups", are external sources of data that you upload or connect to TrueContext. You can reference this data in a form to populate answers or answer options. Data sources save typing, reduce errors, and make it easy to provide mobile users with only the relevant, most current data. as tables (rows and columns) in the TrueContext system. To set up translated values in your Data Source, you must have a column that contains a language code for each row. The topic Data Source Translations describes in detail how to set up translations in a Data Source.
The following example describes how to set up a lookup question for translations.
When the user, dispatch, or App‑to‑App call selects a language, the form displays the translated values from the Data Source.
Tip:You can translate both the display and the data (server) values in your Data Source. The translated values are sent to the server when the user submits the form.
Conditional logic rules that use selected language
You can set up a Conditional Logic rule that’s based on the selected language.
The following example describes how to set up a condition that uses a selected language.
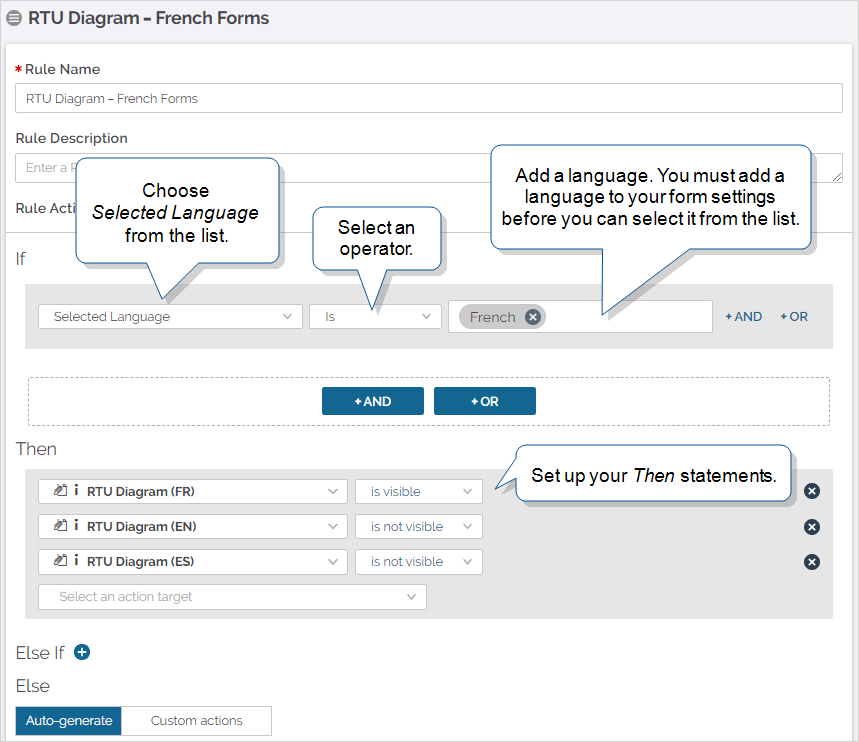
Note:When you build the condition, you can only select languages that you set up in the form settings.
In this example, the Form Designer has an HVAC diagram with labels in different languages. They want to show only the diagram that has labels in the selected language and hide the other translations from the user. They create other rules to do the same for the English and Spanish diagrams.
Info:If you want to include other languages as “Or” conditions, you can select more than one language in the same condition. The topic Building Conditional Logic Rules describes in detail how to set up condition sets that use “And” and “Or”.