Steps to Set Up Translations for a Multi-Language Document
A Multi-Language Document![]() A Multi-Language Document is an output Document connected to a Multi-Language Form. You can generate the Document in any of the languages configured in the form. The Document uses the form's translation files to translate headings, question text, and other content. is an output document that's linked to a Multi-Language Form
A Multi-Language Document is an output Document connected to a Multi-Language Form. You can generate the Document in any of the languages configured in the form. The Document uses the form's translation files to translate headings, question text, and other content. is an output document that's linked to a Multi-Language Form![]() A Multi-Language Form is a form that’s set up with different translations so that field users can choose their preferred language. Translated content includes page and section names, question text, help text, and other form content.. You can generate this document in any language configured in the form, regardless of whether the language is set as Active for form completion. Use Multi-Language Documents
A Multi-Language Form is a form that’s set up with different translations so that field users can choose their preferred language. Translated content includes page and section names, question text, help text, and other form content.. You can generate this document in any language configured in the form, regardless of whether the language is set as Active for form completion. Use Multi-Language Documents![]() A Multi-Language Document is an output Document connected to a Multi-Language Form. You can generate the Document in any of the languages configured in the form. The Document uses the form's translation files to translate headings, question text, and other content. to produce files for all your field users, systems, or customers in their preferred languages—for example, generate English and Spanish versions of the same submission for different audiences. This topic describes the steps to set up translations for a Multi-Language Document if required. This topic applies only to documents with static text that requires translation.
A Multi-Language Document is an output Document connected to a Multi-Language Form. You can generate the Document in any of the languages configured in the form. The Document uses the form's translation files to translate headings, question text, and other content. to produce files for all your field users, systems, or customers in their preferred languages—for example, generate English and Spanish versions of the same submission for different audiences. This topic describes the steps to set up translations for a Multi-Language Document if required. This topic applies only to documents with static text that requires translation.
Available on the Elite tier:
Contents
When to set up translations
If you don’t have any content to translate, you don’t need to set up translations. You only need to set up translations if your headers, footers, properties, or other document details require translation. For example, if your document details only include DREL![]() Data Reference Expression Language (DREL) is used to get form data and metadata and add it to a string, such as dates, usernames, or answers to questions in forms., you don’t need to set up translations.
Data Reference Expression Language (DREL) is used to get form data and metadata and add it to a string, such as dates, usernames, or answers to questions in forms., you don’t need to set up translations.
Info:The topic Multi-Language Document Setup Options describes when documents require translations.
Prerequisites
-
You must be either a TrueContext Admin user or a member of a FormSpace
 FormSpaces are where forms are stored and organized in the TrueContext Web Portal. A TrueContext Team may have multiple FormSpaces, depending on their needs. Admins can set FormSpace permissions to control which users have access to the forms in that FormSpace. group with Can Create permissions.
Set up a standard PDF, Microsoft Word, or HTML Multi-Language Document
-
Navigate to the PDF, Microsoft Word, or HTML document you want to set up. You can choose a new or existing document.
-
To create a new document:
Forms & Integrations > Documents > CREATE DOCUMENT
Select the type of document that you want to create.
-
To edit a document:
Forms & Integrations > Documents > Document Name > EDIT DOCUMENT
Info:The topic PDF, Word, and HTML Documents describes how to set up these documents in more detail.
-
-
Select a Source Language. This is the language you use to enter the following document details:
-
Output File Properties
-
Document header
-
Document title
-
Additional Information
-
Footer
-
Table column headers you set in your Table Layout
The Source Language also indicates the default language for the document when translations aren’t available, or when you add the document to a non-Multi-Language Form.
-
-
Enter or edit the document details. For example, if you selected French as the Source Language, enter the footer information in French.
-
When you finish setting up the document, select Create or Update.
Add languages to your document
-
Navigate to your Multi-Language PDF, Microsoft Word, or HTML document (Forms & Integrations > Documents > Document Name).
-
Select MANAGE LANGUAGES.
Result: The system opens the Manage Languages page.
-
In the Additional Languages section, select a language from the list.
-
Select Download to get an Excel file that contains the translation strings for all translatable
Result: The system generates a translation file (.xlsx) that contains all translatable text in the
The translation file has the structure shown in the following illustration.
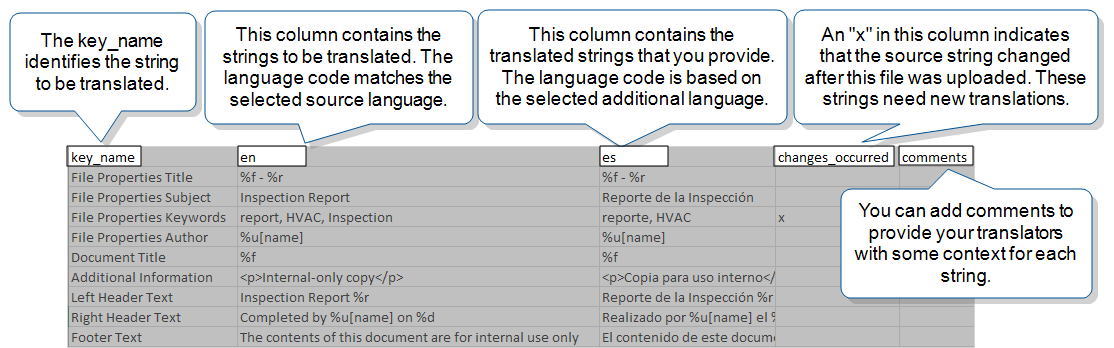
Info:The topic How Multi-Language Translation Files Work: Translation file details provides guidelines and tips for working with the translation files.
-
Add comments for your translator (optional) to provide more information about a translation string. For example, you could provide the translator with synonyms to make the meaning clear. Send the file for translation.
-
Complete the translation file:
-
Add translations for all of the strings.
-
If the changes_occurred column has an x in it, and you’ve updated the translation, delete the x.
-
Once the translation file is complete, UPLOAD the file.
Note:To upload the translation files successfully, you must keep all five column headings exactly the same as in the downloaded file.
-
-
Set the language to Active to make it available for filling out the form. For output documents, all configured languages—active or inactive—remain available for generating output.
-
Select ADD LANGUAGE to set up another language. Repeat steps 3-7 for each additional language up to a maximum of 10. Remember that you don't need to activate a language for it to be used in output documents; only activate languages you want available for users filling out the form.
-
Select Update to save your changes.
Info:Remember to add the Multi-Language Document to the Multi-Language Forms that you want to use it for.
Copy the configuration of a Multi-Language Document
Once you have a Multi-Language Document set up, you can copy its configuration to an existing target document. When you copy a Multi-Language Document configuration, you copy the document setup and any additional languages. This means that if your target document has any languages already set up, the source document languages will overwrite them.
Info:The section Create and Manage Documents: Copy Document configuration to an existing Document describes how to copy a document configuration in more detail.