Google Sheets Data Destination
This topic describes how to configure a Google Sheets Data Destination![]() A Data Destination specifies where to send data from a submitted form. You can use Data Destinations to automate data sharing and storage, routing data to a specific service (such as email or cloud storage) in several different formats., as well as the expected behavior of the Data Destination.
A Data Destination specifies where to send data from a submitted form. You can use Data Destinations to automate data sharing and storage, routing data to a specific service (such as email or cloud storage) in several different formats., as well as the expected behavior of the Data Destination.
Available on all tiers:
Contents
Introduction to Google Sheets Data Destinations
The Google Sheets Data Destination sends data from submitted forms to a Google Sheets spreadsheet. Use form data to create a new spreadsheet or add information to an existing spreadsheet and keep track of related submissions in a single file. Create custom spreadsheet and folder names based on data in the form to logically organize and manage files.
Tip:To set up a Data Destination, follow the instructions in the topic Creating and Managing Data Destinations.
Data Destinations automatically back up data collected in the field. They reduce the need to visit the Web Portal by making the information in submitted forms available through the services you already use. Different documents can also be sent to different services with a single Form Submission.
Info:The topic Data Destinations Overview describes Data Destinations in more detail.
Google Sheets allows users to create, share, and store spreadsheets in the cloud. Google Sheets is directly integrated with Google Drive, making stored spreadsheets available on several desktop or mobile device environments. TrueContext supports Google Sheets stored in your personal My Drive or in your company’s Shared drives.
Info:The topic TrueContext and Google: Two-Way Integration describes the TrueContext and Google integration in more detail.
Configure a Google Sheets Data Destination
-
Go to Forms & Integrations > Data Destinations > CREATE DATA DESTINATION.
-
Select Google Sheets.
-
Configure the Data Destination as specified in the topic Creating and Managing Data Destinations.
-
In the Sheet Configuration tab, configure the following information:
-
Drive type
-
-
If yes, select Shared Drive, and then enter the name of the Shared drive.
-
If no, select My Drive.
-
-
Note:If you don’t include the name of your Shared drive, the system defaults to your personal My Drive.
-
This is the name of the spreadsheet your data will be sent to. If it exists already, your data will be added as a new row. If the spreadsheet doesn't exist yet, the system creates it. Use the Data Reference Expression Language (DREL
 Data Reference Expression Language (DREL) is used to get form data and metadata and add it to a string, such as dates, usernames, or answers to questions in forms.) to customize the spreadsheet name based on data collected in forms.
 -

-
This is the name of the worksheet within the spreadsheet that your data will be sent to. Use DREL to customize the worksheet name using submitted form data or metadata. If the worksheet doesn’t exist yet, the system creates it.
The worksheet name is optional. If you don’t enter a worksheet name, the system sends the data to the first worksheet on the spreadsheet.
-

-
This is the folder your documents will be sent to. If the folder doesn't exist yet, it will be created.
-

-
-
For a single folder, enter the folder name.
Example: For a folder named Inspections, enter Inspections.
-
For multiple folders, use the following Data Reference Expression Language expressions:
-
%fto sort submissions into folders by form name. -
%uto sort submissions into folders by user name. -
%a[Unique IDto sort submissions into folders named with the answer to a specific question. Read our documentation on Unique IDs. A Unique ID refers to the specific identifier of a question, form page, form section, or Data Destination. Unique IDs are used as reference points when pulling data for conditional logic, Analytics projects, Data Destinations, and Documents.] -
Optionally add static text for formatting
Example:
%f for customer %a[CustomerName]returns Building inspection for customer Hansen Co. -
For a subfolder, enter a forward slash (/) following the first folder, and then the name of the subfolder.
Example: Use
%f/%a[Customer Name]to sort submissions into folders by form name, and subfolders by customer name.
-
-
Select the metadata columns to include in your
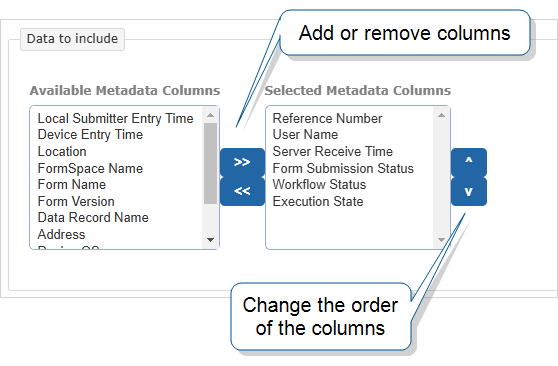
You can add any of the following metadata columns to your
-
Address—Street address of the location where the user submitted the form.
-
Data Record Name—Name of the dispatched or submitted form.
-
Device Entry Time—Date and time when the mobile user submitted the form on the device. The date and time is shown in the mobile user’s local date and time.
-
Device OS—Operating system of the device from which the user submitted the form.
-
Device OS Version—Version of the operating system.
-
Execution State—Indicates if the system successfully executed Data Destinations and other processes related to the submitted form.
-
Form Name—Name of the form.
-
Form Submission Status—Status of the dispatched or submitted form within your workflow.
Note:The Form Submission Status references the record state and data state. For up-to-date status information, refer to the Workflow Status, which references the workflow state
The workflow state describes the current stage in a workflow as a result of the last action taken on a record. For example, a record might have the workflow state "Dispatched". and data flow state A data flow state describes how data from a dispatched or submitted record moves between the Web Portal and the Mobile App. For example, a record might have a data flow state of "Downloaded".. -
Form Version—Version of the form.
-
FormSpace
FormSpaces are where forms are stored and organized in the TrueContext Web Portal. A TrueContext Team may have multiple FormSpaces, depending on their needs. Admins can set FormSpace permissions to control which users have access to the forms in that FormSpace. Name—Name of the FormSpace where the form is stored. -
Local Submitter Entry Time—Date and time when the user submitted the form. The date and time is shown in your local date and time.
-
Location—Coordinates of the location where the user submitted the form. Coordinates are shown in a latitude | longitude format.
-
Mobile Application Version—Version of the Mobile App.
-
Reference Number—Data ID and date of the dispatched or submitted form.
-
Server Receive Time—Date and time when a submitted form reached the server. If the form hasn’t been submitted, it shows when the form was dispatched. The date and time is shown in your local date and time.
-
User Name—First name, last name, and username of the user who submitted the form.
-
Workflow Status
The workflow status describes how a record moves through your company’s workflow. All statuses include a workflow state, and some also contain the data flow state or completion result.—The status of a dispatched or submitted record within your company’s workflow. The Workflow Status always lists a workflow state, and might include a data flow state or completion state for additional context.Info:The topic Form Submission Workflow Status and States describes workflow states and data flow states in more detail.
-
-
Note:The system automatically creates a Data Record ID column. This is a unique identifier for each submitted form.
-
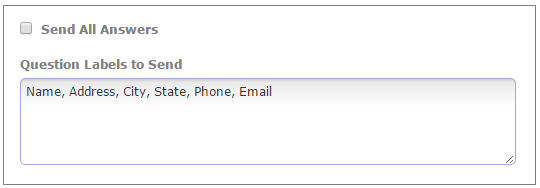
-
If selected, all questions from submitted forms will be sent to the spreadsheet.
-
If not selected, only data from the specified questions will be included.
-
Under Question Labels to Send (which appears when the Send All Answers box is not selected), enter the question labels to include, separated by a comma, semicolon, or line break.
Info:The topic Overview: Unique IDs describes Question Labels in more detail.
-
-
-
Select Create.
Result: The system saves your new Data Destination.
Expected results
Once the Data Destination processes a form submission, the relevant Google Sheet shows the new entry with the following characteristics:
-
The new entry is in the specified drive, folder, and Sheet. If the folder or Sheet don’t exist, the system creates a new one.
-
The entry includes Metadata columns as the first columns in the sheet, and the Answer columns following them. Answer columns appear in the same order as they appear in the form, and the column headers are the Question Unique IDs.
Note:If you change a question Unique ID, the system adds a new column for this question.
-
Answers not collected in a repeatable section
A Repeatable Section is a subform that contains a set of related questions. The data captured is “repeating”, because the field user can complete the same subform more than once, which creates multiple entries. appear as a single row. -
Answers collected in a repeatable section generate a new row for each answer. The system repeats other information, such as metadata, on every row.
Example: The following table shows a single Form Submission in which Part, Quantity, and Price are questions within a repeatable section. In this case, the section has three entries.
Data Record ID Customer PO Part Quantity Price 123456789 Company ABC 123 Compressor 1 $250.00 123456789 Company ABC 123 Control Board 1 $100.00 123456789 Company ABC 123 Switch 3 $25.00
Testing and troubleshooting Data Destinations
Data Destinations should be configured and tested carefully before using them in production. This is key to ensure that TrueContext data is received correctly.
Info:The topic Troubleshooting Data Destinations describes how to troubleshoot a Data Destination in more detail.
Error: Overloaded Connection
Note:Google Sheets does not support multiple edits to a spreadsheet at the same time. If your team has a very high volume of Form Submissions, use a different Data Destination type.
If there are two or more forms submitted to a Google Sheets destination at or around the same time, one of them will receive the error message, "Connection to Google Sheets is overloaded, please try again later".
The destination will try to resubmit up to five times and, for a typical submission, it takes from four to ten seconds for a single Google Sheets destination to execute. When the first execution finishes, the other executions will be retried. If multiple re-submissions occur at the same time, the error will occur again.
Using Shared Google Sheets as Destinations
Note:Google Drive no longer supports adding shared files to your own Google Drive Account. If you previously configured a Data Destination with a shared Google Sheet owned by another user, you might notice that the Data Destination now creates a new file stored in your own account. We recommend that you use Google Sheets stored in Shared drives instead.