Microsoft SharePoint List Data Source
Available on all tiers:
Contents
About
The Microsoft SharePoint List Data Source![]() Data sources, also known as "Lookups", are external sources of data that you upload or connect to TrueContext. You can reference this data in a form to populate answers or answer options. Data sources save typing, reduce errors, and make it easy to provide mobile users with only the relevant, most current data. retrieves data from a SharePoint list in a Microsoft 365 account. This data can then be used to populate a list of options in dropdown or radio button questions.
Data sources, also known as "Lookups", are external sources of data that you upload or connect to TrueContext. You can reference this data in a form to populate answers or answer options. Data sources save typing, reduce errors, and make it easy to provide mobile users with only the relevant, most current data. retrieves data from a SharePoint list in a Microsoft 365 account. This data can then be used to populate a list of options in dropdown or radio button questions.
Data sources![]() Data sources, also known as "Lookups", are external sources of data that you upload or connect to TrueContext. You can reference this data in a form to populate answers or answer options. Data sources save typing, reduce errors, and make it easy to provide mobile users with only the relevant, most current data. are usually set up to fetch data on a specified schedule. This allows teams to maintain and update their data through the external service of their choice, minimizing the need to access the web portal.
Data sources, also known as "Lookups", are external sources of data that you upload or connect to TrueContext. You can reference this data in a form to populate answers or answer options. Data sources save typing, reduce errors, and make it easy to provide mobile users with only the relevant, most current data. are usually set up to fetch data on a specified schedule. This allows teams to maintain and update their data through the external service of their choice, minimizing the need to access the web portal.
Microsoft SharePoint allows users to create lists. These lists can track anything from customer information to survey responses. Because the list is hosted on a user’s Microsoft account, it can be accessed, updated, and synced remotely by all users who have appropriate permissions.
Supported SharePoint List Column Types
Use the following table to check the SharePoint List column types that TrueContext Data Sources and Data Destinations![]() A Data Destination specifies where to send data from a submitted form. You can use Data Destinations to automate data sharing and storage, routing data to a specific service (such as email or cloud storage) in several different formats. support.
A Data Destination specifies where to send data from a submitted form. You can use Data Destinations to automate data sharing and storage, routing data to a specific service (such as email or cloud storage) in several different formats. support.
| SharePoint column type | Data Sources | Data Destinations |
|---|---|---|
| Single line of text | ✔ | ✔ |
| Multiple lines of text |
✔ |
✔ |
|
Choice Note:TrueContext doesn’t support columns that allow multiple selections. |
✔ | ✔ |
| Number |
✔ |
✔ |
| Currency | ✔ |
✔ |
| Date and time | ✔ | ✔ |
| Yes/No | ✔ |
✔ Note:If the value in TrueContext is "yes" or "true", then the value in SharePoint will be "yes". Any other values will result in "no" in SharePoint. |
| Person or Group | ||
| Hyperlink | ||
| Calculated | ✔ | Only supported as a column to match on. You can’t send or edit data in Calculated columns. |
| Image | ||
| Location |
✔ |
Set Up the Data Source
-
Create the data source as described here.
-
Select Microsoft SharePoint List Data Source as the type.
-
Select a Name and optionally enter a Description.
-
Set up the data source using the information below.
Push updates to device after a fetch
If this option is selected, users will get a notification from the Mobile App after a fetch. It will prompt users to reconcile (send/receive or refresh). This setting is recommended when it’s important that users have the most up-to-date data.
-
With "push updates" and an automatic fetch set up, some data sources send a notification for each fetch, whether or not the data source has new data.
-
If the fetch schedule is hourly, users may get notifications hourly even if the data has not changed.
-
Some users may find these notifications annoying or confusing. Consider the fetch frequency carefully if notifications are enabled.
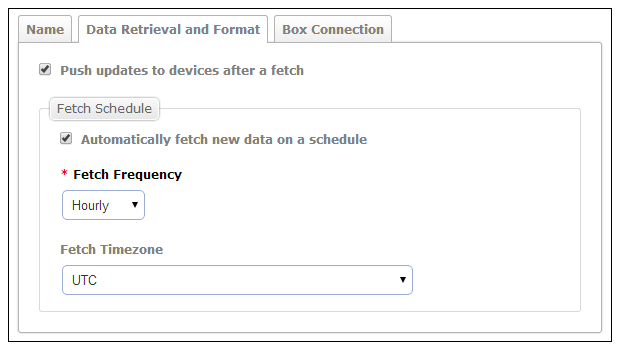
Fetch Schedule
Automatically fetch new data on a schedule:
-
If checked, data will be retrieved from Microsoft at the Fetch Frequency interval.
-
Make sure that the team has at least one Problem Contact Email Address. If a fetch is unsuccessful for any reason, this address will receive an email with an error message and details. Without this email, it may not be immediately clear that a fetch has failed.
-
If unchecked, the data source will not be updated automatically. To retrieve new data from Microsoft SharePoint, the data source will need to be manually updated through the "Fetch New Data" button in the web portal.
Fetch Frequency:
Choose Hourly, Daily, Weekly or Monthly. This is how often the data source will fetch new data from Microsoft SharePoint.
Fetch Timezone:
This applies to all fetch frequency options except “Hourly.” Data will be fetched at midnight in the chosen time zone.
Microsoft 365 Connection
Connection Configuration
Set up a Microsoft 365 Connection or use an existing connection.
In TrueContext, when a Team Admin sets up a Connection, they enter the account credentials for the third-party system. Once they save the Connection, it becomes available to TrueContext and other users for Data Source and Data Destination![]() A Data Destination specifies where to send data from a submitted form. You can use Data Destinations to automate data sharing and storage, routing data to a specific service (such as email or cloud storage) in several different formats. setup. This means that other TrueContext users on the team can fetch and access data available to the third-party user account.
A Data Destination specifies where to send data from a submitted form. You can use Data Destinations to automate data sharing and storage, routing data to a specific service (such as email or cloud storage) in several different formats. setup. This means that other TrueContext users on the team can fetch and access data available to the third-party user account.
Note:We recommend that you create a dedicated Integration User account for your third-party system and use that account to set up TrueContext Connections![]() A Connection is an integration point that's used to link a TrueContext Data Source or Data Destination to an external service to import or export data. Data Destinations and Data Sources that share the same external service can also share the same Connection.. Set up the Integration User with specific permissions and limited access to the third-party system data. This ensures that TrueContext Admin users and users with “Can Create” permissions can only access the data that they need.
A Connection is an integration point that's used to link a TrueContext Data Source or Data Destination to an external service to import or export data. Data Destinations and Data Sources that share the same external service can also share the same Connection.. Set up the Integration User with specific permissions and limited access to the third-party system data. This ensures that TrueContext Admin users and users with “Can Create” permissions can only access the data that they need.
Vanity URL
Tip:Vanity URLs are a Microsoft SharePoint legacy feature.
If your company hosts SharePoint sharepoint.com, select Site has a Vanity URL. Enter your custom domain name in the format my.company.com.
List Path
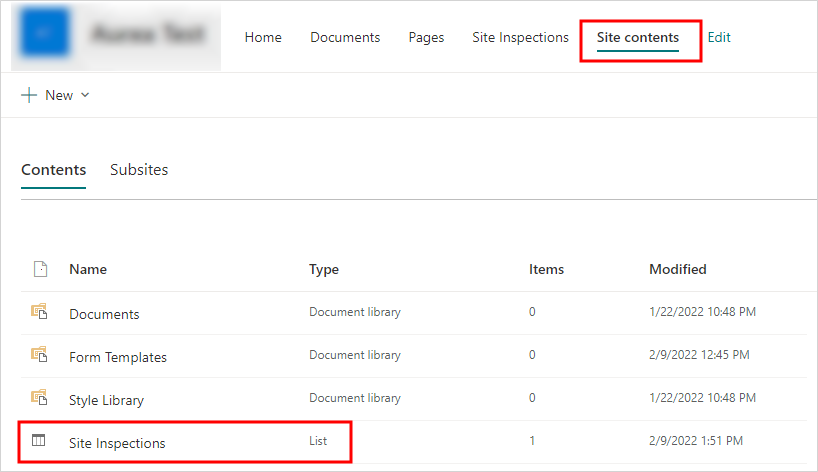
Enter the path to the list containing your data. This can be found in the List Settings. The location of the List Settings varies depending on your permissions and how your Microsoft 365 Administrator has configured the site. This means that the documentation below may not reflect your experience.
-
Make sure you are in the appropriate Site on your Microsoft 365 account.
-
Select Site Contents, and then select your SharePoint list.
-
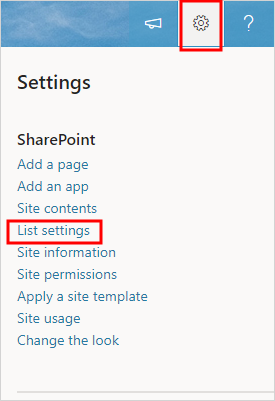
Select the settings icon, and then select List Settings.
-
Your list's web address is listed underneath the list name.

Note: If your list is on the Team Site, it will be considered in the "Root Site".
-
The site prefix is the part of your site path that tells us where the list you're trying to send form submission data to is, relative to the main site. There are three types it could be:
-
/ : The SharePoint URL, e.g. https://companyname.sharepoint.com, aka the root site.
-
/sites/: A sub-site to the main company SharePoint, e.g. https://companyname.sharepoint.com/sites/SubSiteName
-
/teams/: A team site created for a specific group of people on the main company SharePoint, e.g. https://companyname.sharepoint.com/teams/TeamName
Enter this information in File Path field in the TrueContext Connections tab. You do not need to add the /Lists/ part of the URL, but you must specify the Site Prefix before the sub-site.

-
- : < > ? / \ |
- leading or trailing spaces
- sometimes # or %, depending on organization settings
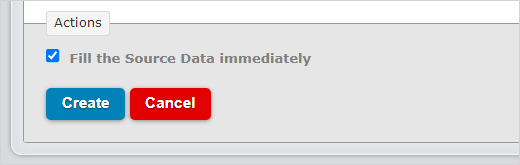
Fill the Source Data immediately
-
If left unchecked, the data source will wait until the specified time and interval to retrieve data for the first time.
-
If checked, the first data retrieval will occur immediately after creating the data source.
Troubleshooting
Microsoft 365 expires the connection token every 90 days. This requires TrueContext Administrators with appropriate permissions to reset the connection in the TrueContext system when the connection token expires. For information on how to do this, follow this link: Microsoft 365 Connection
Read here for common error messages you may encounter with this integration and how to resolve them.