Bulk Dispatch with the TrueContext Portal
Available on all tiers:
Contents
Video demo
Download the Dispatch Template File
In the TrueContext Web Portal![]() The TrueContext Web Portal is a web application used to manage security settings, forms, FormSpaces, other users, Data Sources, and Data Destinations., navigate to the form you want to use to dispatch. If the form has been configured for dispatching, a Dispatch button will be displayed on the page. If this option is not displayed, please review the form configuration.
The TrueContext Web Portal is a web application used to manage security settings, forms, FormSpaces, other users, Data Sources, and Data Destinations., navigate to the form you want to use to dispatch. If the form has been configured for dispatching, a Dispatch button will be displayed on the page. If this option is not displayed, please review the form configuration.
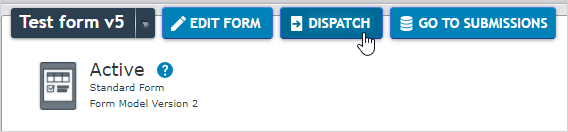
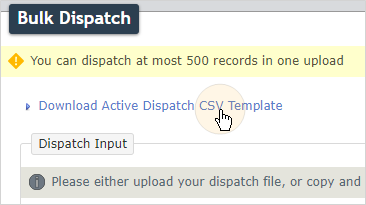
On the following page (the Web Portal dispatching interface), select the BULK DISPATCH button. The Dispatch![]() The term "dispatch" refers to the act of sending a form to a mobile user or customer. Typically, a dispatched record includes some information pre-filled to give the recipient context for the work to be done. Dispatch can be manual or automated (using a Dispatch Data Destination or the TrueContext REST API). page contains options for downloading a dispatch template, and for re-uploading the template after dispatch data has been entered. See the screen capture below. Select the Download Active Dispatch CSV Template hyperlink and save the file to your computer.
The term "dispatch" refers to the act of sending a form to a mobile user or customer. Typically, a dispatched record includes some information pre-filled to give the recipient context for the work to be done. Dispatch can be manual or automated (using a Dispatch Data Destination or the TrueContext REST API). page contains options for downloading a dispatch template, and for re-uploading the template after dispatch data has been entered. See the screen capture below. Select the Download Active Dispatch CSV Template hyperlink and save the file to your computer.
About the Dispatch Template File
The screen capture below shows a sample dispatch template CSV file for a very simple form, opened in a desktop spreadsheet application.
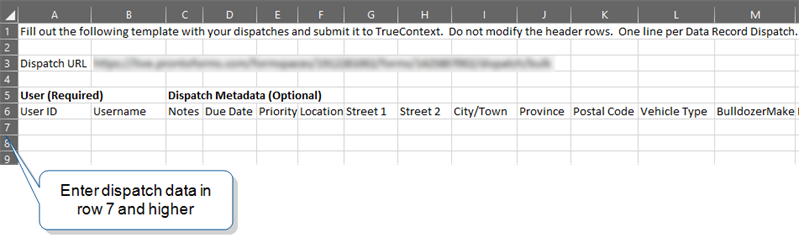
The template file is generated by the TrueContext server, based on the setup of your mobile form. The anatomy of the file is outlined below.
Row 1 -- Basic Usage Instructions
These are simple instructions on usage of the template.
Row 3 -- Dispatch URL
Row 3 is for information only. It indicates the TrueContext Web Portal URL that was visited to generate the template. This URL is also used to upload the completed template file, with dispatch information entered, to the portal for distribution to your mobile users.
Row 5 -- Header Line to Distinguish Dispatch Recipient User Column Group (A & B) from Question Label Column Group (C and Higher)
This is the first of 2 header lines. This line indicates that columns A and B are used to specify the mobile users who will receive the dispatches. It also indicates that the columns beginning with column C are used to specify the optional answers that may be prefilled in the dispatched form.
Row 6 -- Header Line to Indicate Specific Dispatch Recipient User Columns and Specific Question Label Columns
This second header line gives the details of use for each column in the CSV.
Info:If your team is on the Elite tier, you can also dispatch the form in different languages to different users.
Row 7 and Higher -- Dispatch Data Rows
Row 7 is where the TrueContext administrator begins to enter information for dispatching. Each row represents 1 mobile form to be dispatched to a TrueContext user.
Info:Customers![]() FormSpaces are where forms are stored and organized in the TrueContext Web Portal. A TrueContext Team may have multiple FormSpaces, depending on their needs. Admins can set FormSpace permissions to control which users have access to the forms in that FormSpace.. The topic Dispatch Records to a Group: Send a bulk dispatch from the Web Portal describes the steps in detail.
FormSpaces are where forms are stored and organized in the TrueContext Web Portal. A TrueContext Team may have multiple FormSpaces, depending on their needs. Admins can set FormSpace permissions to control which users have access to the forms in that FormSpace.. The topic Dispatch Records to a Group: Send a bulk dispatch from the Web Portal describes the steps in detail.
How to Use the Dispatch Template
To compose the forms to dispatch to your mobile users, begin entering data in row 7 of your template. Each row represents a single form or data record to be dispatched.
For every dispatch, you must specify a TrueContext user who is to receive it on their mobile device. This is done by entering either the User ID in column A or the username in column B. It is mandatory to have a value in either column A or B for each row. In fact, this is the only mandatory data for a dispatch -- columns C and beyond may be left blank if you do not wish to prefill any questions for the mobile user.
See the screen capture below for a sample of a completed dispatch CSV, with 3 records for dispatch, shown in a desktop spreadsheet application.
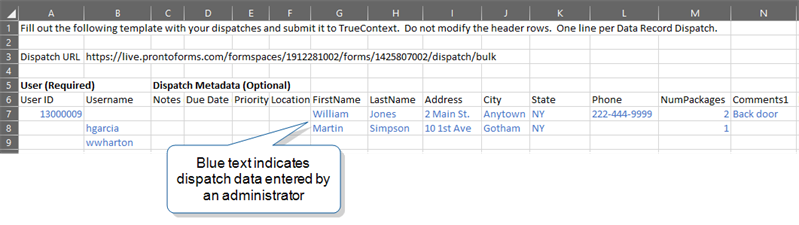
In the sample above, the administrator-entered dispatch data has been colored blue for clarity.
In the dispatch created by row 7, the mobile user's user ID indicates the recipient. This dispatch pre-sets a value for each of the questions of the form.
In the dispatch created by row 8, the mobile user is indicated via the username in column B. In dispatch, no pre-set values are provided for the questions labeled "phone" and "comments1".
In the dispatch created by row 9, the mobile user is indicated by username, and no question values are pre-set. It looks simple, but this is a valid dispatch.
Important things to note:
- Removal of Question Label Columns from Your Form Template is Allowed
The form used in this example is very simple. Longer and more complex forms will have more question labels displayed horizontally in additional columns. To keep your template simple and readable, you may wish to delete question columns for which you do not intend to pre-set values in dispatches. - Re-use of a Generated Template is Allowed
The template is generated dynamically, based on the configuration of the selected form. Unless your form changes, you can re-use this template as many times as you want. If the questions or labels on your form do change, however, it is highly recommended that you download an updated template. - Question Constraints Must be Honored in Dispatches
Attempts to pre-set question values which violate form constraints, like trying to set a phone number question with a person's name, will be rejected by the server. - *NOTE: If you are using Conditional Logic to "Set" an answer on a question, we highly recommend NOT dispatching to this question. The Conditional Logic and dispatched data may conflict and produce inconsistent results.
Note:If you use a spreadsheet application to work with your dispatch data, be sure to save as CSV before uploading to the portal.
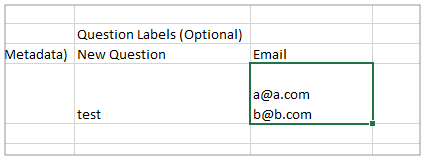
Dispatching Multiple Email Addresses to a Text Field
How do I enter the data in the template to dispatch multiple email addresses to an email field in the form? Separating the email addresses with commas does not work in the bulk dispatch template. For multiple values in the bulk dispatch, you can place each answer on a new line. In Excel, you can enter a new line within a cell by holding down the ALT key while hitting <ENTER>.
Dispatching Images
Images can be dispatched to any attachment control: camera, sketch pad, or signature. This allows administrators to dispatch images that are specific to a particular job, like a site-specific floor plan, a chart for the mobile user to reference, or a sketch produced in TrueContext from an earlier site visit or job estimate.
In order to dispatch images with the Bulk .CSV template, the images must be Base64 encoded. This is typically done programmatically, but it can also be done manually using an online tool. Format the image to dispatch as image/jpeg(or png)|/<base64 string here>. See below:
image/jpeg|/iVBORw0KGgoAAAANSUhEUgAAAAEAAAACCAYAAACZgbYnAAAAAXNSR0IArs4c6QAAAARnQU1BAACxjwv8YQUAAAAJcEhZcwAADsIAAA7CARUoSoAAAAAQSURBVBhXY/gPBEwMDAwMAB32A/9omztwAAAAAElFTkSuQmCC
Dispatching into Metadata using Bulk Dispatch
Easily assign![]() Assigning and reassigning control which users are responsible for dispatched records. A dispatcher with the "Can Manage Assignments" FormSpace permission can assign a record to a user or group and reassign it if the original assignee is unavailable. Field users can also claim unassigned records from the Group Inbox. notes, priorities, due dates, and locations to dispatches, giving mobile users the tools they need to efficiently plan their work in the field. Your mobile users can get a higher-level look at their assigned jobs without needing to look at each individual form: they can sort based on the information right from the inbox.
Assigning and reassigning control which users are responsible for dispatched records. A dispatcher with the "Can Manage Assignments" FormSpace permission can assign a record to a user or group and reassign it if the original assignee is unavailable. Field users can also claim unassigned records from the Group Inbox. notes, priorities, due dates, and locations to dispatches, giving mobile users the tools they need to efficiently plan their work in the field. Your mobile users can get a higher-level look at their assigned jobs without needing to look at each individual form: they can sort based on the information right from the inbox.
It is possible to dispatch data into the following fields:
- Notes: These can be a maximum of 256 characters. These might be things such as working hours or cautions about the site.
- Priority: This can be Low, Normal, or High. If you do not specify a priority, it will default to Normal or No Priority.
- Due Date: This must be a valid date/time in ISO format (YYYY-MM-DD, e.g,. 2017-12-11T15:51:42), and if you do not supply a time zone, it will default to the dispatcher's time zone.
- Location: These must be latitude/longitude coordinates (e.g., 45.347484,-75.909761). You can use third-party tools to convert addresses to coordinates, and use Excel's functionality to merge the data into a single, comma-separated entry in a cell. There must also be no spaces between the latitude and longitude coordinates in the CSV file.
When filling out the information in the CSV file, keep in mind the above limits. An example is below:

| User ID | Username | Notes | Due Date | Priority | Location |
| 132178175 | jane_smith | Inspect 3rd floor office. Access code 3451# | 2017-12-15T17:00:00Z | High | 45.347484,-75.909761 |
| 132178175 | jane_smith | Dog on premises. Call ahead to ensure it is penned before inspection | 2017-12-20T17:00:00Z | High | 45.341089,-75.930432 |
| 132175175 | jane_smith | Call Debbie for access. (613)345-6789 | 2017-12-22T17:00:00Z | Low | |
| 132175175 | jane_smith | Work must be completed after office hours (8-5pm) | 2017-12-13T19:00:00Z | 45.335307,-75.908180 |
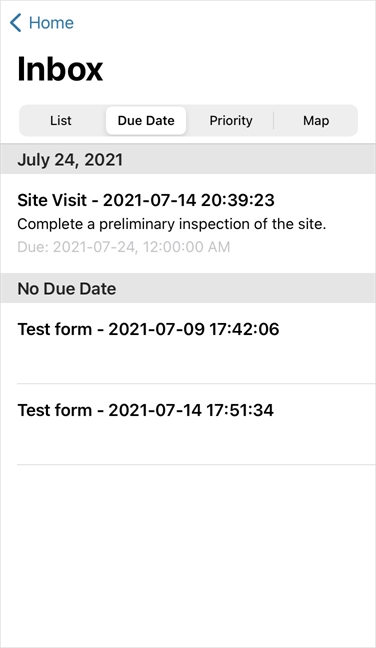
The notes and other metadata will show up in beneath the dispatched form's name on your mobile user's Inbox. The others can act as filters by tapping the different tabs at the top of the Inbox.
Data Formats and Supported Question/Data Types
Not all question types are supported for dispatching. The generated template will not include columns for question types that aren't supported. Further, some question types have specific formatting requirements.
Info:The topic Supported Question and Data Types for Dispatching lists the data and question types that each dispatch method supports. It also describes the formatting requirements for specific types of questions, such as Barcode Scanner and Geolocation.