Manage User Accounts
User accounts give your team access to TrueContext. Each person needs their own user account so that you can track work, control access, and manage permissions. This topic describes how to set up user accounts and perform user admin tasks, such as unlocking an account, exporting user data, and assigning the user to groups.
Info:You can also manage users with the TrueContext REST API. The topic TrueContext REST API: Users describes the users endpoint in more detail.
Available on all tiers:
Contents
Setup instructions: Create a user account
Prerequisites
-
Admin user role (team admin) in TrueContext
-
Available licenses for new users (Check your subscription)
Info:You can add a user for each license that you purchased. Licenses are the "seats" you pay for, while users are created to use those seats. Learn more about managing your subscription.
-
User information:
-
Password policy decision: Will users set their own passwords (recommended) or will you set them (not recommended)?
Create a user and enter account details
-
Go to Users & Groups > Users > Create User.

-
Does your team have more than one TrueContext subscription?
-
If yes, choose a subscription for the new user.
-
If no, the system doesn't prompt you to choose a subscription. Go to the next step.
-
-
Enter the user details. Username and Email Address are required.
-
Choose one of the password options.
Note:We recommend that you choose the option to Send user a link to securely set their password. This option provides the highest level of security, because only the user knows their password.If you choose to set the password yourself (not recommended), you must:
Enter and confirm the password.
Securely communicate the password to the user. It's your responsibility to make sure that only the user knows their password.
Advise the user to change their password immediately after their first login:
On the Mobile App > Settings > Change Password.
By selecting Forgot Password on the login page of the Mobile App or Web Portal.
By signing into the Web Portal and going to username > User Profile > Change Password.
-
In the Permissions section, select a user role.
- Mobile-only user: For field technicians, gives limited access to the TrueContext Web Portal
 The TrueContext Web Portal is a web application used to manage security settings, forms, FormSpaces, other users, Data Sources, and Data Destinations..
 - User: Can use the Mobile App and the Web Portal—access depends on group FormSpace FormSpaces are where forms are stored and organized in the TrueContext Web Portal. A TrueContext Team may have multiple FormSpaces, depending on their needs. Admins can set FormSpace permissions to control which users have access to the forms in that FormSpace. permissions.
- Admin user: Gives access to the Web Portal team admin functions.
- Mobile-only user: For field technicians, gives limited access to the TrueContext Web Portal
-
Assign
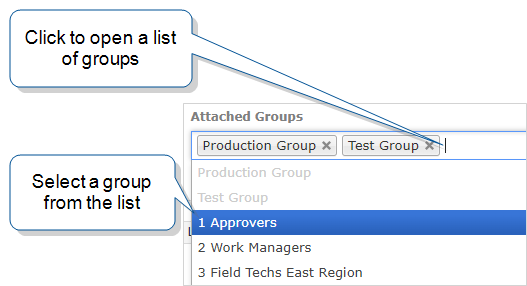
Assigning and reassigning control which users are responsible for dispatched records. A dispatcher with the "Can Manage Assignments" FormSpace permission can assign a record to a user or group and reassign it if the original assignee is unavailable. Field users can also claim unassigned records from the Group Inbox. groups. Groups control which forms, resources Resources are materials that field technicians can access while they work on records in the Mobile App. A resource might be a Resource Document, like a manual or a floor plan, or a Resource Image, like a schematic or a diagram. Resources are uploaded to a FormSpace and can be referenced in forms or made available in the Resource Library., and data users can access and what permissions they have. New users are automatically assigned to the Production Group and the Test Group.Note:Groups are the only way to give users access to forms. Users can't access forms unless they belong to a group that has permissions in the FormSpace where those forms are stored.
-
To assign the user to a group, click in the Attached Groups field, and then select a group from the list. Repeat this step to add more groups.
-
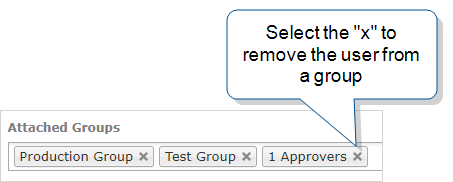
To remove the user from an assigned group, select the "x" next to the group name.
Info:The topic Manage Groups describes how to create groups and assign permissions in more detail.
-
-
Set up the user's Locale.
-
Language: The display language for the Web Portal and the Form Builder. This does not change the language displayed on the Mobile App.
Info:The topic Language Settings and Translations describes the standard TrueContext language options and how to set them up in more detail.
-
Preferred Time Zone: The time zone used to display data in the Web Portal. This setting overrides the team-level setting.
This setting only changes how the time is displayed for this user, not the actual value stored in the system.
Info:The topic Time Zone Settings: User Profile Settings explains this setting in more detail.
-
-
Set up the welcome email. In step 4, did you select the Send user a link... password option (recommended)?
- If yes, the option to Send Welcome Email... is automatically selected.
- If no, you can choose whether to automatically send the user a welcome email.
The welcome email includes:
- Sign-in instructions.
- Password setup link (if you selected the Send user a link... option).
- Mobile App download information.
In the Custom Message in Welcome Email field, you can enter a message to add to the standard welcome email (optional).
-
Once you've added all the information on the Account tab, you can either:
- Add more user profile information on the other tabs.
- Select Create to add the user to your team. You can update the user's profile later if you want to add information.
User profile information
The following sections describe the user profile tabs and the information they contain.
Account
-
First and Last Name: Used in submitted records and generated documents, can be referenced using the DREL
Data Reference Expression Language (DREL) is used to get form data and metadata and add it to a string, such as dates, usernames, or answers to questions in forms. expression %u[name]. -
Username: Used to sign into the TrueContext system. Throughout the system, used to associate the user with submitted or assigned records. Can be referenced using the DREL expression
%u[username].Note:Only team admins (Admin users) can change a username. We recommend that you don't change a username once a user has signed in. If you do, the user must log out and then back in with the new username, losing any work in progress.
-
Email Address: For users to access and recover their account if they forget their password or if multi-factor authentication (MFA) is enabled. Also used with Email Data Destinations. Can be referenced using the DREL expression
%u[email]. -
Role: The user's role controls what users can access in the Web Portal. It works together with the user's groups and FormSpace permissions.
Info:The topic Permissions Quick Reference: How permissions work describes the relationship of user roles and FormSpace permissions in more detail.
-
Language: The display language for the Web Portal and the Form Builder. This does not change the language displayed on the Mobile App.
Info:The topic Language Settings and Translations describes the standard TrueContext language options and how to set them up in more detail.
-
Preferred Time Zone: The time zone used to display data in the Web Portal. This setting overrides the team-level setting.
This setting only changes how the time is displayed for this user, not the actual value stored in the system.
Info:The topic Time Zone Settings: User Profile Settings explains this setting in more detail.
Billing
- The Billing Account is the subscription that you added the user to.
- To identify the user as the Account Owner, select the checkbox. This simply flags the user as the account owner in our system and has no other effect.
Contact (optional)
Contact information includes phone number, address, and a second (alternate) email address. This information is available in the User Data Source and when you export user data.
Provide an Alternate Email Address when you want to:
-
Use the alternate email address as the organizer of an event.
For example, you might want customer appointments to show
service.team@company.comas the organizer rather than the individual technician's email. -
Send submitted data to a different email address than the user's primary account address.
For example, a field technician completes a service report using their company tablet. Their primary email (
alex.general@company.com) is their general work email where they receive daily communications. Their alternate email (alex.reports@company.com) is specifically set up to receive copies of completed service reports. By sending the submitted data to the alternate email address, the technician can keep their service documentation organized separately. This makes it easier to track and reference completed work.
Organization (optional)
You can add organizational information—such as the user's employee ID or manager's name—to help identify users within your team. This information appears in User List CSV Exports and User Data Sources.
Advanced
-
Aliases: Aliases provide a way for you to set up alternative usernames that map to usernames in other systems. This streamlines integration between TrueContext and back-office systems.
-
Each user can have up to five unique system-alias pairs.
-
If your team uses SSO (SAML), you might also have a username suffix set up. If you do, the alias must include the suffix, for example:
- Username suffix:
@company.co - Alias:
alexl@company.co.
This ensures the correct username mapping between systems.
- Username suffix:
-
-
Show 'Get Started' Tab: The Get Started tab is displayed when a user signs into the TrueContext Web Portal. As the name suggests, this tab contains links to content designed to help users get started using TrueContext. The Progress indicator on the Get Started tab keeps track of how many of the recommended topic links a user has clicked through. To hide the tab, clear the checkbox.
-
Preferred Page Size: For Admin users and Web Portal Users, specifies the number of results per page. For example, the list of form submissions (dispatched and submitted records) shows 100 records per page unless you change this setting.
-
CSV Export File Delimiter: For Admin users and Web Portal Users, specifies the delimiter—either a comma or a semi-colon—for CSV export files.
Verify a newly-created user account
After creating the account:
-
Select Users & Groups.
-
Find the new user in the list.
Info:You can sort the list by Date Created to find the most recently added users at the end of the list. The section View and filter the user list explains in detail how to search for specific users in the list.
-
Check that their role and group assignments are correct.
-
Confirm that they received their welcome email (if selected).
Manage existing users
Prerequisites
You must have the Admin user role (team admin) in TrueContext.
View and filter the user list
What you can do with the user list
The user list helps you to manage your team user accounts, troubleshoot access issues, and review account activity. For example, you can:
- Find users who can't log in, haven't reconciled data recently, or have account problems.
- Identify inactive users who haven't used the system recently.
- Review user activity to optimize user license allocation.
- Check for suspended subscriptions or locked accounts that need attention.
Step-by-step: View and filter the user list
-
Select Users & Groups.
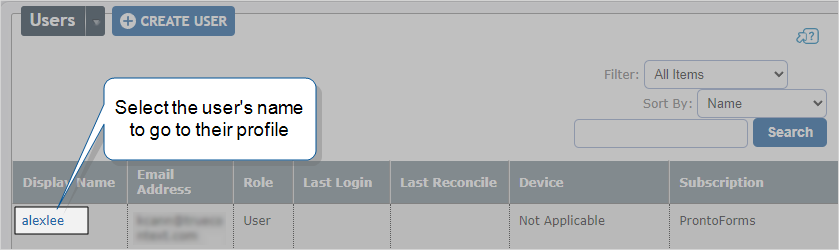
Result: The user list opens and displays the following fields:
- Display Name: First name, last name, and username.
- Email Address: The user's primary email address.
- Role: User's access to Web Portal functionality.
- Last Login: When the user last signed into the Web Portal.
- Last Reconcile: When the user last reconciled mobile data (good indicator of activity).
- Device: Registered mobile devices (devices on which a user has signed into the TrueContext Mobile App). Details include the device model, operating system, and Mobile App version.
- Subscription: Which billing account each user is assigned to.
-
Do you want to find specific users who need help?
-
If yes, search for a user by name, or use the filter options to find users by:
-
Activity status (never logged in, never reconciled).
-
Account status (suspended subscription, locked out, password expired).
-
User role.
-
Self-registration.
Info:This option only displays if an Admin user sets up Set Up Self-Registration for your team.
-
-
If no, continue with other user management tasks.
-
View and edit user profiles
You can check and edit user profile information when you need to update contact information or troubleshoot access issues.
Info:If you need to change a user's group membership, you do this by updating the group. The topic Manage Groups: How to make changes to existing groups describes the steps in detail.
-
View and filter a list of users. From the list, select the user whose profile you want to check.
Result: The user profile displays the following tabs and fields.
Account Tab
Overview: Summarizes user account information and settings.
Field Description User Role Controls access to the Web Portal. Language and Timezone User's preferred language and timezone settings. These only affect the display language in the Web Portal and don't change the Mobile App language or the stored values of timestamps. Subscription and Max Active Devices Subscription type and number of registered devices allowed. Self-Registration Status Displayed when Self-Registration is enabled for your team, indicates whether a user self-registered. Activity Last login to the Web Portal, last device reconciliation, and last record submitted by this user. Contact Phone number, email address, and other contact details. Organization Company role information such as Employee ID, manager name, and other relevant details (if already entered). Permissions Tab
Overview: Shows the user's group membership and the FormSpace permissions for those groups.
Key sections:
- User Groups: Shows which groups the user belongs to and any special permissions within those groups, such as Group Admin.
- User FormSpace Permissions FormSpace permissions define what members of a user group can do within a FormSpace. For example, permissions control whether group members can submit forms on the Mobile App or manage work in the Web Portal.: Shows which FormSpaces the user's groups can access and what actions they can perform (such as submit, test, approve, or manage assignments).
Devices Tab
Overview: Lists the user's registered mobile devices (devices on which a user has signed into the TrueContext Mobile App). Details include the device model, operating system, and Mobile App version.
Key information: Users can have up to three active devices by default. Signing in with a fourth device deactivates the first device that the user registered.
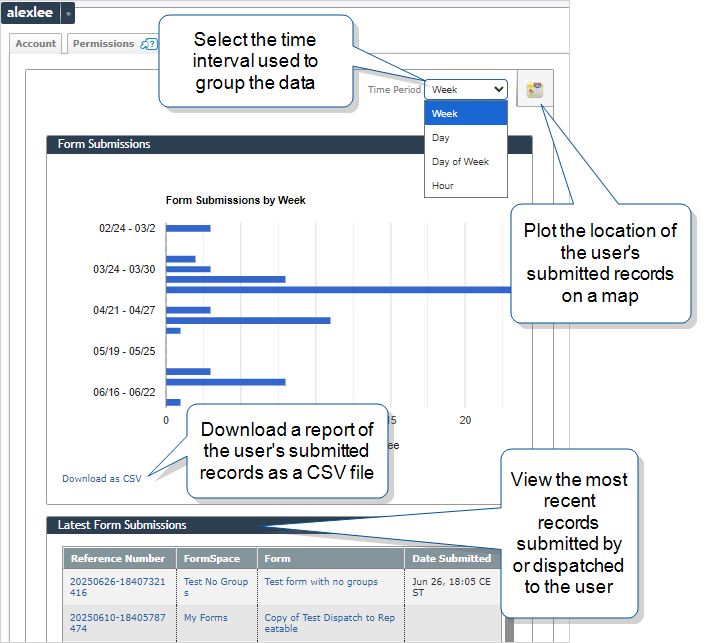
Activity Tab
Overview: Shows data record submission activity as a chart and table. Each option provides a different way to analyze the user's activity—through charts, geographic mapping, data export, or detailed lists.
-
Do you need to update any information in the user's profile?
-
If yes, hover over the arrow next to the username and then select Update.
Result: The Edit Account page opens where you can change the user's details. When you're done, select Update to save the changes.
-
If no, continue with other user management tasks.
Tip:For security reasons, only a team admin can change a user's email address in the Web Portal. All users can change their own email address in the Mobile App.
-
Export user data
Export detailed user information for reporting or team management. The exported file includes the details of all users on your team.
-
Select Users & Groups.
-
Hover over the arrow next to Users and select Export Users to CSV.
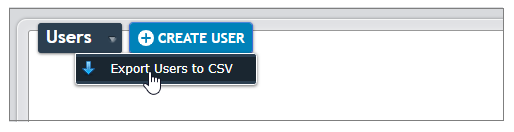
Result: The CSV export is downloaded to your default download location.
Change passwords
Note:Users can change their own passwords using the Forgot Password link on the login page. We recommend that users change their own passwords whenever possible.
-
View and filter a list of users. From the list, select the user whose password you want to change.
-
Select Change Password.
-
Set and confirm the new password.
Note:When you set a password on behalf of another user, you should:- Securely communicate the new password to the user. It's your responsibility to make sure that only the user knows their password.
- Advise the user to change their password immediately after their first login. Users can do this on the Mobile App.
Unlock a user's account
To protect your TrueContext data, the system locks a user account after five failed login attempts. Locked-out users can’t sign in to the TrueContext Mobile App or Web Portal to complete, submit, or view forms.
Info:The topic User Account Lockout describes this feature in detail.
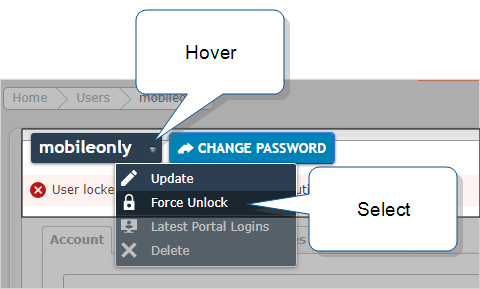
Some users might not have access to an email address associated with their account. Because they can’t receive the password reset link by email, a TrueContext Admin user (team admin) must unlock the account for them.
-
Go to Users & Groups and then select the user from the list.
-
Hover over the arrow next to the username, and then select Force Unlock.
-
When prompted, confirm that you want to unlock this user.
Result: The system unlocks the account and removes the warning banner.
Note: For added security, we recommend that you change the user’s password after you unlock their account.
Delete a user
- Only delete users when absolutely necessary. Deleted user accounts cannot be recovered.
- User submissions remain but the user profile is permanently removed.
- Any Data Source partitions linked to the user are automatically deleted. Deleting the partition does not delete any data.
- Deleting users doesn't reduce your license count.
- Go to the user's profile.
- Hover over the arrow next to the username and select Delete.
- Confirm the deletion.
Troubleshoot user issues
Use the user list filters and individual user profiles to identify and resolve common user problems.
Find users who have login issues
-
Check for login issues. Filter the user list by:
- Never Logged In, to find users who haven't successfully accessed the system.
- Locked Out, to identify users who need password resets after multiple failed login attempts.
- Password Expired, to find users who need to set new passwords.
-
Check for account status problems:
- Filter the user list by Access Suspended to find users on suspended subscriptions.
- Review individual user profiles for specific account status details.
-
Verify that users can receive welcome emails:
-
Verify that the email address is correct in the user's profile.
-
Check whether your organization blocks external emails.
Info:The topic Network Connectivity Reference lists the IPs, domains, and endpoints that must not be blocked.
-
Identify inactive Mobile App users
To check Mobile App usage:
- Filter the user list by Never Reconciled to find users who haven't used the Mobile App while online.
- Sort the list by Last Reconcile The term "reconcile" refers to a send/receive action between the mobile app and the TrueContext server. This synchronizes new form versions, data sources, and dispatches from the Web Portal to the mobile app to ensure that mobile users are working with up-to-date resources. This also synchronizes new form submissions from the mobile app to the Web Portal to ensure that work completed by a mobile user gets properly submitted and sent through data destinations. A reconcile can be manually or automatically initiated and requires network connectivity. date to identify users who haven't reconciled recently.