Set Up a Salesforce Apex REST Data Destination
This topic provides step-by-step instructions to configure a Salesforce Apex Rest Data Destination![]() A Data Destination specifies where to send data from a submitted form. You can use Data Destinations to automate data sharing and storage, routing data to a specific service (such as email or cloud storage) in several different formats..
A Data Destination specifies where to send data from a submitted form. You can use Data Destinations to automate data sharing and storage, routing data to a specific service (such as email or cloud storage) in several different formats..
A Salesforce Apex REST Data Destination enables the interaction between TrueContext and a Salesforce or Apex Rest API endpoint. With a Salesforce Apex REST Data Destination, you can fully utilize the data collected in TrueContext for custom actions in your Salesforce org.
Available as an add-on for the Intelligent and Elite tiers:
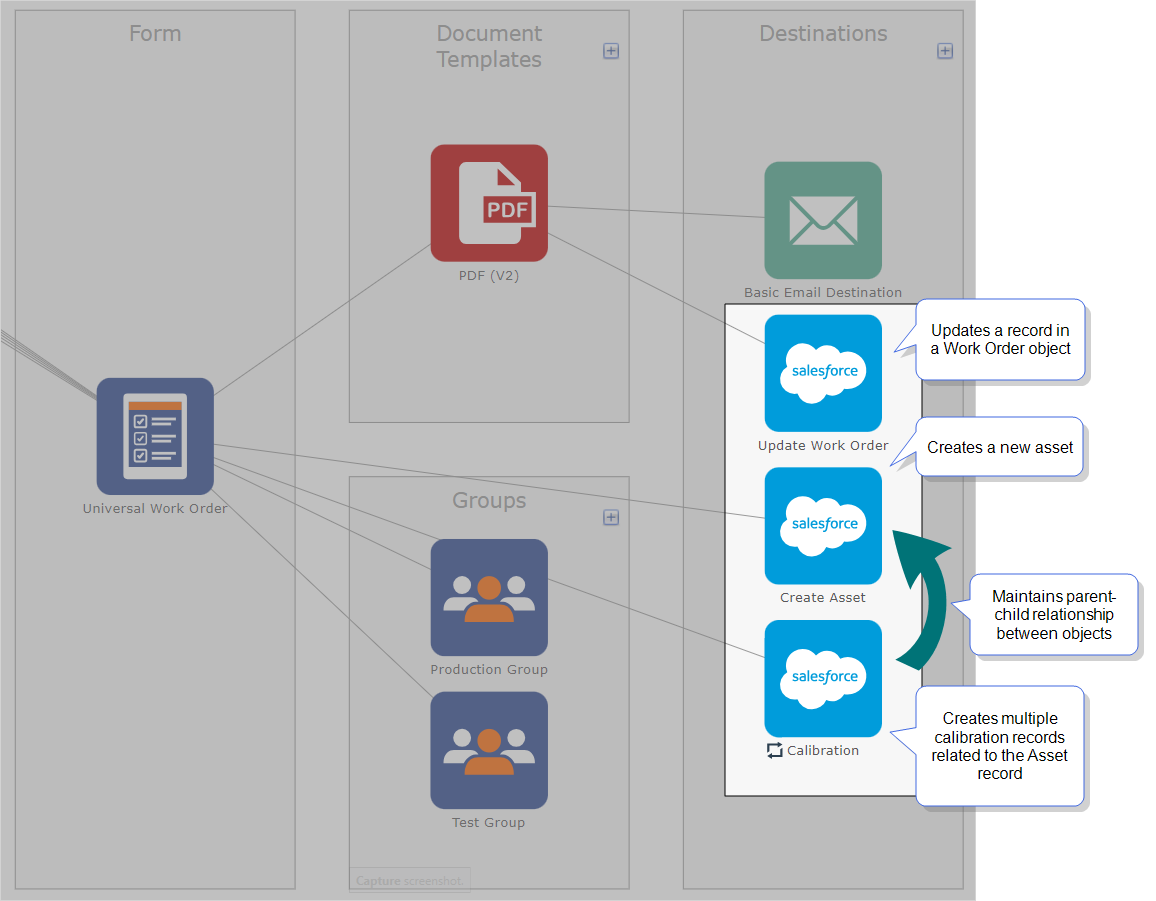
How a Salesforce Apex REST Data Destination works
You can configure a Salesforce Apex REST Data Destination to enable TrueContext to:
-
Interact with the Salesforce REST API
 The TrueContext REST API enables developers to update and manage data communicated between TrueContext and their external, third-party systems. Admins can call our API endpoints after they set up an API application and API Key. functions for standard objects.
For example, a Salesforce Apex REST Data Destination can push form data to update Chatter feeds.
-
Send a custom message to an Apex REST API endpoint.
For example, your developers can write APEX code to parse the JSON request body that contains data from submitted forms.
Info:The Salesforce Apex Developer Guide describes how a developer should configure an Apex endpoint.
Prerequisites
-
You must be either
-
a TrueContext Admin user or
-
a member of a FormSpace
FormSpaces are where forms are stored and organized in the TrueContext Web Portal. A TrueContext Team may have multiple FormSpaces, depending on their needs. Admins can set FormSpace permissions to control which users have access to the forms in that FormSpace. group with Can Create permissions.
-
-
Either a Salesforce Connection already exists in your TrueContext FormSpace, or you are a TrueContext Admin user and can create a Salesforce Connection.
-
Make sure that the TrueContext team has at least one Problem Contact Email Address. If the system fails to update records in a Data Destination, the Problem Contact Email Addresses get the error message and details.
-
Obtain the required header parameters and the URL for the REST API endpoint that you want to call.
-
Configure a Document with a Request Body formatted as per the Salesforce requirements, and then link the Document to one or more forms.
Info:The following topics describe in detail how to configure each template-driven document type to build your own data structure:Salesforce requires that you properly escape all the content in your Request Body for the specified document format.
Select the Salesforce Apex REST Data Destination
-
In the TrueContext Web Portal
The TrueContext Web Portal is a web application used to manage security settings, forms, FormSpaces, other users, Data Sources, and Data Destinations., go to Forms & Integrations > Data Destinations. -
Select Create Data Destination.
- From the Cloud Service Integration list, select Salesforce Apex REST Data Destination.
Configure the Name and other Destination Basics
On the Destination Basics tab, you can configure the name and other preferences:
-
Auto-link newly created forms and specific document types to this destination.
-
Disable the destination (to configure the destination for future use).
-
Select the number of times the destination fails before the system sends a problem notification.
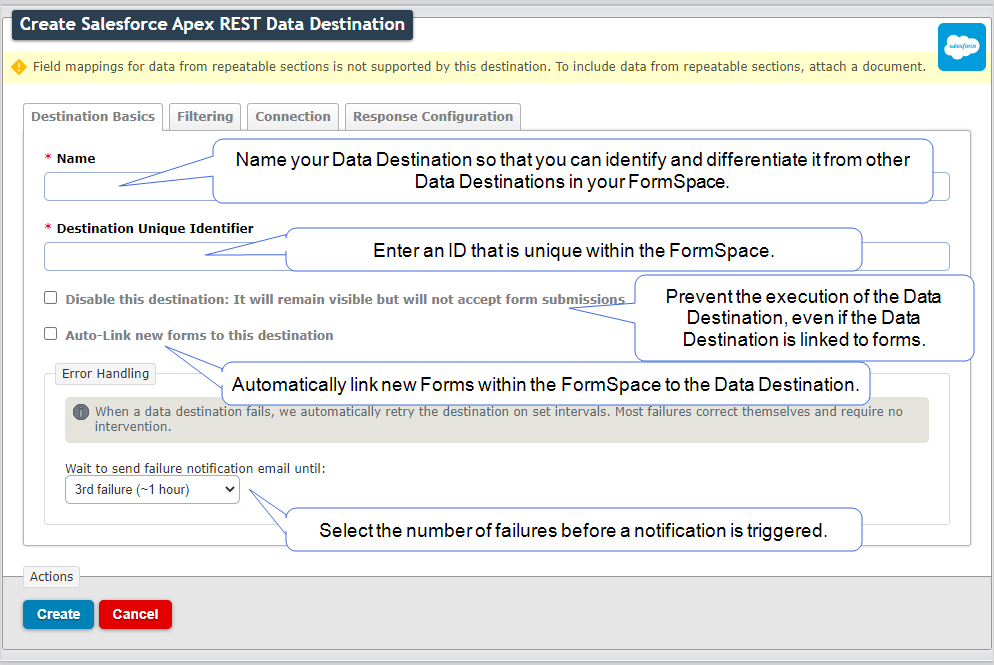
The following image shows how to configure the Destination Basics settings.
-
Name your Data Destination.
The name helps you to identify and differentiate this Data Destination from other Data Destinations
A Data Destination specifies where to send data from a submitted form. You can use Data Destinations to automate data sharing and storage, routing data to a specific service (such as email or cloud storage) in several different formats. in your FormSpace. -
Enter a Unique ID.
The system automatically generates a Unique ID based on the name. You can change the system-generated Unique ID to any alphanumeric or special characters, but the ID must be unique within the FormSpace.
-
Do you want to set up this destination, but temporarily prevent sending submitted form data to it?
-
If yes, select the Disable this destination... option. This prevents the execution of the Data Destination, even if you link it to one or more forms. You can save the configuration and enable the destination later.
-
If no, clear the Disable this destination… option to enable this destination for immediate use.
-
-
The Auto-Link new forms… option automatically links new forms created or imported in the same FormSpace to the Data Destination. Do you want to auto-link forms?
-
If yes, select this option.
Result: The system prompts you to auto-link documents. Go to step 5.
-
If no, clear this option, and then go to step 6.
-
-
The Auto-Link documents… option applies to auto-linked forms. This option saves you the effort of specifying a list of documents for each new form. Do you want to automatically link documents to this Data Destination?
-
If yes, select this option, and then select the documents to link.
-
If no, clear this option.
-
-
For Error Handling, from the Wait to send failure notification… list, select your preferred frequency.
If a Data Destination fails to execute, the system continues the attempts to execute it on a regular schedule. The system sends emails to the Problem Contact Email Addresses based on the configured frequency.
Tip: Most failures correct themselves and require no intervention.
Configure filtering rules for Data Destination execution
Filtering gives you greater control over which submitted forms are sent to your Data Destination. The Data Destination executes only when all conditions configured in the Filtering settings are met.
Keep the default settings or configure additional filter rules. Filter rules enable you to apply more conditions that determine whether the submitted form data gets sent to this specific Data Destination. You can apply filter rules to each of several Data Destinations to direct submitted forms to different destinations.
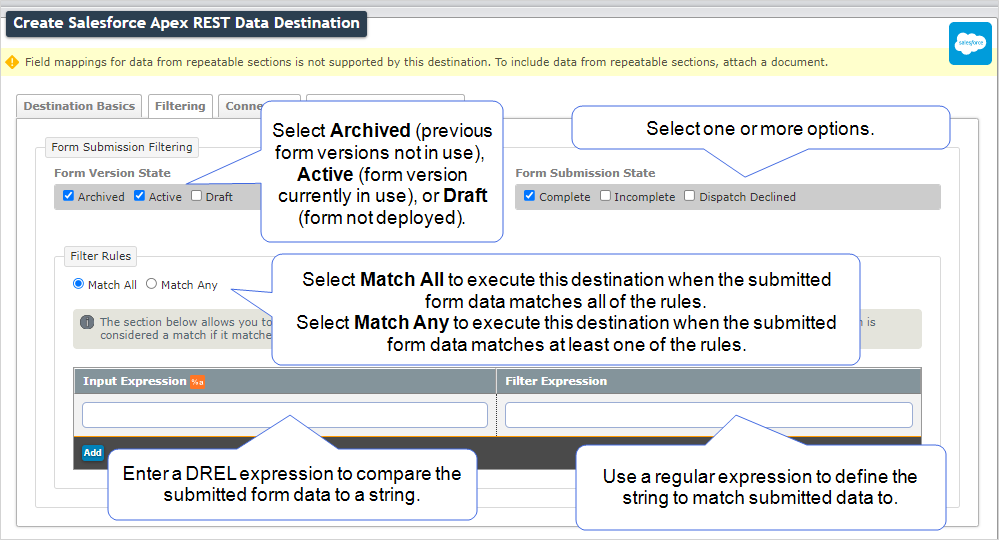
The following image shows how to configure the Filtering settings.
-
Select at least one Form Version State.
If you want the Data Destination to receive data from… Then select... previous form versions, not currently in use Archived
For example, you sent data from form submissions to an Email Data Destination. You now prefer to store all data in Salesforce instead. You can select Archived to send data from previous forms versions to Salesforce.
Note:Make sure you link this Data Destination to the previous form versions: Forms & Integrations > FormName > Version History > Version > Form Outputs > Edit Form Outputs
the latest form version, currently accessible to front-line workers Active
For example, you change a form to reflect the new product specifications. You can select Active to send data from only the latest form version to Salesforce.
forms used for testing Draft
For example, you dispatch a draft form to a few app users with Can Test permissions. You can select Draft to send data from the draft form to a Salesforce Sandbox. In this example, your Salesforce Connection must be configured as a Sandbox connection.
-
Select at least one Form Submission State.
-
Complete—execute the Data Destination when front-line workers submit complete forms.
-
Incomplete—execute the Data Destination when front-line workers submit incomplete TrueContext Teamwork-enabled forms.
-
Dispatch Declined—execute the Data Destination when you dispatch a prepopulated form to a Mobile App user and the app user declines the form.
-
-
In the Filter Rules section, you can apply conditions to execute the Data Destination based on form data and metadata. For example, you can create a rule to execute the destination only when a question has a response of “Pass”.
-
Do you want to execute the Data Destination only if the submitted data matches all of the rules?
-
If yes, select Match All. The destination executes if the submitted data matches all of the rules.
-
If no, select Match Any. The destination executes if the submitted form data matches at least one rule.
Note:The Match Any/Match All option applies to the conditions defined in the Filter Rules section only. The Data Destination executes only when all conditions for Form Submission Filtering and Filter Rules are met.
-
-
Input Expression—enter a DREL expression to specify the form data or metadata to match.
-
Filter Expression—enter a regular expression to define the string that you want to match, for example,
Pass.
-
Info:The topic Apply Filtering to Data Destinations describes in detail how to configure the Filtering settings.
Select or create a Salesforce Connection
The following image shows how to configure the Connection settings.

-
The Connection Configuration options available to you in this section vary depending on your account role settings and existing Salesforce Connections
A Connection is an integration point that's used to link a TrueContext Data Source or Data Destination to an external service to import or export data. Data Destinations and Data Sources that share the same external service can also share the same Connection..Do you have a TrueContext Admin role?
-
If yes, you can either select an existing Salesforce Connection or configure a new one.
-
If no, you can only select an existing Salesforce Connection that’s configured for your current FormSpace. If the system displays No available connections, contact your company’s TrueContext administrator for help.
-
-
Select an HTTP Method.
-
Post uses data from a submitted form to create a record in Salesforce.
-
Put uses data from a submitted form to create or replace an existing record in Salesforce.
-
Patch uses data from a submitted form to update part of an existing record in Salesforce.
-
-
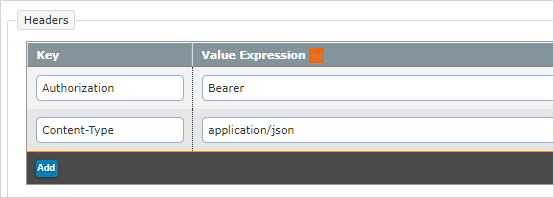
You can pass additional parameters to the endpoint by defining a set of key-value pairs in the Headers section. You can even use DREL expressions to populate the values with data from submitted forms.
For example, you might store different forms in different locations within Salesforce, based on the form name. Enter a Key that identifies the location and the Value Expression
%fto send the form name as the value.The following image shows examples of other key-value pairs, in this case, defined by static text rather than a DREL expression.
-
A custom URL prefix enables you to target specific locations in the Data Destination. Does the endpoint use a custom URL prefix?
-
If yes, from Apex REST Prefix list, select Custom and then enter the prefix.
-
If no, keep the default value /services/apexrest.
-
-
Enter the Apex REST Endpoint URL. You can use a DREL expression to dynamically generate the URL.
Info:If you use a DREL expression to generate the URL, remember to escape the data you reference. This ensures that the system URL encodes the output generated by the DREL expression.
Store response outputs to create multiple records sequentially
Salesforce Data Destinations typically return a record ID to TrueContext. These responses enable you to make sequential requests, typically to create parent-child records.
The topic Use Response Data Handling to Store Data Received from a Third-Party System explains how these work and provides example use cases.
The topic Configure Response Data Handling for Salesforce Data Destinations describes how to set up a parent-child relationship.
Keep in mind that TrueContext stores the ID of the last object created in Salesforce. If a Data Destination creates a record and attaches files to it, TrueContext stores the ID of the last file attached. If you need to create a record and attach files to it, we recommend that you create two separate Data Destinations.
For more information about Salesforce API responses, refer to the Salesforce API documentation.
On the Response Configuration tab, select either the Don’t store… or Store all… option as shown in the following example.

Tip:If you want to make this destination a parent of a child destination, select the option to store response outputs. When you configure the child destination, you can use the %o DREL![]() Data Reference Expression Language (DREL) is used to get form data and metadata and add it to a string, such as dates, usernames, or answers to questions in forms. property to reference the stored output.
Data Reference Expression Language (DREL) is used to get form data and metadata and add it to a string, such as dates, usernames, or answers to questions in forms. property to reference the stored output.
Create and save the new Data Destination
Once you configure all required settings, select Create.
Result: The system creates your Salesforce Data Destination in TrueContext and displays the Data Destination details page. You can now link the Data Destination to forms in the same FormSpace.
Tip: Test and troubleshoot a Salesforce Data Destination before you use the Data Destination in a live Salesforce environment.