Post a Chatter Feed Item using the Salesforce Apex REST Data Destination
Available as an add-on for the Intelligent and Elite tiers:
This recipe shows you how to configure a Data Destination![]() A Data Destination specifies where to send data from a submitted form. You can use Data Destinations to automate data sharing and storage, routing data to a specific service (such as email or cloud storage) in several different formats. to post a Salesforce Chatter Feed Item when a user submits a form. This recipe describes how to:
A Data Destination specifies where to send data from a submitted form. You can use Data Destinations to automate data sharing and storage, routing data to a specific service (such as email or cloud storage) in several different formats. to post a Salesforce Chatter Feed Item when a user submits a form. This recipe describes how to:
-
Configure a Salesforce Apex REST Data Destination to post a Chatter Feed Item.
-
Configure a Document with a Request Body to post a Chatter Feed Item.
To support existing integrations, some items will continue to use “prontoforms” or “pf” in the domain or code.
Configure a Salesforce Apex REST Data Destination to post a Chatter Feed Item
Prerequisites
-
You must be an Admin user.
-
You must have a Salesforce account with Chatter enabled. Chatter is enabled by default on Salesforce organizations created after June 22, 2010.
-
You must have a Salesforce Connection configured.
Info:The topic Salesforce Connection describes in detail how to configure a Salesforce Connection.
Steps
-
Go to Forms & Integrations > Data Destinations.
-
Select CREATE DATA DESTINATION, and then select Salesforce Apex REST.
-
Configure the Destination Basics, Filtering, and Response Configuration tabs as needed.
Info:The topic Salesforce Apex Data Destination describes in detail how to configure a Salesforce Apex REST
 The Salesforce Apex REST is a type of Salesforce Data Destination that enables TrueContext to interact with Salesforce by means of an Apex REST API endpoint. If using an Apex REST API endpoint, developers can write APEX code to send custom messages that pull specific data from submitted forms. Data Destination.
 -
On the Connection tab:
-
Select your Salesforce Connection.
-
Select POST as the HTTP Method.
-
Under Apex REST Prefix, select Custom, and enter the following as the prefix:
/services/data/v51.0Note:Make sure to adjust the API version to your current Salesforce API version. In the example, the API version is 51.0.
-
Enter the following as the Apex REST Endpoint:
/chatter/feed-elements
The following example shows the configuration of the Connection tab.

Tip:You can leave the custom prefix field blank, and enter the prefix and the endpoint in the Apex REST Endpoint section.
-
-
Select Create.
Result: You created a Salesforce Apex REST Data Destination that can post a Chatter Feed Item.
Configure a Document with a Request Body to post a Chatter Feed Item
Prerequisites
-
Make note of the Salesforce Record ID, Group ID, or User ID that will parent the Feed Item. You must include one of the IDs in the Salesforce
SubjectIdparameter. -
You must have a Request Body formatted according to Salesforce requirements.
Info:The Salesforce Developer Guide explains in detail how to format a Request body to Post a Chatter Feed item.
Steps
-
Go to Forms & Integrations > Documents.
-
Select CREATE DOCUMENT.
-
Select a document type from the Template-driven Text Documents. You can select DREL
Data Reference Expression Language (DREL) is used to get form data and metadata and add it to a string, such as dates, usernames, or answers to questions in forms., FreeMarker, or Handlebars. -
Configure your document as needed.
Info:The following topics describe in detail how to configure each document type: -
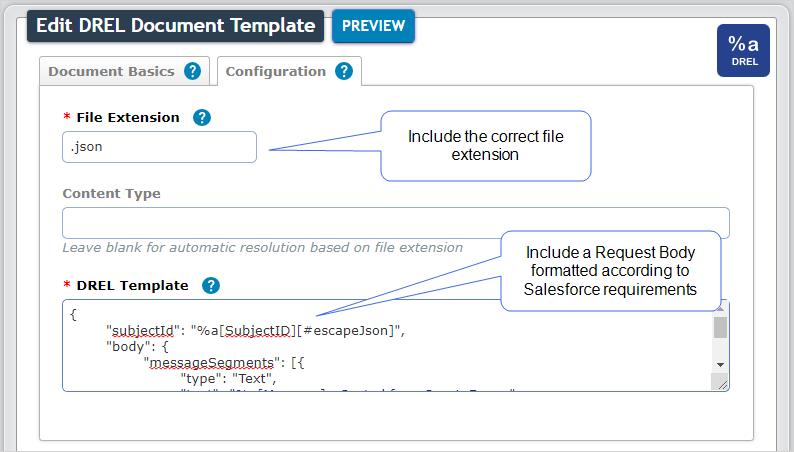
Include the Request Body formatted according to Salesforce requirements in the following sections:
-
DREL documents—in the DREL Template section.
-
FreeMarker documents—upload an FTL file in the FreeMarker Template section.
-
Handlebars documents—in the Handlebars Template section.
Info:We recommend that you escape the data for all JSON, XML, HTML, and CSV documents. This ensures that the system generates a valid document in your selected format.
The following example shows a DREL Document with a Request Body formatted according to Salesforce requirements.
 Info:The following sections contain Request Body examples.
 -
-
Select Create.
Result: You created a Document with a Request Body to post a Salesforce Chatter Feed Item.
DREL Request Body examples
The following Request Body posts a message to Chatter based on the answer to a question in a TrueContext form, where
-
a question with the Unique ID
A Unique ID refers to the specific identifier of a question, form page, form section, or Data Destination. Unique IDs are used as reference points when pulling data for conditional logic, Analytics projects, Data Destinations, and Documents. Messagepopulates part of the text in the Chatter Feed Item, and -
a question with the Unique ID
recordIDpopulates the SalesforcesubjectIdparameter in the Request Body. This means that thesubjectIdmight change for every submitted form.
Note:All DREL expressions in the example include a property to escape the data. This means that if the answer has special characters or line breaks, the system still generates a valid JSON document.
{
  "body": {
    "messageSegments": [
      {
        "type": "Text",
        "text": "%a[Message][#escapeJson] - Posted from TrueContext"
      }
    ]
  },
  "feedElementType": "FeedItem",
  "subjectId": "%a[recordID][#escapeJson]"
}
In this next example,
-
a question with the Unique ID
SiteIDpopulates the SalesforceentityIdparameter -
a question with the Unique ID
WOLocationpopulates part of the text in the Chatter Feed Item -
a question with the Unique ID
SFDCUserIDpopulates a Salesforce User ID that displays as a Mention in the Chatter message, and -
the Salesforce
subjectIDparameter is hardcoded. This means that thesubjectIdis the same for every submitted form.
Note:All DREL expressions in the example include a property to escape the data. This means that if the answer has special characters or line breaks, the system still generates a valid JSON document.
{
  "body": {
    "messageSegments": [
      {
        "type": "Text",
        "text": "A site inspection was submitted for location "
      },
      {
        "type": "EntityLink",
        "entityId": "%a[SiteID][#escapeJson]"
      },
      {
        "type": "Text",
        "text": " at %a[WOLocation][#escapeJson] by "
      },
      {
        "type": "Mention",
        "id": "%a[SFDCUserID][#escapeJson]"
      }
    ]
  },
  "feedElementType": "FeedItem",
  "subjectId": "0F91I000000hndjSAA"
}
In this final DREL example,
-
a question with the Unique ID
AccountID, and a question with the Unique IDSiteIDpopulate the SalesforceentityIdparameter -
a question with the Unique ID
SFDCUserIDpopulates a Salesforce User ID that displays as a Mention in the Chatter message, and -
the Salesforce
subjectIDparameter is hardcoded. This means that thesubjectIdis the same for every submitted form.
Note:All DREL expressions in the example include a property to escape the data. This means that if the answer has special characters or line breaks, the system still generates a valid JSON document.
{
  "body": {
    "messageSegments": [
      {
        "type": "Text",
        "text": "A new opportunity was was created for account "
      },
      {
        "type": "EntityLink",
        "entityId": "%a[AccountID][#escapeJson]"
      },
      {
        "type": "Text",
        "text": " from an inspection at location "
      },
      {
        "type": "EntityLink",
        "entityId": "%a[SiteID][#escapeJson]"
      },
      {
        "type": "Text",
        "text": " by "
      },
      {
        "type": "Mention",
        "id": "%a[SFDCUserID][#escapeJson]"
      },
      {
        "type": "Hashtag",
        "tag": "NewSalesOpp"
      }
    ]
  },
  "feedElementType": "FeedItem",
  "subjectId": "0F91I000000hndjSAA"
}
Handlebars Request Body example
In the following example,
-
the expression
{{pf:outputFormat "JSON"}}sets the output format to JSON. When you add this expression, the system escapes the data referenced by Handlebars and generates valid JSON output. -
a question with the Unique ID
GroupIDpopulates the SalesforcesubjectIdparameter in the Request Body. This means that thesubjectIdmight change for every submitted form. -
a question with the Unique ID
RecordIDpopulates the SalesforceentityIdparameter -
a question with the Unique ID
TechnicianId, and a question with the Unique IDSupervisorIdpopulate a Salesforce User ID that displays as a Mention in the Chatter message, and -
the
{{#pf:if}}element indicates a condition based on the answer to a question with the Unique IDFollowUpWorkOrder.
{{pf:outputFormat "JSON"}}
{
  "feedElementType": "FeedItem",
  "subjectId": "{{answers.GroupID.[0]}}",
  "body": {
    "messageSegments": [
      {
        "type": "Text",
        "text": "Work Order "
      },
      {
        "type": "EntityLink",
        "entityId": "{{answers.RecordID.[0]}}"
      },
      {
        "type": "Text",
        "text": "has been completed by "
      },
      {
        "type": "Mention",
        "id": "{{answers.TechnicianId.[0]}}"
      },
      {{#pf:if answers.FollowUpWorkOrder. [0] "is" "Yes"}}
      {
        "type": "Mention",
        "id": "{{answers.SupervisorId.[0]}}"
      },
      {
        "type": "Text",
        "text": " - A follow-up work order will be generated."
      },
      {{/pf:if}}
    ]
  }
}
Link the Data Destination and Document to the form
Prerequisites
-
You must have a form configured.
-
You must have a Salesforce Apex REST Data Destination configured to post a Chatter Feed Item.
-
You must have a Document with a Request Body to post a Chatter Feed Item configured.
Note:Make sure that the Unique IDs of your questions match the Unique IDs you specified in the Document.
Steps
-
From the Forms & Integrations menu, navigate to the form you want to set up.
-
Select EDIT FORM.
Result: The form opens in edit mode.
-
Select DESTINATIONS, and then select ADD A DATA DESTINATION.
Result: A list of your Data Destinations
A Data Destination specifies where to send data from a submitted form. You can use Data Destinations to automate data sharing and storage, routing data to a specific service (such as email or cloud storage) in several different formats. opens. -
Select the Salesforce Apex REST Data Destination you configured to post a Chatter Feed Item.
Result: The system adds the Data Destination to your form. A page to configure the Data Destination on the form opens.
-
In the Documents section, select the document you configured to post a Chatter Feed Item from the dropdown.
Tip:Remember to Save and Deploy the form when you’re ready to make it available to your field users.