Enable Data Passthrough on Forms
Data Passthrough is a setting you can enable on a form when you don’t want the TrueContext server to store your data. Use this feature when your organization’s security policies prohibit storing information on an external server.
This topic describes how Data Passthrough works and how to enable the setting on a form. It also includes a list of TrueContext features that are not compatible with Data Passthrough.
Available on all tiers:
Contents
How Data Passthrough works
When you enable the Data Passthrough setting on a form, the TrueContext server keeps the submitted form data in encrypted storage for 24 hours. After 24 hours, the server deletes the data from the TrueContext server.
Why Data Passthrough requires two types of Data Destinations
Data Passthrough relies on your Data Destinations![]() A Data Destination specifies where to send data from a submitted form. You can use Data Destinations to automate data sharing and storage, routing data to a specific service (such as email or cloud storage) in several different formats. to store the data from submitted forms in your preferred system.
A Data Destination specifies where to send data from a submitted form. You can use Data Destinations to automate data sharing and storage, routing data to a specific service (such as email or cloud storage) in several different formats. to store the data from submitted forms in your preferred system.
To prevent possible data loss, you must associate at least two unique types of Data Destination![]() A Data Destination specifies where to send data from a submitted form. You can use Data Destinations to automate data sharing and storage, routing data to a specific service (such as email or cloud storage) in several different formats. with each Data Passthrough-enabled form. This is important because TrueContext deletes the submitted data from our server after 24 hours, even if a Data Destination fails.
A Data Destination specifies where to send data from a submitted form. You can use Data Destinations to automate data sharing and storage, routing data to a specific service (such as email or cloud storage) in several different formats. with each Data Passthrough-enabled form. This is important because TrueContext deletes the submitted data from our server after 24 hours, even if a Data Destination fails.
For example:
-
A user submits a form with Data Passthrough enabled.
-
The system executes your Data Destinations.
-
Your first Data Destination, Google Sheets, fails to execute because of a problem with Google services.
-
Your second Data Destination, Email, executes successfully.
-
You can access your data from the second Data Destination.
Info:The topic Data Destinations Overview includes a full list of all the different Data Destination types you can configure.
A second Data Destination can also help you to troubleshoot your form. For example:
-
A user submits a form with Data Passthrough enabled.
-
The system executes your Data Destinations.
-
Your Email Data Destination fails because of an incorrect email address.
-
You can access the data from the submitted form in your additional Data Destination and see that the email address is incorrect.
Note:The TrueContext Support team can’t easily troubleshoot forms that have Data Passthrough enabled, because they can’t access data from your submitted forms. If you need help with troubleshooting Data Destination failures, access the data from a destination that executed successfully and provide that data to Support.
TrueContext features incompatible with Data Passthrough
The Data Passthrough setting deletes submitted data from the TrueContext server 24 hours after submission. For this reason, any features that require data from a submitted form are not compatible with Data Passthrough, including:
- Form Submission Corrections
- Viewing Form Submissions from the Mobile App Sent page
- Retrieving Form Submissions/Documents via the TrueContext REST API
- Advanced Analytics
- Mobile Search
- TrueContext Teamwork
Enable Data Passthrough on a form
Prerequisites
-
Your form must have two different types of Data Destinations added. This ensures that you have a backup in case your main Data Destination fails. For example:
- You can configure Data Passthrough for a form that has both a Dropbox and an Email Data Destination.
- You cannot configure Data Passthrough for a form that has two different Email Data Destinations configured.
Warning:If both of your Data Destinations fail, you will lose your data after 24 hours. The TrueContext server holds your data for 24 hours and re-executes the entire submission, including successful Data Destinations. After 24 hours, the TrueContext server deletes the data.
-
Your form must not have Editing enabled.
-
Your form must not have TrueContext Teamwork
 TrueContext Teamwork is a feature that enables mobile users to transfer incomplete forms for other users to complete as part of a multi-user workflow. This can be useful for jobs that require someone else's expertise or that span multiple shifts. enabled.
 -
We strongly recommend that you configure at least one Problem Contact Email Address.
Info:The topic Set up Problem Contact Email Addresses describes how to configure an email address to receive notifications when Data Destinations fail.
Steps to enable Data Passthrough on a form
-
From the Forms & Integrations menu, navigate to the form you want to set up.
-
Select Edit Form.
Result: The form opens in edit mode.
-
Select Settings, and then select Advanced Properties.
-
Select the checkbox to enable Data Passthrough.
Result: The system confirms that you enabled Data Passthrough.
Tip:Remember to Save and Deploy the form when you’re ready to make it available to your field users.
Before you enable Data Passthrough
When you make any changes to the form
When you make any changes to Data Sources
Data sources, also known as "Lookups", are external sources of data that you upload or connect to TrueContext. You can reference this data in a form to populate answers or answer options. Data sources save typing, reduce errors, and make it easy to provide mobile users with only the relevant, most current data. or Data Destinations associated with the form
To mitigate the risk of data loss, ensure that your Data Destinations execute properly.
How failed Form Submissions re-execute in Data Passthrough-enabled forms
Data Passthrough-enabled forms require that you configure at least two different types of Data Destinations. If any of your Data Destinations fail, the server re-executes the form submission, including previously successful Data Destinations. This means that the server re-sends the data from the submitted form to all your Data Destinations.
Note:A failed Data Destination is the only reason we don’t immediately delete the data from a Data Passthrough-enabled form. If both of your Data Destinations continue to fail, you will lose your data after 24 hours.
We re-execute the form submission every 10 minutes for up to 24 hours. We delete the data when all destinations have successfully executed or after 24 hours have passed. Our server is configured to delete data that’s older than 24 hours, but only once a day. This means it can take up to 48 hours for your data to be deleted.
An email Data Destination succeeds.
A Google Sheets Data Destination fails.
The server re-executes both destinations every ten minutes until they all succeed, up to 24 hours.
The email destination receives multiple sets of data from the submitted form.
Stop a failed Form Submission from re-executing
-
Identify the Data Destination that failed. To do that go to
Data & Analytics > Submissions (by Form) > FormName > Continue
or
Forms & Integrations > FormName > Go to submissions
Result: The Web Portal displays the Form Submissions page for the selected form. By default, the Form Submissions page displays form submissions from the last 30 days.
-
Select the Form Submission that failed.
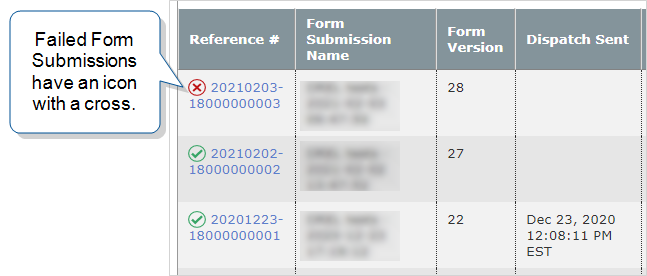
Result: The Form Submission details page opens.
-
On the error message, identify the Data Destination that failed.
In the following example, the Form Submission has three different Data Destinations configured. The Data Destination that failed is the Microsoft SharePoint List Data Destination, as specified in the error message.
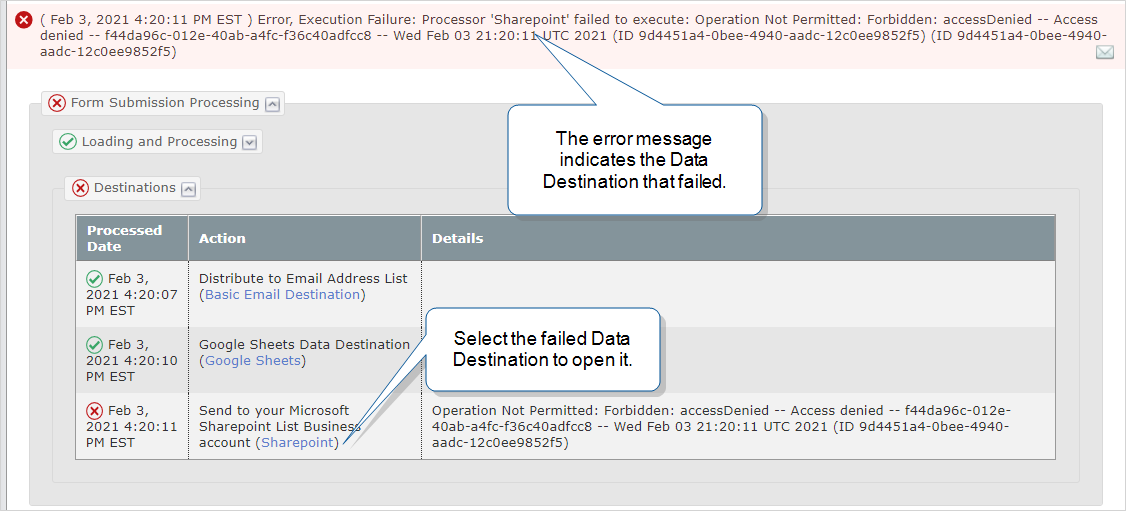
-
Select the failed Data Destination to open it, and then select EDIT DATA DESTINATION.
Result: The Data Destination opens in edit mode.
-
In the Destination Basics tab, select the check box to disable the Destination.
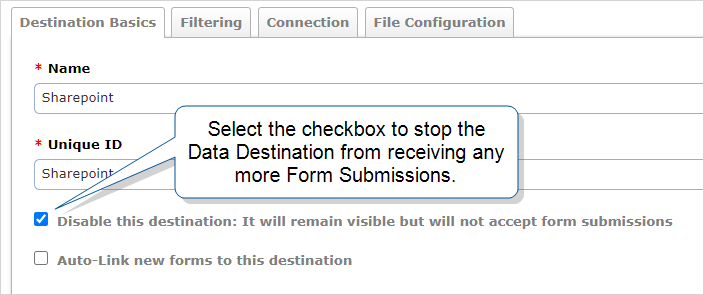
Result: The Data Destination is no longer active and does not receive any more Form Submissions.
-
Select Update to save your changes.
Result: The failed Form Submission re-executes one last time, and no Data Destinations fail.