Set Up Form Properties
This topic describes the Form Builder![]() The Form Builder is the tool that form designers use to create forms. In the Form Builder, accessed from the TrueContext Web Portal, form designers can add and edit pages, sections, and questions, as well as attach data destinations and configure the form's settings. Settings that you can customize. These include settings to control what’s displayed on the Mobile App, the documents that a user can download, and other form-level properties.
The Form Builder is the tool that form designers use to create forms. In the Form Builder, accessed from the TrueContext Web Portal, form designers can add and edit pages, sections, and questions, as well as attach data destinations and configure the form's settings. Settings that you can customize. These include settings to control what’s displayed on the Mobile App, the documents that a user can download, and other form-level properties.
Available on all tiers with more options on the Intelligent and Elite tiers:
Contents
Form Builder Settings page
To set up the properties of a specific form:
-
Forms & Integrations > Form Name > Edit Form
or
Forms & Integrations > Create New Form, select the form type, and then enter the form name and description.
Tip:The Summary Page Options view displays the description in the Mobile App.
-
Select Settings.
Result: The system displays the Settings page. From here, you can set up the form properties.
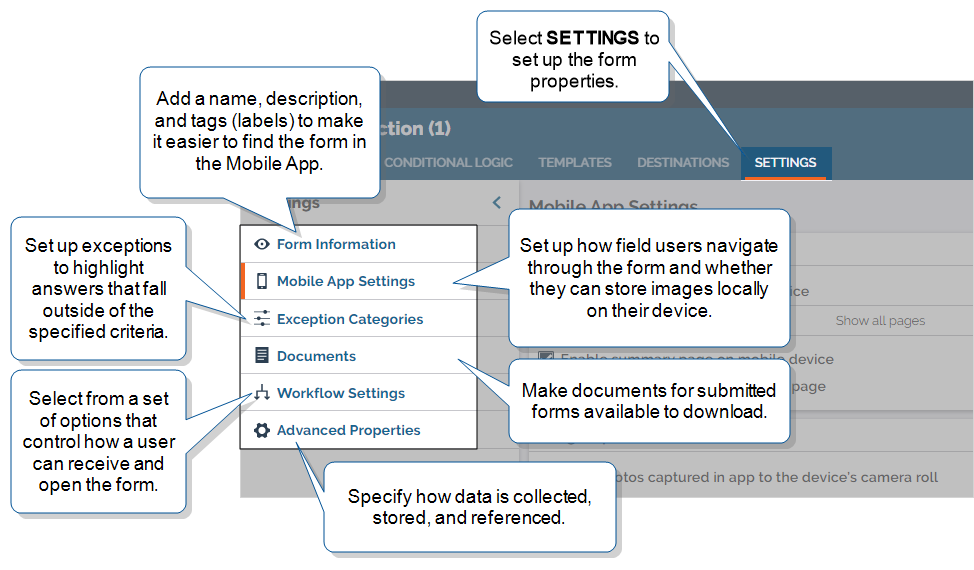
The following sections describe the properties in more detail.
Form Information
General Information
-
Form Name
-
A name that clearly identifies the form, such as Vehicle Inspection.
Note: Changes to the Form Name could affect Documents and Data Destinations
 A Data Destination specifies where to send data from a submitted form. You can use Data Destinations to automate data sharing and storage, routing data to a specific service (such as email or cloud storage) in several different formats.. Check all Document and Data Destination A Data Destination specifies where to send data from a submitted form. You can use Data Destinations to automate data sharing and storage, routing data to a specific service (such as email or cloud storage) in several different formats. settings to determine the potential impact of any changes to the Form Name.
 -
Form Description
-
Enter a short description of your form for future reference. The description also displays in the Forms list on the Mobile App.
-
Tags
-
Tags help your field users quickly find the form they need in the Forms, Inbox, Drafts, and Sent lists. Field users can select or type tag names to display a list of matching forms.
To add a tag, type it in the Tags field, and then select Return or Enter.
Tip:Tags are not case-sensitive.
The following example shows how to add the tags inspection and campus:
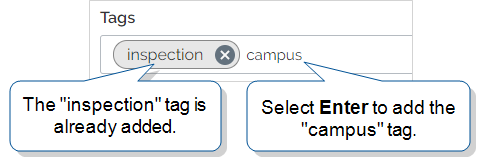
Tags can have up to 12 alphanumeric, -, and _ characters. You can add up to 250 tags per form.
Info:The topic Use Form Tags in the Mobile App to Filter a List of Forms describes tags in more detail.
Languages
Available on the Elite tier:
Info:The topic Set Up a Multi-Language Form provides detailed steps to set up multiple languages.
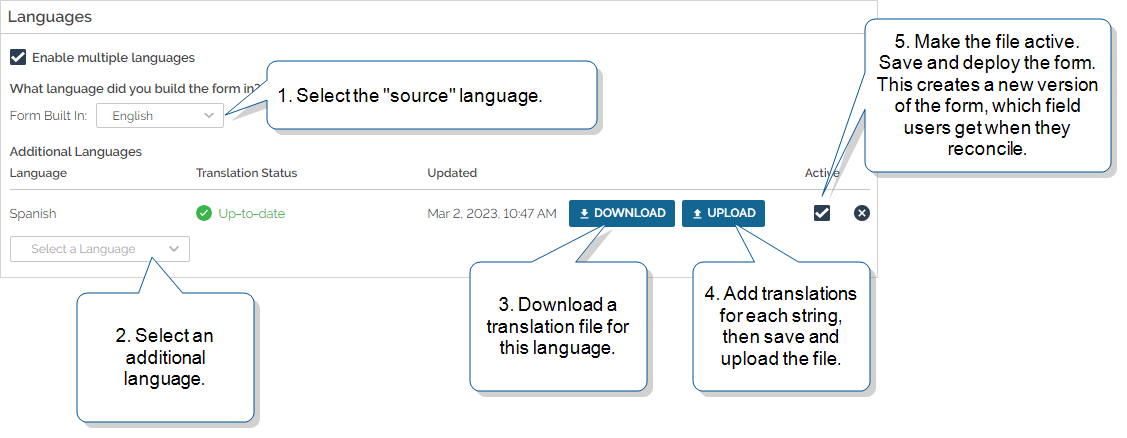
Info:The Multi-Language feature does not include app framework content (navigation, action buttons, and error messages, for example). This content is translated based on the user’s device locale, as described in the topic Language Settings and Translations.
Mobile App Settings
The Mobile App Settings control how Mobile App users navigate through the form and whether they can access a summary view. They also control whether they can store images locally on their devices.
Form Options
Form Options control form navigation.
Navigation index
The navigation index is a list of the pages in a multi-page form.
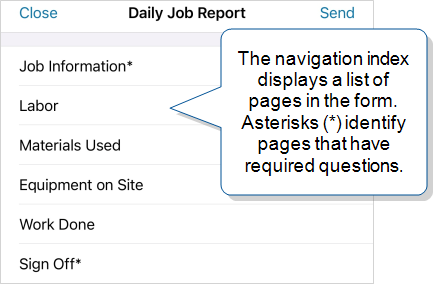

-
Show only visited pages—Users must answer all required questions on the current page before they can move to the next page. Once they’ve completed a page, they can go back to it.
-
Show all pages—Users can work through the form in any order, even jumping ahead several pages.
Note:If your form includes Conditional Logic, think carefully before you select the Show all pages option. Users might skip over a question that triggers a Conditional Logic rule. If the user goes back to a previous page and triggers that rule, some of their work could be changed or erased.
Summary Page Options
Users can access a Summary Page to review their answers before they submit the form.
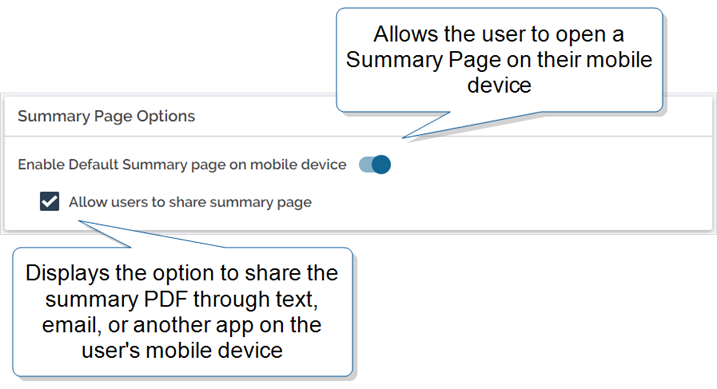
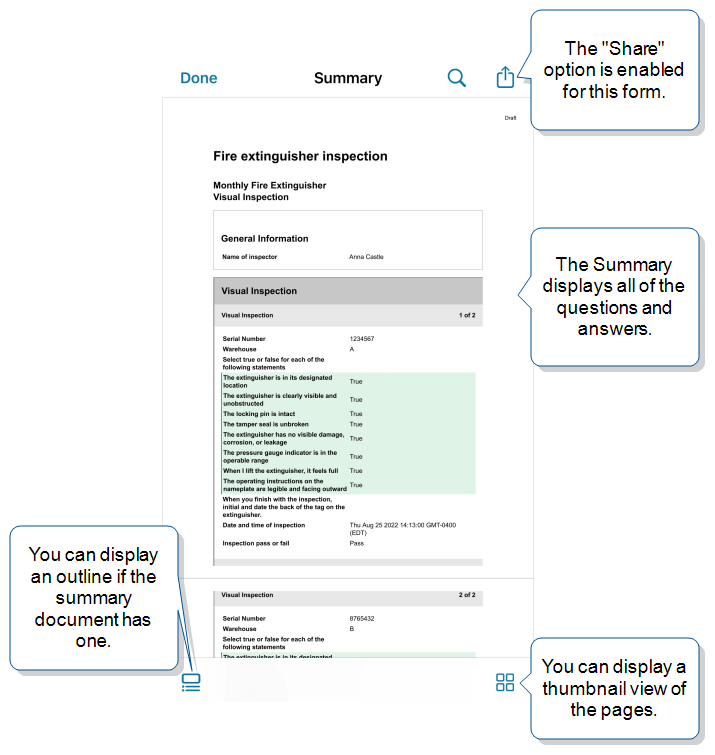
The Summary Page:
-
Helps field users to confirm that they’ve entered all data correctly.
-
Gives customers a clear view of the work completed before they sign off. To let users share the summary page, select Allow users to share summary page.
Tip:If you want to limit access to sensitive data, clear the option to allow users to share the Summary Page. They won’t be able to print the summary or share by text or email.
Image Options
Image options control whether field users can save photos taken in the TrueContext Mobile App to their device.
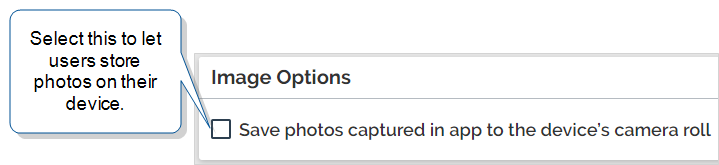
If you have HIPAA compliance requirements, we recommend that you do not enable the option to save images on devices.
Work History
Available on the Elite tier:
Prerequisites
You can only map entities![]() An entity is a category that identifies who or what a form is about, such as an asset, site, project, customer, person, or product. to questions with supported question types that are not in repeatable sections. Invalid questions won't be available to select in the entity mapping picker. Supported question types for entity mapping are:
An entity is a category that identifies who or what a form is about, such as an asset, site, project, customer, person, or product. to questions with supported question types that are not in repeatable sections. Invalid questions won't be available to select in the entity mapping picker. Supported question types for entity mapping are:
- Text Field (Free Text or Integer data types)
- Barcode Scanner
- Dropdown/Radio Button (Free Text or Integer data types; supports Data Source Data sources, also known as "Lookups", are external sources of data that you upload or connect to TrueContext. You can reference this data in a form to populate answers or answer options. Data sources save typing, reduce errors, and make it easy to provide mobile users with only the relevant, most current data. lookup and inline lists)
- String Concatenation
Capture Work History: Map entities to questions
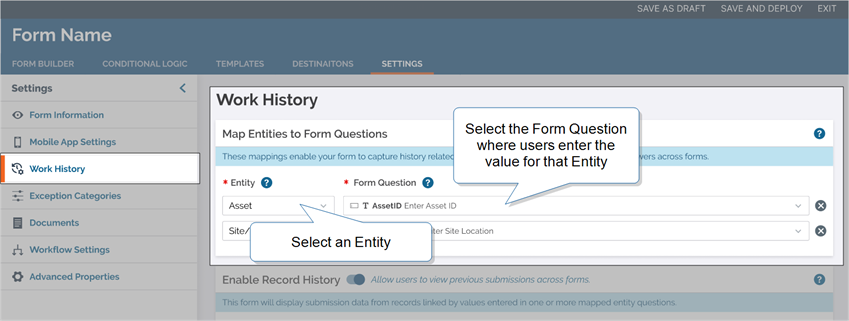
- Open your form in the Form Builder.
- Go to SettingsWork History. In the Map Entities to Form Questions section:
-
Select an Entity represented by a question in your form.
AND
- Select the Form Question where users enter the value for that entity. You can only map one question per entity.
-
Optionally, repeat steps 3 and 4 to map a second Entity. There is a maximum of two mapped entities per form. Delete a mapped entity
A form question mapped to an entity type, used to match other submissions that share the same answer. if you need to add an additional one.
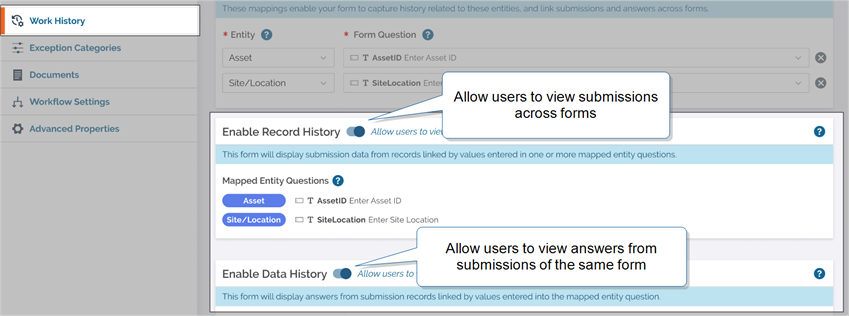
Display Work History
- EnableRecord History Record History refers to complete records from submissions across forms that share matching mapped entity values. It lets users review past work related to the same entity, such as an asset, site, or customer.
- Enable Data History Data History refers to data from submissions of the same form that share matching mapped entity values. It lets users review previous answers related to the same entity, such as an asset, site, or customer.
Exception Categories
Exceptions highlight issues in real time as your field users work through a form. Exceptions provide color-coded feedback directly in the form.

This example shows three typical Exception categories, each with a different color.
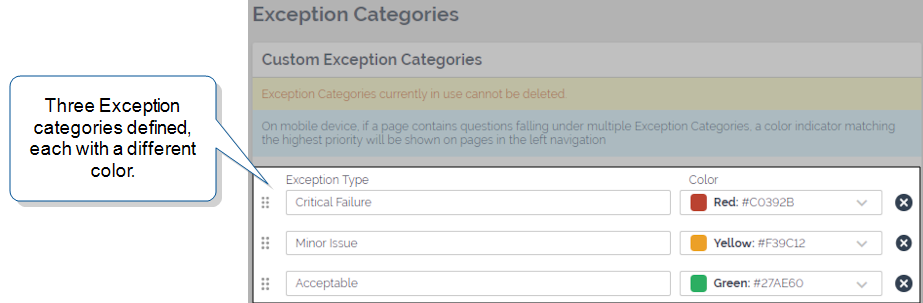
Info: If an answer triggers more than one Exception, the highest priority (top) category applies. The topic Answer Exceptions describes in detail how to set up your Exception categories.
Once you define Exception categories, you can apply them to number-based and options-based questions throughout the form. You can also set up a Recap question to count the number of answers in each category. Then, you can use that value to drive Conditional Logic. For example, you can count the number of critical issues and enforce a specific workflow based on that count.
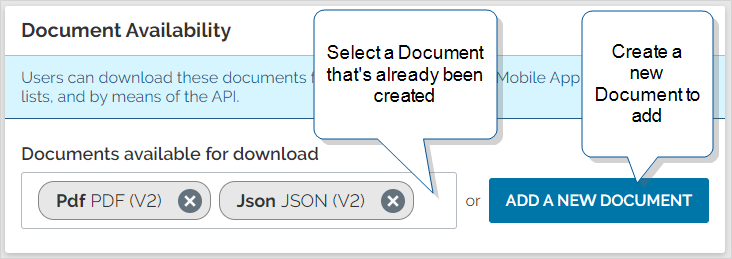
Documents
Documents display the contents of submitted forms in different formats. In the Documents section, you can make documents available for download from the Web Portal, the TrueContext REST API, and the Mobile App Sent and Search lists. This setting does not affect documents sent to a Data Destination.
Select the Documents available for download field and choose a document from the list. To create a new document, select Add a new document.
Workflow Settings
The Workflow Settings control a sequence of processes by which a user can open a form. These include dispatched forms, edits to submitted forms, search options, TrueContext Teamwork![]() TrueContext Teamwork is a feature that enables mobile users to transfer incomplete forms for other users to complete as part of a multi-user workflow. This can be useful for jobs that require someone else's expertise or that span multiple shifts. options, and App‑to‑App custom callback parameters.
TrueContext Teamwork is a feature that enables mobile users to transfer incomplete forms for other users to complete as part of a multi-user workflow. This can be useful for jobs that require someone else's expertise or that span multiple shifts. options, and App‑to‑App custom callback parameters.
Form Initiation Methods
Configure how you want mobile users or supervisors to begin a workflow.
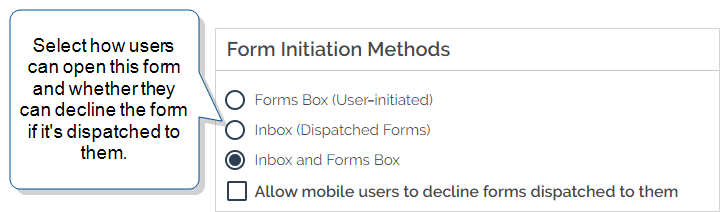
- Forms Box (User-initiated)
- Mobile users can open blank forms from the Forms list in the Mobile App.
- Inbox (Dispatched forms)
-
Admins can dispatch a form to one or more mobile users. They can choose to prepopulate some of the answers to the form. Mobile users can access all forms dispatched to them from their Inbox in the Mobile App.
Info:
- Inbox and Forms Box
- Mobile users can open blank forms from the Forms list and dispatched forms from their Inbox.
Tip:Make sure that the Forms list or Inbox are enabled for your team.
If you allow users to access dispatched forms from their Inbox, you can also allow users to decline them. When a user declines a dispatch, the form submission status changes to Cancelled.
Note:If you enable the TrueContext Teamwork setting, users can’t decline dispatched forms.
Refresh on Form Open
Available on the Intelligent and Elite tiers:
Refresh on Form Open is an advanced form-level setting that activates a check for form and data freshness. When a field user or an App‑to‑App request opens the form, TrueContext checks and updates the following types of data:
-
The latest version of the form.
-
Any Resource Images and Resource Documents used in the form.
-
Data Source values from the most recent fetch.
-
User lists for TrueContext Teamwork-enabled forms that field users can transfer directly to another user.
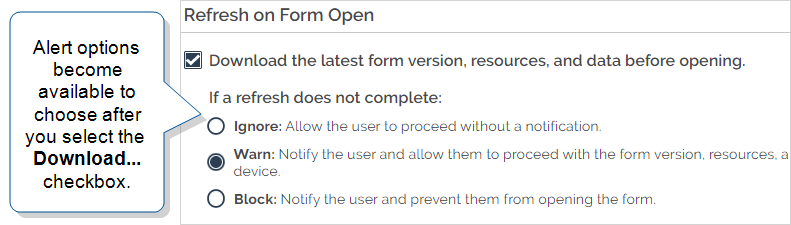
Enforce a check for the latest form version and data. You can block or warn the user if the refresh can’t get the latest updates.
Use an App‑to‑App request to launch the TrueContext Mobile App from a third-party app and enforce a check for form and data updates.
For Refresh on Form Open, remember that users must reconcile to get the form version that has this setting enabled. After that, the refresh action automatically checks for new form versions and data.
The following table describes the options you can choose if a refresh fails to complete.
| Form setup | Description | Reason for failed refresh | Alert displayed on the Mobile App |
|---|---|---|---|
| Ignore |
Least restrictive, field users can open and work on the form. Users can work without interruption but might not have the latest form version and data. |
Device is offline | None |
| Network or system error | None | ||
| Warn |
More restrictive, notifies the field user that their form and data might not be up-to-date. Users can decide whether to proceed without the latest form version and data. |
Device is offline | 
|
| Network or system error | 
|
||
| Block |
Most restrictive, user must refresh before they can start work on the form. Ensures that the form version and data are up-to-date before the user starts work. If the system can’t perform the data freshness check or updates, it blocks the user, even if their data is up-to-date. Warning:
This option prevents field users from starting work if the data freshness check or updates fail. Use this option only when you know that field users will be online when they open the form. |
Device is offline | 
|
| Network or system error | 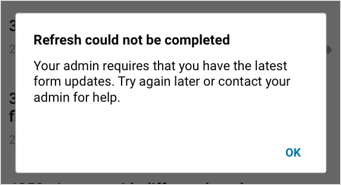
|
Info:The topic Refresh on Form Open describes in detail how this option works.
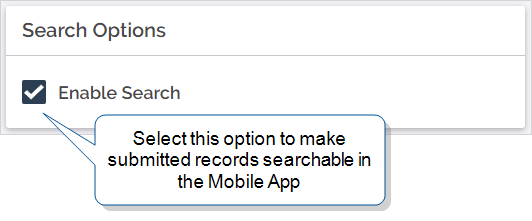
Search Options
Users can search for submitted forms or incomplete TrueContext Teamwork-enabled forms.
Corrections (Editing)
You can allow Mobile App users to correct
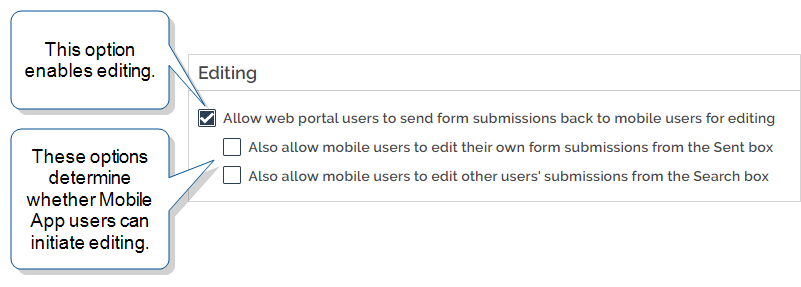
From the Web Portal, you can send a record for corrections. You can send the record to the user who submitted the record or to a different user.
-
If you enable Data Passthrough, you can’t send forms for corrections
-
If you want users to initiate corrections from the Sent or Search lists, make sure to enable these in the team-level settings.
Info:Unlike dispatched forms, forms sent for corrections can’t be declined. The topic Editing Form Submissions describes how corrections work in more detail.
TrueContext Teamwork
Available on the Intelligent and Elite tiers:
The TrueContext Teamwork feature supports team collaboration by enabling your mobile users to transfer forms between them. With the TrueContext Teamwork feature, it's easy to implement a multi-user workflow.
Some jobs require more than one technician to complete an assignment. Your mobile workforce can submit incomplete forms for other team members to complete. Supervisors or team leads can track the work’s progress in the Web Portal and take action (unassign or assign![]() Assigning and reassigning control which users are responsible for dispatched records. A dispatcher with the "Can Manage Assignments" FormSpace permission can assign a record to a user or group and reassign it if the original assignee is unavailable. Field users can also claim unassigned records from the Group Inbox. work) as needed.
Assigning and reassigning control which users are responsible for dispatched records. A dispatcher with the "Can Manage Assignments" FormSpace permission can assign a record to a user or group and reassign it if the original assignee is unavailable. Field users can also claim unassigned records from the Group Inbox. work) as needed.
Note: This feature supports consecutive workflows. Only one mobile device user at a time can be assigned to a record.
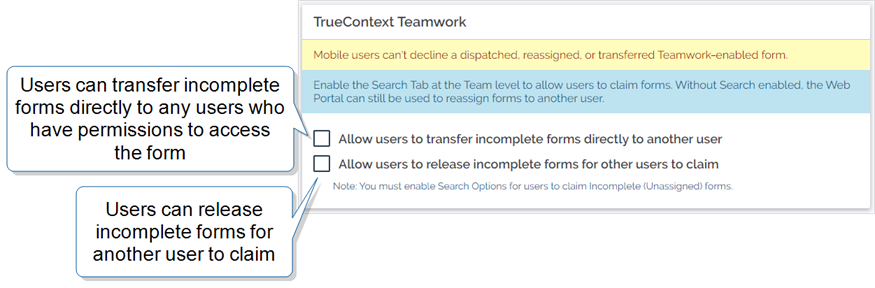
Tip:With any TrueContext Teamwork configuration, supervisors can always unassign and assign forms as needed.
-
If you enable this setting, users can’t decline dispatched forms.
-
The topic Steps to Enable TrueContext Teamwork on a Form describes the TrueContext Teamwork feature in more detail.
App‑to‑App Callbacks
App‑to‑App callback parameters define the data to send back to a third-party app on the user’s device. For example, your Field Service Management (FSM) app launches a form that captures the job start date. You can configure a custom callback parameter to send the parameter name and value back to your FSM app.
![App-to-App Callbacks section with four parameters and corresponding DREL expressions defined. For example, Parameter = JobStartDate (to match the source app) and %a[Job - start date], which returns the answer to the question with that unique ID](../../../Resources/Images/ConfigureCustomCallbacksExample1.png)
Info:The topic Configure App‑to‑App Custom Callback Parameters describes how App‑to‑App callbacks work in more detail.
Sent Box Options
Sent Box Options control whether a mobile user can view submitted records in the Sent box. You can also set the number of records the Sent box stores and how long a record stays in the Sent box.
Remember to switch on the Sent box in the team settings if you want users to access their submitted records. The topic Team Settings: Mobile Device Settings describes how to select the tabs that display for your team on the Mobile App.
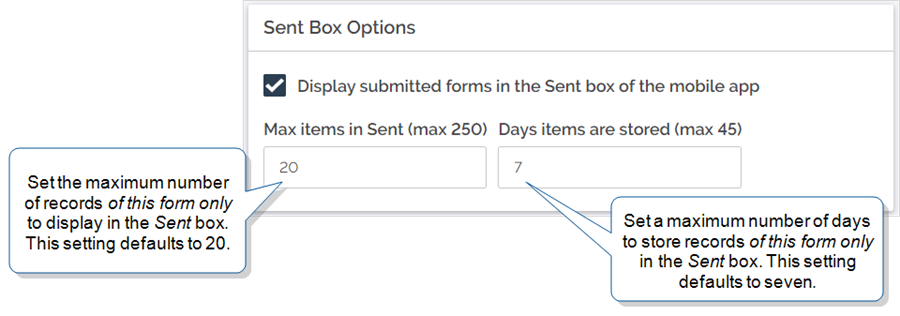
Tip:Select Display submitted forms in the Sent box of the mobile app to show submitted forms in the mobile app's Sent box. This setting helps control form access for compliance requirements like GDPR.
By default, the Sent box stores 20 records per form for seven days. You can change those values to store a maximum of 250 records per form for up to 45 days.
Note:This setting only affects the current form version, not other submitted forms displayed in the Sent list.
Advanced Properties
Data Record Naming
A Data Record Naming![]() A Data Record Naming expression provides a way to create a unique name for dispatched, saved, and submitted forms. The naming expression also applies to forms that a user saves as draft on their device. A customized name helps you and your mobile users quickly search for and identify forms. expression provides a way to create a unique name for dispatched, saved, and submitted forms. The naming expression also applies to forms that a user saves as draft on their device. A customized name helps you and your mobile users quickly search for and identify forms.
A Data Record Naming expression provides a way to create a unique name for dispatched, saved, and submitted forms. The naming expression also applies to forms that a user saves as draft on their device. A customized name helps you and your mobile users quickly search for and identify forms. expression provides a way to create a unique name for dispatched, saved, and submitted forms. The naming expression also applies to forms that a user saves as draft on their device. A customized name helps you and your mobile users quickly search for and identify forms.
![Data Record Naming section, Naming expression field that shows the DREL expression %a[CustomerName] %f - %d %t. This names dispatched, saved, and submitted forms with the answer to the "CustomerName" question, along with the form name, date, and time that the form was dispatched, submitted, or saved.](../../../Resources/Images/Form Settings/FBDataRecordNamingSettings.png)
The system displays the unique, customized name at various stages of your workflow:
-
Dispatched forms—in the Mobile App Inbox and in the TrueContext Web Portal
The TrueContext Web Portal is a web application used to manage security settings, forms, FormSpaces, other users, Data Sources, and Data Destinations. -
Saved forms—in the Mobile App Drafts
-
Submitted forms—in the Mobile App Search, Outbox, and Sent lists and in the TrueContext Web Portal
Data Record Naming does not affect the name of files sent through Data Destinations. The topic Change How Form Submissions Are Named and Organized in Cloud Services describes how to name files in Data Destinations.
Data Passthrough
Data Passthrough is a setting you can enable on a form when you don’t want the TrueContext server to store your data. Use this feature when your organization’s security policies prohibit storing information on an external server.
The Data Passthrough setting deletes submitted data from the TrueContext server 24 hours after submission. For this reason, any features that require data from a submitted form are not compatible with Data Passthrough.
Your form must have two different types of Data Destinations added. This ensures that you have a backup in case your main Data Destination fails.
Warning:If both of your Data Destinations fail, you will lose your data after 24 hours.

Info:The topic Enable Data Passthrough on Forms describes the Data Passthrough feature in more detail.
Advanced Options
The advanced options include geolocation![]() Geo Location refers to the capture of location data in a form. A Geo Location question can act as a selector, where the user selects a location on a map, or as a stamp, which automatically captures the device's current location when a form page opens. Location data is classified as Fine (GPS) or Coarse (Network), depending on the accuracy of the source. and maximum submission size settings.
Geo Location refers to the capture of location data in a form. A Geo Location question can act as a selector, where the user selects a location on a map, or as a stamp, which automatically captures the device's current location when a form page opens. Location data is classified as Fine (GPS) or Coarse (Network), depending on the accuracy of the source. and maximum submission size settings.
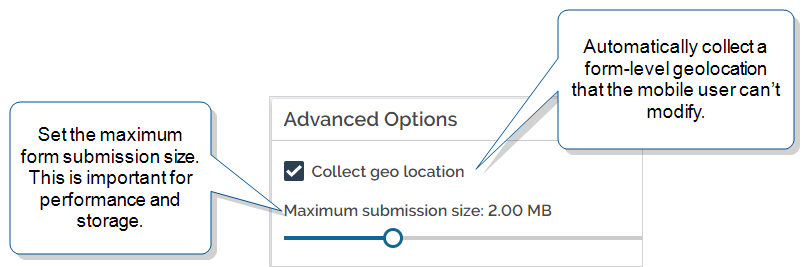
Collect geo location
Enable Collect geo location to capture the user’s location automatically when they open the form. The system stores the location as Form Submission metadata. View it in the Web Portal and reference it in Documents and Data Destinations, depending on your setup.
For the system to capture a location, the user must turn on location services on their device.
Info:The topic Geolocation Data describes in detail how the different geolocation options and questions work.
Maximum submission size
The Maximum submission size slider sets how much data a single Form Submission can contain, including all attachments.
-
Default: 2 MB.
-
Maximum: 20 MB.
A smaller submission size optimizes performance and storage. It also reduces the impact on mobile data plan usage. Forms that capture image, audio, or file attachments approach the limit more quickly.
Tip:Keep the maximum at around 2 MB for forms with few attachments. Increase the limit when a form captures multiple high-resolution images or long audio recordings.
Unique Reference Number
The Form Submission Reference Number is the TrueContext unique identifier for a dispatched or submitted form. The Reference Number includes the dispatch or submission date (in UTC) and a form submission identifier. You can customize the Reference Number to work with your back-office systems and to provide context in lists of dispatches and submissions.
The following example shows the unique reference number displayed in the Web Portal.
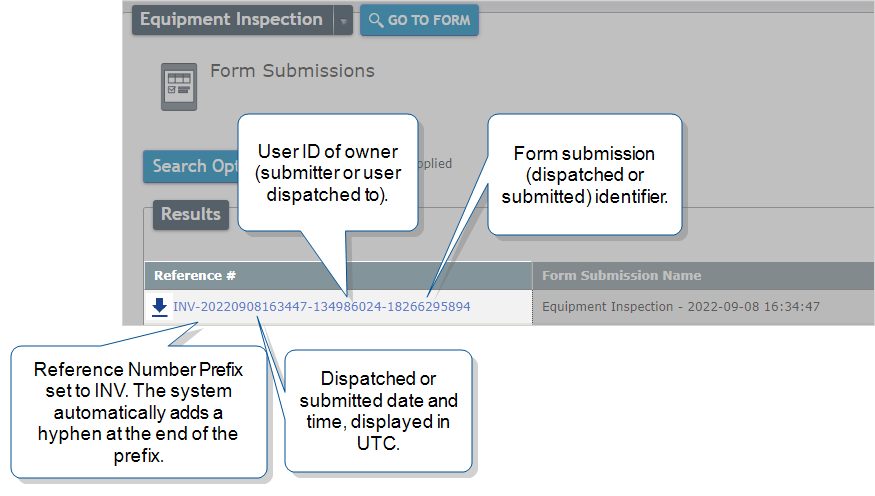
You can customize the Reference Number by adding:
-
A Reference Number Prefix—any string of text that helps to identify the form submission.
Note:Unlike Data Record Naming, which doesn’t affect the reference number, you cannot use a DREL
Data Reference Expression Language (DREL) is used to get form data and metadata and add it to a string, such as dates, usernames, or answers to questions in forms. expression in the prefix. -
The date and time of the dispatch or submission, displayed in UTC.
-
The User ID of the user who submitted the form or was sent the dispatched form.
Info:The topic Find a User ID or Username describes how to find a User ID.
